


Table of Contents
Smith machine squats can be an effective lower body exercise when your stance, bar position, and depth match the fixed rail path. They are especially useful for beginners, solo home gym lifters, and anyone who wants more setup consistency while training quads and glutes.
Key Takeaways
- The Smith machine squat works best when your feet are slightly in front of the bar, not forced into an exaggerated forward position.
- It usually feels more stable than a free bar squat, which can help beginners practice depth, bracing, and repeatable reps.
- Quads usually do a lot of the work, while glutes still contribute strongly when depth and hip movement are controlled.
- Safety stops are mandatory for solo training, and your best squat depth is the deepest position you can own without heel lift or loss of spinal control.
- Smith squats are useful on their own, but they become even better when paired with other patterns like the Smith machine Romanian deadlift and Smith machine hip thrust.
The Benefits of the Smith Machine Squat
The Smith machine squat is useful because it reduces balance demands and makes setup more repeatable. For many lifters, that means cleaner reps, more confidence training alone, and a clearer lower body training focus.
- More repeatable mechanics. The fixed path removes some balance noise, so you can spend more attention on stance, bracing, and depth.
- Helpful for quad focused training. A more upright trunk with more forward knee travel usually increases knee extensor demand in squat mechanics, which helps explain why Smith squats often feel quad biased for many lifters.[1]
- Better solo setup. Easy hook reracking and adjustable safeties make hard sets feel more manageable when you train without a spotter.
- Useful for home gym progression. If you train on a Smith machine collection setup, the lift is easy to repeat from session to session because bar height, hooks, and safeties are easy to standardize.
What Muscles Does the Smith Machine Squat Work
The Smith machine squat still trains the major lower body chain, but the work distribution can feel different from a free bar squat. Your exact emphasis depends on stance width, torso angle, depth, heel elevation, and how far your feet sit in front of the bar.
- Quadriceps. The quads usually drive the movement, especially when you keep the torso fairly upright and let the knees travel naturally forward.
- Glutes. The glutes contribute strongly through hip extension, especially when you control depth and avoid cutting the rep short.
- Adductors. The adductors help stabilize and extend the hips, and they usually become more noticeable as stance width and depth increase.
- Hamstrings. The hamstrings support the squat, but they usually do not become the main limiting muscle in most Smith squat setups.
- Core and upper back. Bracing still matters because the rails do not protect you from losing trunk position, they only guide the bar path.
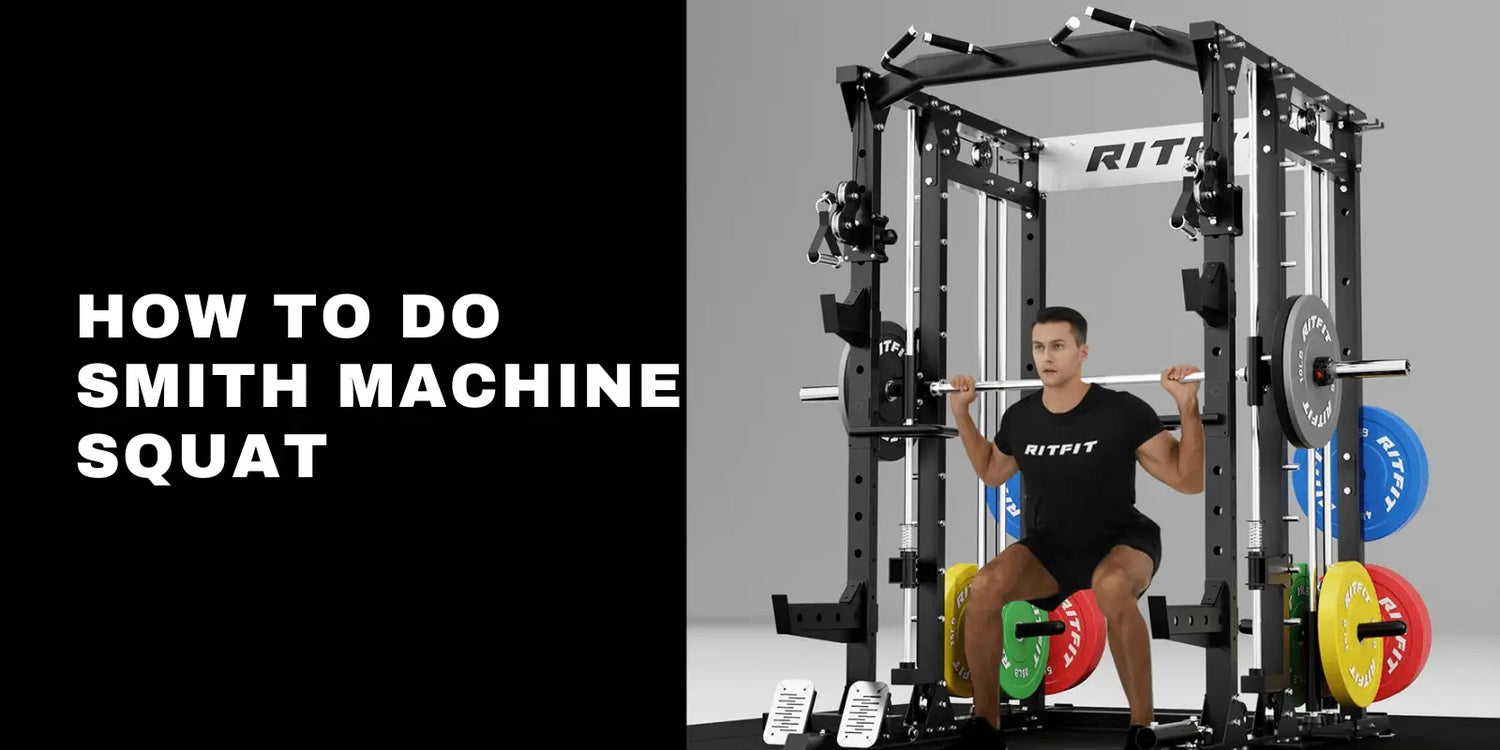
How to Do Smith Machine Squats
Proper Smith machine squat form matters because the fixed rail only works well when your body is aligned with it. The goal is to build a setup that lets you stay balanced through the whole foot, keep the bar over a stable base, and move through a depth you can control.
Step 1, Set the machine and safety stops
Set the bar around upper chest height and place the safeties just below your lowest controlled squat depth. If you are unsure how much the bar itself weighs on your machine, check the label or compare it with this guide on how much a Smith machine bar weighs before loading plates.
Step 2, Build your stance
Start with your feet about shoulder width apart, toes slightly out, and your feet slightly in front of the bar rather than directly under it. Your best setup is the one that lets you descend through your whole foot without heel lift, knee collapse, or being pulled onto your toes.
Step 3, Unrack and brace
Set the bar across the upper traps, take a firm grip, stand tall, and rotate the hooks clear before the first rep. Take a full breath into the trunk and brace before you move, because a guided bar path still needs a stable body under it.
Step 4, Descend with control
Break at the knees and hips together, then sit down into the squat while keeping pressure across your heel, midfoot, and forefoot. Depth should stop where you can still keep the rep controlled and your spine position consistent, because squat quality drops once mobility limits force compensations.[2]
Step 5, Drive up and rerack
Push the floor away, keep your knees tracking with your toes, and let your hips and shoulders rise together. At the top, finish tall, then rotate the hooks back into place and confirm the bar is secure before you step away.
Beginners Smith Machine Squat Routine
A beginner routine works best when it teaches repeatable reps before heavy loading. Use the plan below as a two day per week template and keep one or two reps in reserve on most working sets.
Warm Up Protocol, The RAMP Method
A short RAMP warm up works well because it raises temperature, prepares the neuromuscular system, and lets you rehearse the exact pattern before loading.[3] You do not need anything fancy, you just need a sequence that wakes up your ankles, hips, trunk, and squat pattern.
| Phase | Exercise | Sets or Reps | Purpose |
|---|---|---|---|
| Raise | Bike or brisk walk | 5 minutes | Increase body temperature and general readiness. |
| Activate | Glute bridges | 2 x 12 to 15 | Wake up the hips before squatting. |
| Mobilize | Spiderman lunge with rotation | 5 per side | Open the hips and thoracic spine. |
| Mobilize | Leg swings | 10 per leg | Improve dynamic range of motion. |
| Potentiate | Empty bar Smith squats | 2 x 8 to 10 | Rehearse stance, brace, and depth. |
The 4 Week Progression Cycle
This four week example builds pattern quality first, then adds workload, then pulls fatigue down before the next cycle. Keep the load honest, and only add weight when every rep looks and feels the same.
- Week 1. Smith machine squat 3 x 10, Smith machine Romanian deadlift 3 x 10, Smith calf raise 3 x 15, plank 3 x 30 seconds.
- Week 2. Smith machine squat 3 x 10, split squat 2 x 10 per leg, Smith machine hip thrust 3 x 12, Smith calf raise 3 x 15.
- Week 3. Smith machine squat 4 x 8, reverse lunge 3 x 8 per leg, stiff leg deadlift 3 x 10, Smith calf raise 4 x 12.
- Week 4. Smith machine squat 3 x 12 with slower tempo, step up 2 x 12 per leg, Smith calf raise 3 x 20, then reset and begin a new cycle slightly heavier.
Common Smith Machine Squat Mistakes
The Smith machine feels stable, but it still punishes a bad setup. Most problems come from forcing a foot position that does not match the rails, or from chasing depth and load before control.
- Placing the feet directly under the bar. This usually makes the rep feel cramped and pushes the knees forward without giving the hips room to move naturally.
- Pushing the feet too far forward. Too much forward displacement can turn the exercise into a hack squat style pattern and make balance feel artificial.
- Skipping the safeties. Safeties are not optional on a hard set, especially when you train alone.
- Losing the brace at the bottom. If the ribs flare or the pelvis tucks hard under, your depth has probably gone past what you can control that day.
- Driving through the toes only. The rep usually feels stronger and more stable when pressure stays balanced through the whole foot.
- Letting one leg take over. The rails can hide side to side differences, so stay mindful of even pressure through both feet.
Tips for the Smith Machine Squat
Small setup changes make a big difference on this lift because the bar path cannot adapt around you. A few repeatable habits will make the exercise feel stronger, safer, and easier to progress.
- Use floor references. Mark the same foot position each session so your warm up sets and work sets match.
- Own the eccentric. Lower the weight with control instead of dropping into the bottom and hoping the rails save the rep.
- Choose the right shoe. Flat shoes work well for many lifters, and heeled lifters can work well if ankle mobility is the limiting factor.
- Do not force a universal stance. The best setup is individual, so use the rails as a guide, not as a reason to copy someone else exactly.
- Use related patterns to round out training. Pairing Smith squats with the Smith machine front squat or a Smith machine hack squat can help you rotate emphasis without abandoning the machine.
- Keep the exercise in context. If your goal is safe solo home training, this article also pairs well with is it safer to squat in a Smith machine.
Smith Machine Squat vs Free Weight Squat
These lifts look similar, but they are not the same task. The Smith machine gives you a fixed path, while a free bar squat demands that you organize the path yourself.
- Bar path. The Smith machine guides the bar, while a free bar lets the body and bar find their own relationship over the midfoot.
- Balance demand. Free bar squats usually ask more from stabilizers, timing, and coordination, while Smith squats simplify the balance problem.
- Setup freedom. Smith squats let you experiment more easily with slight forward foot placement and quad bias without worrying about the bar drifting.
- Transfer. Smith strength does not map perfectly onto barbell strength, but it still builds useful lower body size and confidence.
- Programming role. Many home gym lifters use a multifunctional Smith machine as a practical main squat option when safety, space, and repeatability matter more than competition style barbell specificity.
Smith Machine Squat Variations
Variations matter because small changes in stance, depth, and torso position can change which tissues feel most loaded. Different squat patterns can shift glute, thigh, and lower back demand, and squat and hip thrust training can complement each other well when glute development is the goal.[4] [5]
- Smith machine front squat. This is a strong option when you want a more upright torso and a clear quad bias.
- Smith machine split squat. This reduces side to side hiding and is useful for unilateral leg strength.
- Smith machine Bulgarian split squat. This is one of the best choices when you want hard glute and quad work with less balance noise.
- Smith machine hack squat. This pattern usually feels even more quad biased because the feet move farther forward and the torso stays more fixed.
- Smith machine sumo squat. A wider stance can make adductors and glutes feel more involved for some lifters.
FAQs
How far forward should your feet be in a Smith machine squat?
Start with your feet slightly in front of the bar, then adjust until you can squat through your whole foot without heel lift. For many lifters that means a small step forward, not an exaggerated wall sit position, because the fixed path still has to match your hip and ankle mechanics.
Is the Smith machine squat good for beginners?
Yes. The Smith machine squat can be beginner friendly because the bar path is fixed and the safeties are easier to use than a free bar setup. It still requires good bracing, controlled depth, and a stance that feels natural for your body, so start light and practice first.
Can Smith machine squats build glutes and quads?
Yes. Smith machine squats can build both quads and glutes when you use enough range of motion, steady progression, and good control. A more upright setup often feels more quad biased, while a slightly wider stance and more hip travel can shift more work toward the glutes.
Do Smith machine squats count the same as barbell squats?
No. Smith machine squats do not transfer one to one to barbell squats because the fixed rails reduce balance demands and change the movement pattern. They are still a valid strength and hypertrophy exercise, but you should track them as their own lift instead of treating them as a direct barbell equivalent.
Should your knees go over your toes in a Smith machine squat?
Yes. Some forward knee travel is normal in a Smith machine squat, especially when you stay upright and keep pressure through the full foot. The bigger concern is whether your knees track in line with your toes and whether the setup feels controlled, stable, and pain free under load.
How low should you go on a Smith machine squat?
Go as low as you can while keeping your foot pressure balanced, your spine controlled, and your hips moving smoothly. Parallel is a useful target for many people, but your best depth is the deepest position you can own without heel lift, knee cave, butt wink, or pain.
Is the Smith machine squat safe for your knees?
Yes. Smith machine squats can be knee friendly when the stance matches your body, the load is sensible, and the reps stay controlled. Knee discomfort usually comes from forcing a setup that does not fit your mechanics, skipping warm up work, or chasing depth that you cannot control yet.
Which shoes work best for a Smith machine squat?
Flat shoes work well for many lifters, and raised heel shoes can also work well if ankle mobility limits your depth or upright posture. The best choice is the one that helps you keep your whole foot stable, maintain clean knee tracking, and repeat the same setup every set.
Conclusion
The Smith machine squat is not a shortcut, it is a tool that rewards a smart setup and repeatable execution. If you match your stance to the rails, respect your best depth, and use safeties every session, it can be a highly productive way to build stronger quads, glutes, and lower body confidence at home.
Disclaimer: This article is for general educational purposes only and is not medical advice. If you have current knee, hip, or back pain, recent surgery, unexplained weakness, numbness, or dizziness, get clearance from a qualified clinician before loading Smith machine squats.
References
- Straub RK, Powers CM. A biomechanical review of the squat exercise: implications for clinical practice. Int J Sports Phys Ther. 2024;19(4):490-501. doi:10.26603/001c.94600
- Myer GD, Kushner AM, Brent JL, et al. The back squat: a proposed assessment of functional deficits and technical factors that limit performance. Strength Cond J. 2014;36(6):4-27. doi:10.1519/SSC.0000000000000103
- Afonso J, Brito J, Abade E, et al. Revisiting the Whys and Hows of the warm up: are we asking the right questions. Sports Med. 2024;54(1):23-30. doi:10.1007/s40279-023-01908-y
- Coratella G, Tornatore G, Caccavale F, Longo S, Esposito F, Cè E. The activation of gluteal, thigh, and lower back muscles in different squat variations performed by competitive bodybuilders: implications for resistance training. Int J Environ Res Public Health. 2021;18(2):772. doi:10.3390/ijerph18020772
- Plotkin DL, Rodas MA, Vigotsky AD, et al. Hip thrust and back squat training elicit similar gluteus muscle hypertrophy and transfer similarly to the deadlift. Front Physiol. 2023;14:1279170. doi:10.3389/fphys.2023.1279170


