


Table of Contents
- Why Grip Fails Before Big Muscles
- What Are Lifting Straps? (And What They Are Not)
- The Three Main Types of Straps
- Material Matters: Cotton vs. Nylon vs. Leather
- The "Cheating" Myth
- When Should You Use Lifting Straps?
- How to Put Lifting Straps On (Step-by-Step Masterclass)
- Visualizing the Perfect Wrap
- Common Beginner Mistakes (Troubleshooting)
- Advanced Tips & Tricks
- Detailed Exercise Walkthroughs
- How to Buy Your First Pair
You know the feeling. You are mid set on a heavy deadlift. Your legs feel strong, your back is ready to work, but your hands start to open. The bar slips. The set ends, not because your muscles are done, but because your grip failed first.
This is where lifting straps help. They allow your target muscles to keep working after grip stops being reliable. They are not a shortcut and they do not replace grip strength. They are simply a tool to prevent your hands from ending productive sets too early.
Key Takeaways
- Lifting straps help you keep training your back, glutes, and hamstrings when grip becomes the limiting factor.
- Use straps mainly for heavy pulling movements like deadlifts, RDLs, rows, and shrugs.
- Always wrap lasso straps inward toward the thumb so the bar tightens the strap instead of loosening it.
- Do warm ups without straps, then add them only when grip starts to limit performance or focus.
- Avoid straps on pressing movements and be very cautious with Olympic lifts.
Decision Tree: Should You Use Straps?
Step 1: Is this a pulling movement where gravity is trying to open your hands?
If no, do not use straps.
If yes, continue.
Step 2: Are you still warming up?
If yes, lift without straps.
If no, continue.
Step 3: Is grip limiting the set or distracting your technique?
If yes, use straps.
If no, keep lifting barehanded.
Step 4: Do you want to maintain or build grip strength?
Keep warm ups strap free and include some pulling work without straps. Add simple grip training if needed.
Why Grip Fails Before Big Muscles
During heavy pulling exercises, some of the strongest muscles in your body are doing the work. Your glutes, hamstrings, lats, and spinal muscles are built to move large loads. Your hands are not.
Grip relies on small muscles in the forearms and fingers. These muscles fatigue faster than your hips and back. When grip fails first, the set ends early and your target muscles miss valuable training volume.
Lifting straps reduce this bottleneck by helping your hands stay connected to the bar when loads get heavy or reps get high.
The "Weakest Link" Phenomenon
When you train without straps, you are limited by your weakest link. If your back can row 100 pounds for 12 reps, but your hands can only hold 100 pounds for 6 reps, guess when the set ends? It ends at 6 reps.
What does this mean for your progress?
- Under-trained Muscles: Your back missed out on 6 reps of growth. You stopped the set, but your target muscle (the back) was barely warming up. You essentially wasted the set because your hands quit on you.
- Mental Distraction: Instead of focusing on squeezing your back muscles and keeping perfect form, your brain goes into panic mode. All you can think about is "don't drop it, don't drop it." You lose that "mind-muscle connection" because your nervous system is screaming about your slipping grip.
- Compensated Form: When your grip starts to go, your form usually breaks down. You might start jerking the weight or rounding your back to try and catch the rep quickly before your hands open. That is how injuries happen.
Lifting straps solve this specific problem. They act as an external tendon. They reinforce that "paperclip" link so it becomes as strong as the rest of the chain. By wrapping a strap around the bar and your wrist, you transfer the weight of the heavy iron directly into your wrist and forearm structure, bypassing the tiny finger muscles.
What Are Lifting Straps? (And What They Are Not)
Lifting straps are incredibly simple pieces of equipment. In a gym full of complex machines, pulleys, and electronics, the lifting strap is primitive. It is usually just a strip of heavy-duty fabric, cotton, nylon, or leather, about an inch or an inch-and-a-half wide, and maybe 18 to 24 inches long.
They are not gloves. Gloves just cover your skin to stop calluses; they don't actually help you hold the weight (in fact, gloves can sometimes make the bar harder to hold because they make the handle thicker). Straps are different. They mechanically lash your hand to the bar.
The Three Main Types of Straps
You will see a few different styles in the gym store or online. It is easy to buy the wrong ones if you don't know what you are looking at.
1. The Lasso Strap (The Closed Loop)
This is the gold standard. If you see a "lifting strap" in a movie or at your local gym, it is probably a lasso strap. It is a single strip of material with a loop sewn at one end. You thread the other end through that loop to create a lasso shape.
- Why it's the best for beginners: It is adjustable. You can make it tight or loose. It works on barbells, dumbbells, pull-up bars, and machine handles. It is the "Swiss Army Knife" of straps. This guide will focus almost entirely on this type.
2. The Figure-8 Strap
These look exactly like the number 8 made out of fabric. They have two big loops. You put your hand through one loop, run the strap under the bar, and put your hand through the second loop.
- The Vibe: These are for absolute monsters. You see Strongman competitors use these to deadlift huge weight.
- The Downside: They are too secure. You are literally locked to the bar. You cannot let go quickly if you lose your balance. Also, you can't really tighten them; they are a fixed size. They are great for deadlifts, but terrible for dumbbells or cleans. If you are a beginner, skip these for now.
3. Lifting Hooks
These are wrist cuffs with a metal hook hanging off the palm. You don't wrap anything; you just hook the metal over the bar.
- The Vibe: They seem convenient, but they often feel clunky. You lose the "feel" of the bar in your hand. They prevent you from squeezing the bar tight. Lasso straps generally offer a better connection and are safer.
Material Matters: Cotton vs. Nylon vs. Leather
When you go to buy your first pair, you will be faced with a choice of fabric. It might not seem important, but the material changes how the strap feels and works.
Table 1: Strap Material Comparison
| Material | Feel | Grip "Stickiness" | Durability | Best For... |
|---|---|---|---|---|
| Cotton | Soft, comfy, absorbs sweat. | Good, but can slide if very dry. | Medium. Eventually frays. | Beginners. Best comfort/price. |
| Nylon | Slick, smooth, very strong. | Slippery on smooth bars. | High. Indestructible. | Olympic lifting (fast release). |
| Leather | Stiff at first, then molds to hand. | Excellent. Sticks to knurling. | Very High. Ages well. | Experienced lifters. |
Recommendation: For your very first pair, grab some padded cotton straps. They are usually inexpensive, they are soft on your wrists, and they do the job perfectly. Avoid the fancy leather ones until you know you like using straps, as leather takes time to break in and can be uncomfortable at first.
The "Cheating" Myth
We have to address the elephant in the room. You might have heard someone in the gym say, "Straps are for cheaters!" or "Real lifters don't use straps."
This is old-school "bro science" and you should ignore it.
Is a weightlifting belt cheating? Are running shoes cheating (instead of running barefoot)? No. They are tools that allow you to perform better and safer.
The Strongman Argument
Here is the ultimate rebuttal to anyone who says straps are for the weak: Look at the World's Strongest Man competitions. The biggest, strongest humans on the planet use lifting straps. When they deadlift massive weight, they are wearing straps.
If the strongest people in the world use them, you are allowed to use them too.
The "Grip Training" Balance
The only grain of truth to the "cheating" myth is this: If you use straps for everything, your grip will get weak. If you strap up for your warm-ups, your curls, and your light rows, your forearms will turn into noodles.
The Solution: Use straps strategically. We don't want to replace our grip; we want to assist it. You should still do plenty of lifting with your bare hands to keep them strong. We will cover exactly when to use them and when to skip them in the next section.
When Should You Use Lifting Straps?
Knowing when to pull the straps out of your gym bag is just as important as knowing how to use them. You want to follow the "Pulling Rule."
The Golden Rule: Heavy Pulls Only
A "pull" exercise is any movement where you are dragging the weight toward your body or fighting gravity to hang onto it. Gravity is trying to open your hand; the strap stops it.
The Best Exercises for Straps:
- The Deadlift: This is the #1 exercise for straps. The deadlift is usually the heaviest lift you will do. Your legs and back can handle way more weight than your hands. Once you get past your warm-up sets, strap up so you can focus on driving your hips through.
- Romanian Deadlifts (RDLs): This exercise is all about a slow, deep stretch in the hamstrings. If you are worried about dropping the bar, you will rush the movement. Straps let you hang out at the bottom of the rep and really feel the stretch.
- Barbell & Dumbbell Rows: To grow a thick back, you need to pull heavy. Straps take the forearms out of the equation so you can focus on the lats and mid-back.
- Shrugs: Your trapezius muscles are incredibly strong and can shrug massive weight. Your hands will fail long before your traps do. Straps are a great tool for heavy shrugging.
- Rack Pulls: Since these are partial deadlifts, you can typically lift even more weight than a normal deadlift. Your grip stands no chance here without help.
- High-Rep Pull-ups / Lat Pulldowns: Usually, you don't need straps for pull-ups. But if you are doing a burnout set and your forearms cramp up early, strap in to get the last reps for your back.
When to NEVER Use Straps
There are times when using straps is useless, or even dangerous.
- Pushing Exercises: Never use straps for bench press, overhead press, or dips. Gravity is pushing the bar into your palm, not out of it. Plus, if you get stuck under a bench press, you can't safely bail if you are tied to the bar.
- The Warm-Up: Do not put straps on for your first set with the empty bar. Do all warm-up sets barehanded. Only put straps on when the weight gets heavy enough that it becomes a distraction.
- Clean and Snatch (Olympic Lifts): Olympic lifts are fast and require wrist rotation. If your hand is strapped tight to the bar, your wrist cannot rotate correctly, and the risk of injury goes way up. Unless you are a trained Olympic lifter using appropriate quick-release solutions, do not use lasso straps for these explosive moves.
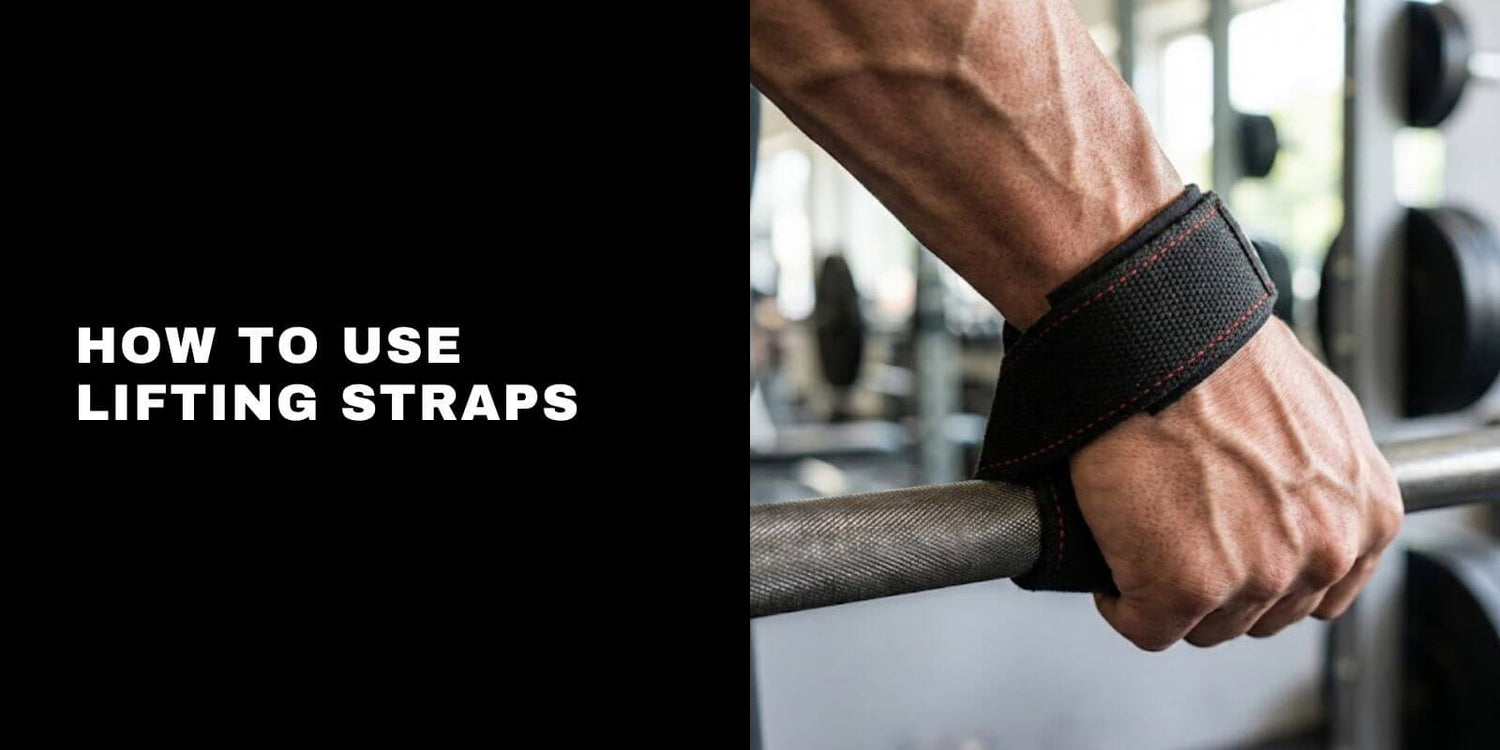
How to Put Lifting Straps On (Step-by-Step Masterclass)
Alright, grab your straps. We are going to do this together. It might feel clumsy at first, like learning to tie your shoelaces, but after a few tries, you will be able to do this quickly.
We are going to break this down into three phases: The Setup, The First Hand, and The Second Hand (The Tricky Part).
Phase 1: The Setup (Before You Approach the Bar)
You need to get the straps ready on your hands before you even touch the weights.
Step 1: Thread the Loop
Hold the strap. You will see one end has a small loop sewn into it. The other end is just a long, flat "tail." Take the tail and push it through the sewn loop. Pull it through until you create a large circle, like a lasso.
Step 2: The Mirror Image Check (Crucial!)
Do this for both straps. Now, lay them flat on a table or the floor. Look at them.
- The Rule: They should look like mirror images of each other.
- Think of your feet. You have a left foot and a right foot. They are opposites. Your straps need to be opposites too.
- If they look exactly identical (parallel), one of them is wrong. Flip one over so the loops point in opposite directions.
Step 3: Putting Them On Your Wrists
Slide your hand through the big lasso loop.
- Tighten it: Pull the tail so the loop tightens around your wrist.
- Placement: The strap should sit on your wrist bone, or just slightly below it towards the hand. It should not be way up your forearm like a watch, and it shouldn't be loose around your fingers.
- The "V" Check: Look at your open palm. The strap should be coming across your palm and hanging down between your thumb and your index finger.
- Check the back of your wrist. The strap crosses itself to form a "V" shape. That "V" should point inwards (towards your thumb). If the "V" points towards your pinky, you have the strap on the wrong hand (or you threaded it backward). Switch hands.
Visual Check: Hold your hands out in front of you, palms up. You should see a strap hanging down from the space between your thumb and pointer finger on both hands.
Phase 2: Wrapping the First Hand (The Easy Side)
Always start with your non-dominant hand. If you are right-handed, wrap your left hand first.
- Why? Because once your first hand is locked in, it becomes clumsy. You want your dominant hand free to help wrap the non-dominant hand.
Step 4: The Approach
Walk up to the barbell. Stand in the middle, right where you plan to grip. Place your left hand (non-dominant) on the bar. Do not close your grip yet. Let the tail of the strap dangle straight down under the bar.
Step 5: The "Inward" Wrap (The Golden Rule)
This is where most beginners fail. You must wrap the strap in the correct direction.
- Take your free hand (your right hand) and grab the dangling tail of the strap.
- Pull the tail under the bar, then up the back side, and over the top towards your thumb.
- Repeat: You are wrapping INWARDS. The strap should spiral towards the middle of the bar.
- Never wrap outwards towards the weight plates (towards your pinky). If you wrap outwards, the strap will loosen when you grip it. If you wrap inwards, gripping the bar makes the strap tighter.
Step 6: One or Two Loops Only
You don't need to wrap the entire length of the strap around the bar.
- Wrap it around once completely. Maybe twice if the strap is long.
- Leave a little bit of the tail hanging loose. That is fine.
- Why? If you wrap it too many times, the handle becomes super thick and hard to hold. You want to be holding the bar, not a handful of cloth.
Step 7: The "Motorcycle Rev" (How to Tighten)
Now the strap is looped loosely around the bar. It’s time to lock it in.
- Place your hand over the strap and the bar.
- Imagine you are sitting on a motorcycle. To make the bike go, you rev the throttle by twisting your wrist down.
- Do that motion on the bar. Rotate your wrist forward (down), grip the strap, and roll it back (up).
- As you "rev" the bar, the strap will cinch down tight.
- Do this 2 or 3 times until there is minimal slack. Your wrist should feel tethered to the bar.
The Second Hand (The Tricky Side)
Now your left hand is strapped in tight, so you have to do the second hand mostly solo. This takes practice, so don't get frustrated.
Step 8: Position the Hand
Place your right hand (dominant) on the bar. Again, let the tail dangle underneath the bar.
Step 9: The One-Handed Flick
You need to get that tail from under the bar to over the bar using only your right hand.
- Technique A (The Finger Walk): Reach your thumb and pointer finger under the bar and pinch the strap to pull it up and over.
- Technique B (The Flick): Use your fingers to bat the strap forward so momentum swings it up and over the bar.
- The Pro Tip (The Bar Roll): Rotate the barbell slightly using the hand that is already strapped in. The friction can help carry the right strap up and over the top so you can catch it with your thumb.
Step 10: The Second Rev
Once you have the strap looped over the bar (even loosely), you have won.
- Grab the bar with your right hand.
- Perform the Motorcycle Rev motion.
- Twist, grip, twist, grip.
- The strap will tighten itself down.
Step 11: The Final Check
Give the bar a little tug with both hands. Do you feel locked in? Does it feel secure?
- If the bar feels like it's rolling out of your fingers, you wrapped it the wrong direction (outwards). Unwrap and do it again.
- If it feels solid, you are ready to lift.
Visualizing the Perfect Wrap
To make sure you really get it, let's use some analogies.
The "Candy Cane" Stripe
When you wrap the strap around the bar, it should look like a stripe on a candy cane. It should spiral neatly. It shouldn't be bunched up in a big ball. If it looks like a bird's nest, unwrap it and smooth it out flat. The flatter the strap lays against the bar, the better the grip.
The "Seatbelt" Feel
When you are fully tightened, it should feel like a seatbelt locking up. When you pull up on the bar, there should be no "give." The tension should go straight to your wrist. If you pull up and the strap slides or stretches before catching, it is too loose. Crank that motorcycle throttle again.
Common Beginner Mistakes (Troubleshooting)
You are going to make mistakes the first few times. That is normal. Here is what to look out for so you can fix it fast.
Mistake 1: The "Pinky Wrap" (Wrong Direction)
The Error: You wrapped the strap towards the outside of the bar (towards the weights).
The Result: When you lift, the bar naturally wants to roll out of your hand. If you wrapped outwards, the bar will unroll the strap as it falls. You will drop the weight.
The Fix: Always wrap INWARDS. Towards your thumb. Towards the center of your body. This way, when the bar tries to roll down, it actually tightens the strap against your hand.
Mistake 2: The "Loosey Goosey"
The Error: You wrapped the strap, but you didn't do the motorcycle rev to tighten it.
The Result: There is slack between your hand and the bar. When you pull, the bar drops before the strap catches it. This feels terrible and can irritate your wrists.
The Fix: You must cinch it tight. There should be no obvious gap.
Mistake 3: Wearing Them Too High or Low
The Error: Wearing the loop way up on your forearm or down around your knuckles.
The Result: If it's on your forearm, it can slide and rub your skin. If it's on your knuckles, it can slip off.
The Fix: Place it directly on the base of the wrist joint so it pulls against solid structure.
Mistake 4: The "Death Grip" Bunching
The Error: Crumpling the strap into a ball in your palm.
The Result: You are holding a lump of fabric, not the bar. This increases the diameter of the grip, making it harder to hold.
The Fix: Keep the strap flat. Smooth it out with your thumb as you wrap.
Mistake 5: Using Them as a Crutch
The Error: You rely on them so much that your bare hands get weak. You start using them for warm-ups or for exercises that aren't heavy.
The Result: You become "strap dependent."
The Fix: Follow the "Warm-Up Rule." Bare hands until the weight gets heavy enough to distract you. Then strap up.
Advanced Tips & Tricks
Once you master the basics, here are a few pro tips to get even more out of your straps.
The Chalk Hack
Sometimes, especially with slick straps or smooth bars, things can feel slippery.
The Fix: Put gym chalk on the strap itself. Rub chalk on the inside of the strap (the part that touches the bar) to increase friction.
Marking Left and Right
Since the straps are mirror images, it can be annoying to figure out which is which every time.
The Fix: Once you find the correct setup (where the V points to the thumb), mark "L" and "R" on the inside of the wrist loops with a marker or a small piece of tape.
Washing Your Straps
Your straps are going to get gross. They absorb sweat and gym grime.
- Cotton/Nylon: You can wash these in a washing machine. Use a mesh laundry bag and air dry.
- Leather: Do not machine wash. Wipe them down with a damp cloth and use leather conditioner occasionally.
Detailed Exercise Walkthroughs
Let's walk through exactly how to use straps on the most common exercises, move by move.
The Deadlift
This is the big one.
- Stance: Step up to the bar and set your feet first.
- Bend Over: Hinge down to the bar.
- Non-Dominant Hand: Wrap your left hand and tighten it.
- Dominant Hand: Wrap your right hand using the one-handed flick and tighten it.
- The Check: Squeeze the bar and make sure both sides feel evenly tight.
- The Lift: Brace your core and pull.
- The Release: Lower the weight to the floor. Open your hands and let the straps unspool.
Dumbbell Rows
This is tricky because the weights are separate.
- Setup: Place the heavy dumbbell on a bench or rack so you can wrap it without bending awkwardly.
- Strap In: Wrap your lifting hand onto the dumbbell handle while standing comfortably.
- The Lift: Pick it up, get into position, and row.
- The Switch: Put the weight down, unwrap, swap hands, and re-wrap.
Lat Pulldowns
- Reach Up: Stand and reach for the bar.
- The Wrap: Wrap the tail over the bar and into your palm.
- Tightening: Many pulldown bars rotate, so tighten by twisting the strap with your fingers.
- Sit Down: Once you are strapped in, sit down and start the set.
How to Buy Your First Pair
You are ready to buy. Here is a quick checklist so you don't waste money.
- Style: Look for "Lasso" or "Loop" straps. Avoid "Figure 8" or "Hooks" for now.
- Length: Look for straps that are roughly 20 to 24 inches long.
- Padding: As a beginner, look for straps with wrist padding for comfort.
- Brand: You don't need to spend a fortune. Many reputable brands make solid straps at a reasonable price.
FAQ
Do straps make grip weaker?
Only if you use them for everything. Keep warm ups and some pulling work strap free.
Should beginners use straps?
Beginners can use straps for heavy pulls when grip limits performance, but should avoid them in Olympic lifts.
Do I need straps for pull ups?
Usually no. They can help finish high rep sets when grip fatigue ends the set early.
Are figure eight straps better than lasso straps?
Figure eight straps are very secure but less versatile. Lasso straps work better for most lifters.
What strap length works best?
Most lifters do well with straps around 20 to 24 inches long.
Conclusion
Lifting straps are not magic, but they are incredibly effective for building a massive back and strong legs. They let you train your back until your back gives up, not your hands.
Don't let the "cheating" myths scare you. Use them wisely. Use them for your heaviest pulls. Use them when your hands are fried but your body wants more. But remember to keep training your natural grip on your warm-ups so you stay well-rounded.
Grab a pair, practice that "motorcycle rev" motion, and get ready to add some serious weight to the bar. You've got this!
