


Table of Contents
- The Rise of the Home Smith Machine Cable Fly
- Why the Cable Fly on a Smith Machine is Great for Home Gyms
- Muscles Worked During a Cable Fly on a Smith Machine
- Understanding Your Equipment for the Cable Fly
- Stance and Setup for a Safe Cable Fly on a Smith Machine
- Step-by-Step Guide to Performing the Smith Machine Cable Fly
- Angles and Variations for the Cable Fly on a Smith Machine
- How to Adjust the Cable Fly on a Smith Machine for Narrow Widths
- Fixing Common Mistakes in the Smith Machine Cable Fly
- How to Include the Smith Machine Cable Fly in Your Workout Routine
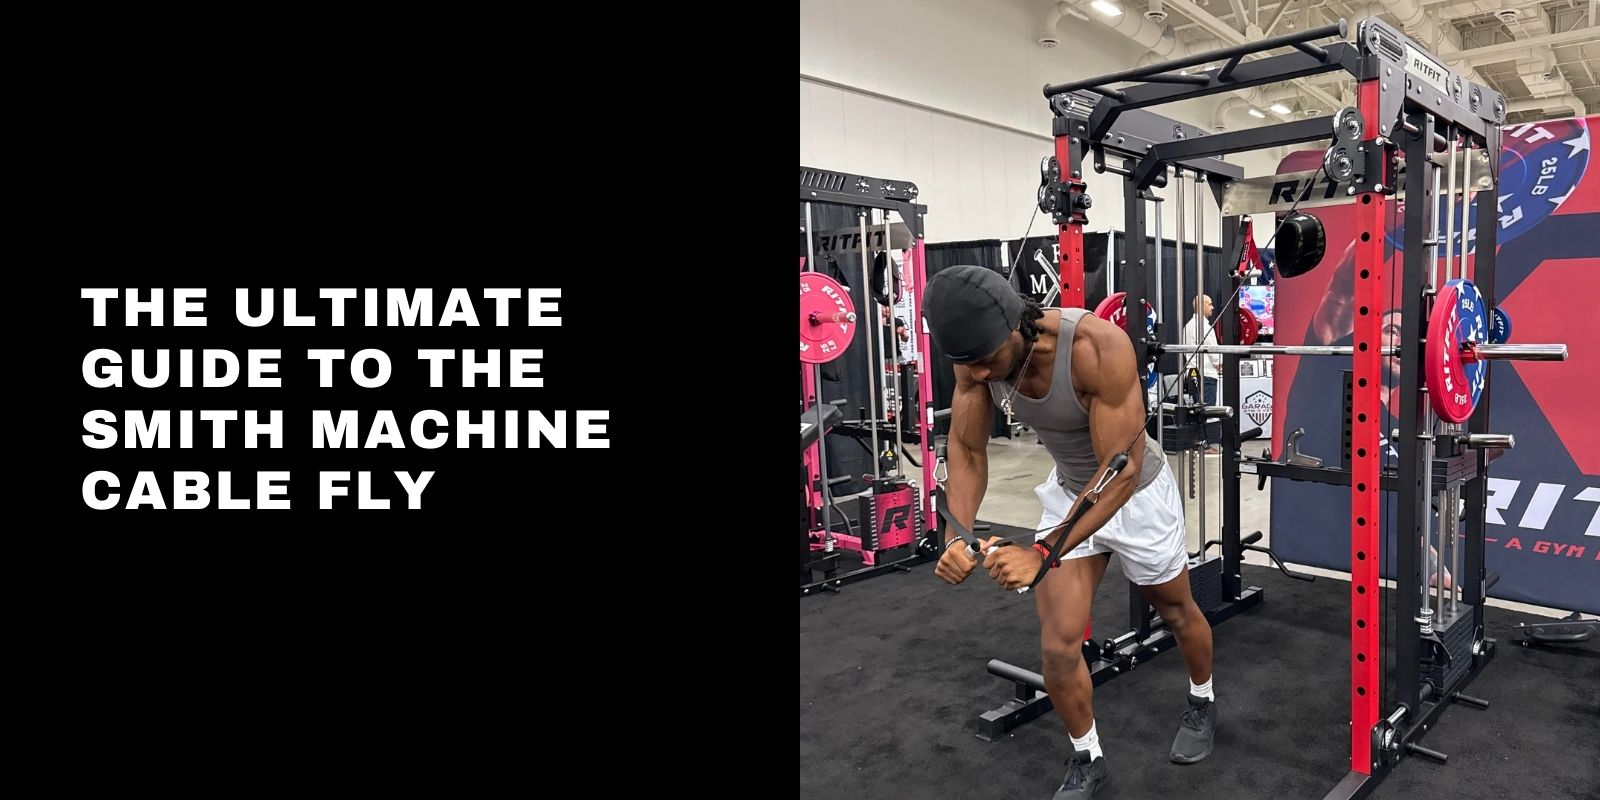
The evolution of the modern home gym has centered around a singular, transformative piece of equipment: the all-in-one Smith machine and functional trainer. Devices like the RitFit M1 have democratized access to professional-grade cable resistance, allowing home enthusiasts to perform movements previously reserved for commercial health clubs. Among these, the cable chest fly stands as a pinnacle of isolation training, a movement that, when executed correctly, offers superior hypertrophic potential compared to free weights due to its unique mechanical tension curve.
However, performing cable flys on a compact Smith machine presents a specific set of biomechanical and logistical challenges. Unlike the sprawling 12-foot cable crossover stations found in commercial gyms, home units are constrained by narrower footprints, specific pulley ratios, and lighter structural mass. This report serves as a comprehensive, expert-level guide to mastering the cable fly within these constraints. It bridges the gap between exercise physiology, mechanical engineering, and practical gym floor application, providing a roadmap for safe, effective, and hypertrophy-focused chest training.
Key Takeaways
- Use a split stance and a slight forward lean to stay stable and keep tension on your chest, not your lower back.
- Start every set with handles tucked near your armpits, then press out to the start position, never walk out already stretched.
- Keep a small, fixed elbow bend throughout the rep so it stays a fly, not a triceps press.
- On narrow all-in-one trainers, finish with a small cross-over at the top to keep tension at peak contraction.
- If you feel shoulders or arms more than chest, reduce load, shorten the bottom range, and slow the eccentric before changing anything else.
The Rise of the Home Smith Machine Cable Fly
The Shift from Commercial to Compact
For decades, the "chest fly" was synonymous with two distinct environments: the dumbbell rack and the commercial cable crossover. The dumbbell fly, while accessible, suffers from a critical flaw: gravity. As the weights travel upward, the line of force aligns with the bones of the arm rather than the fibers of the pectoral muscle, resulting in zero tension at the peak of the contraction. The commercial cable crossover solved this by providing horizontal resistance, but its massive footprint made it an impossibility for garage gyms.
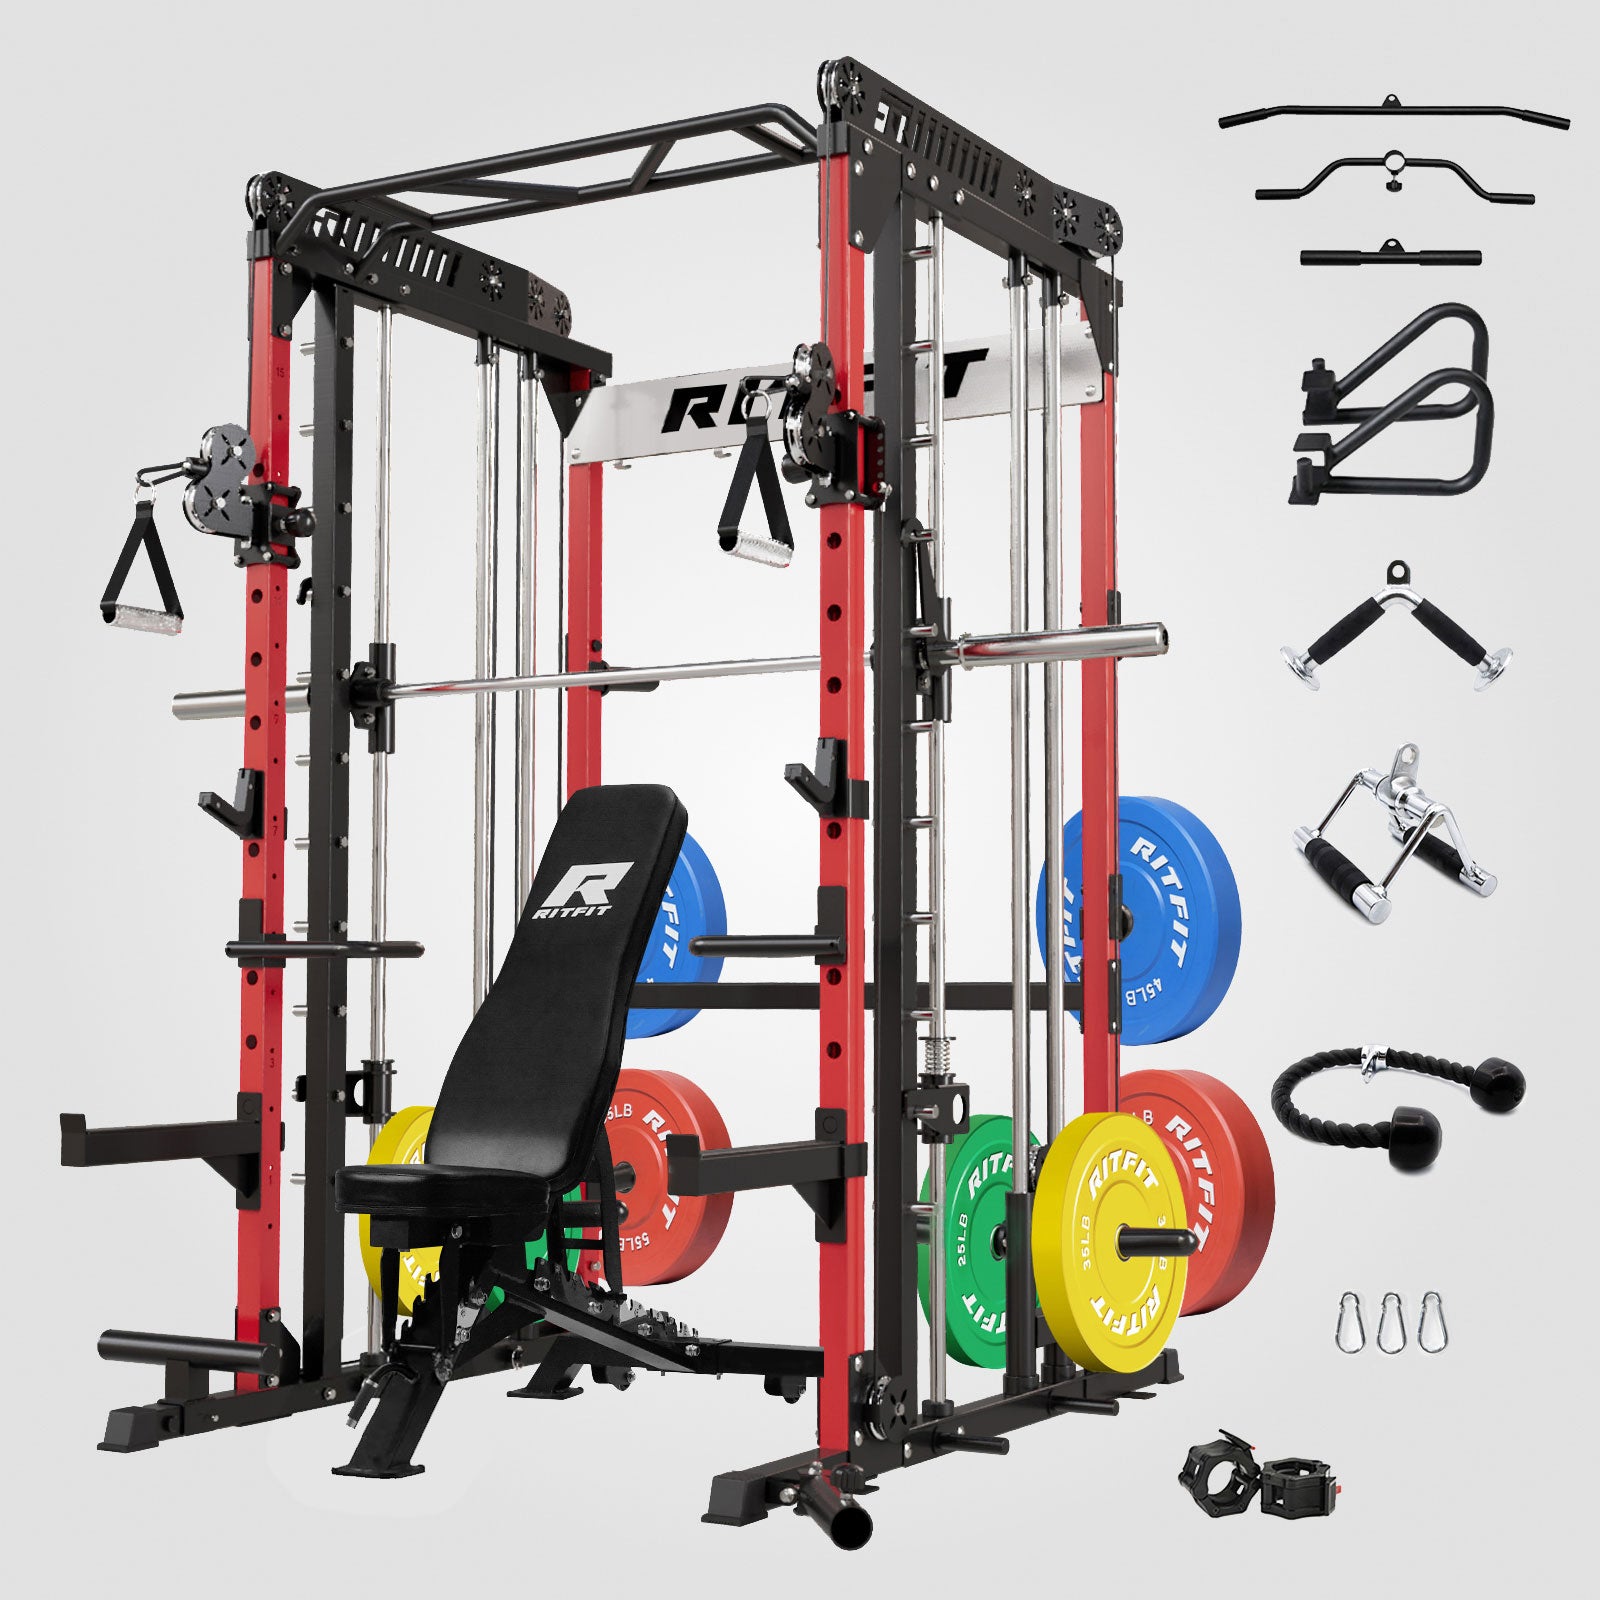
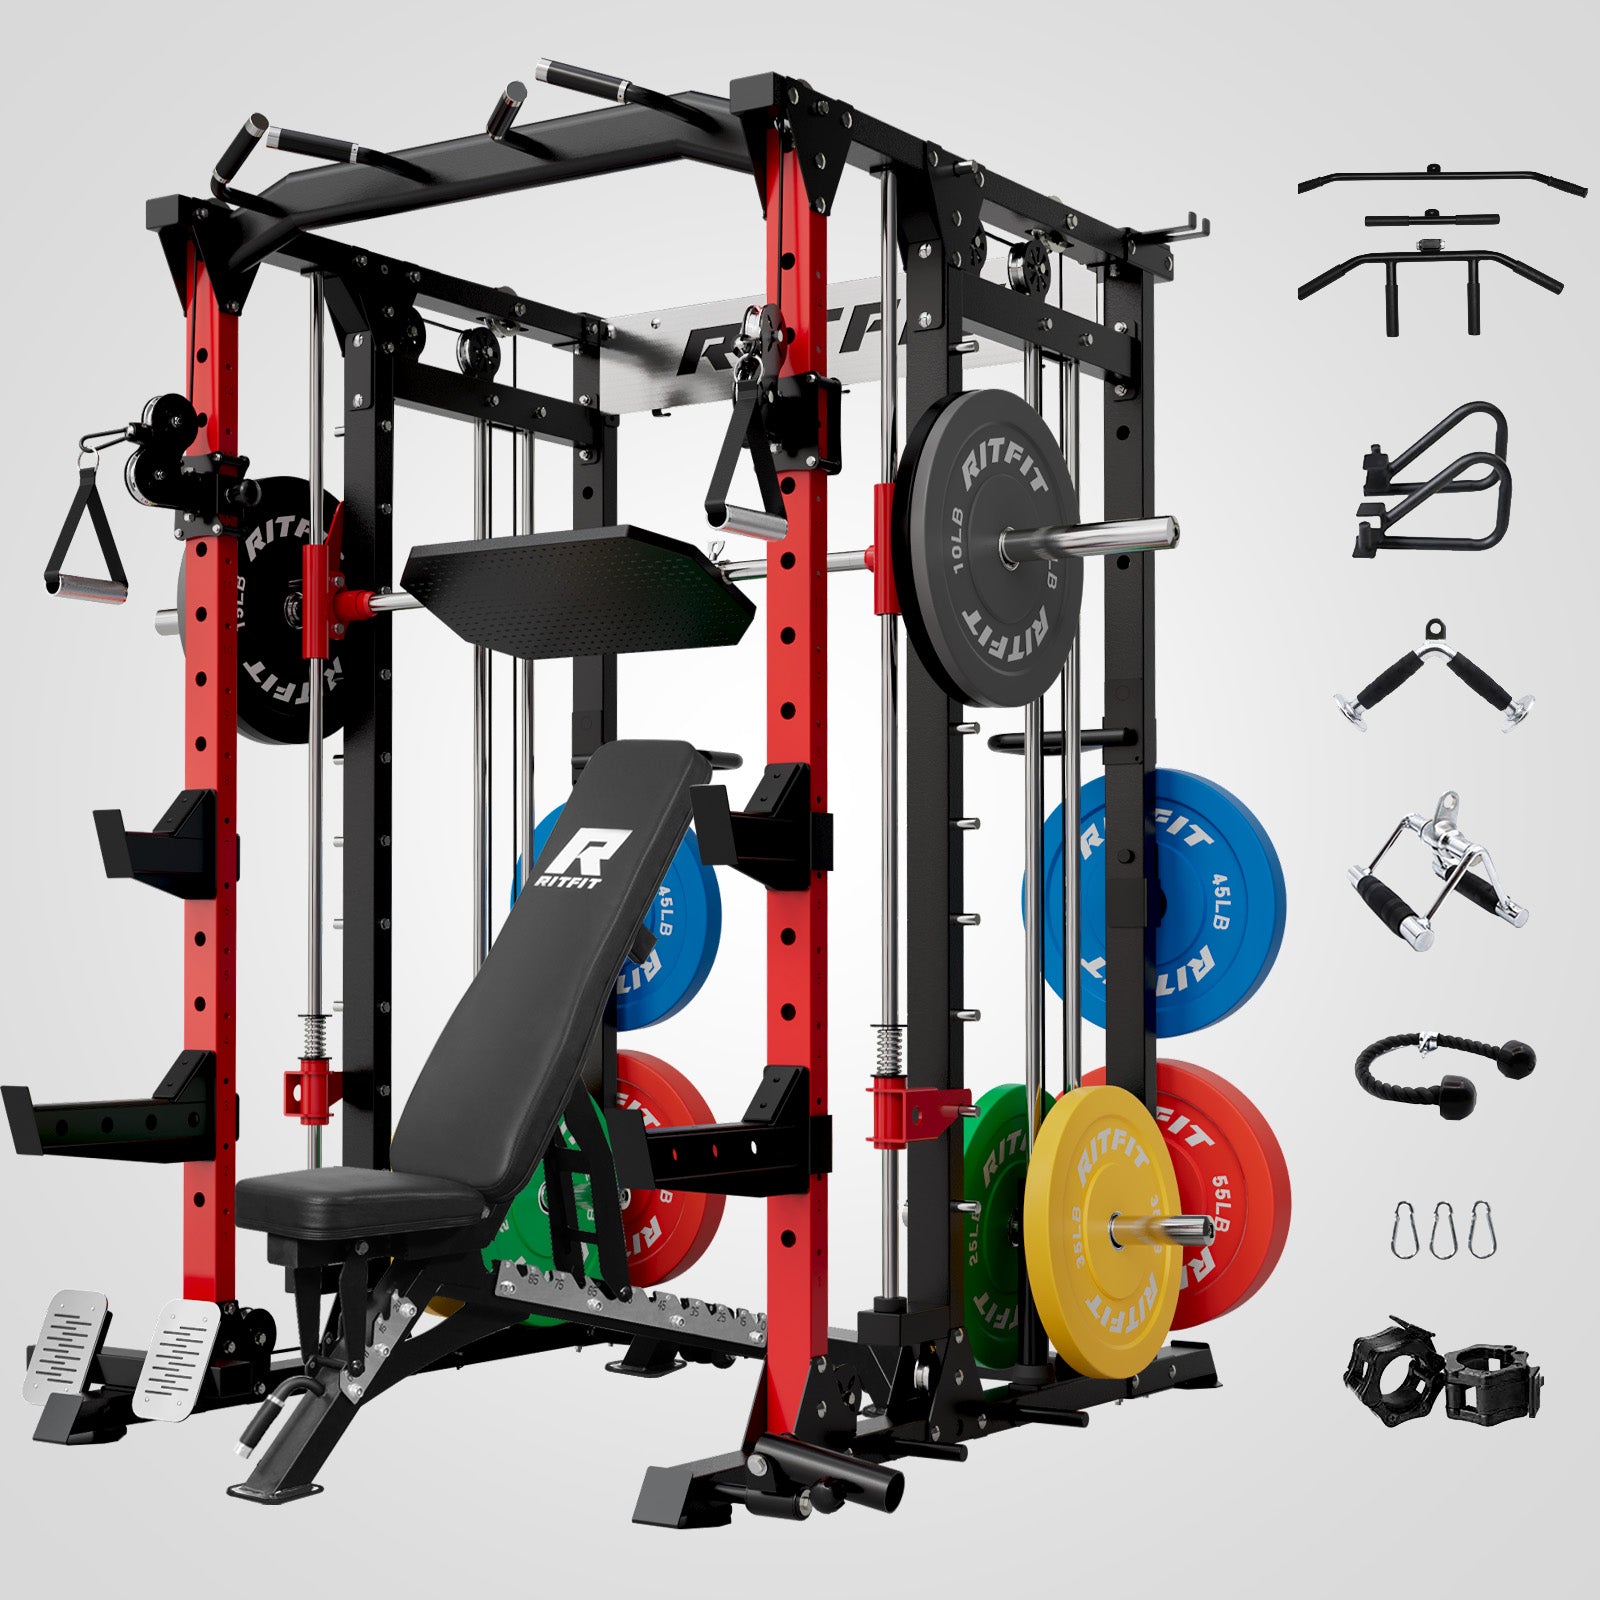
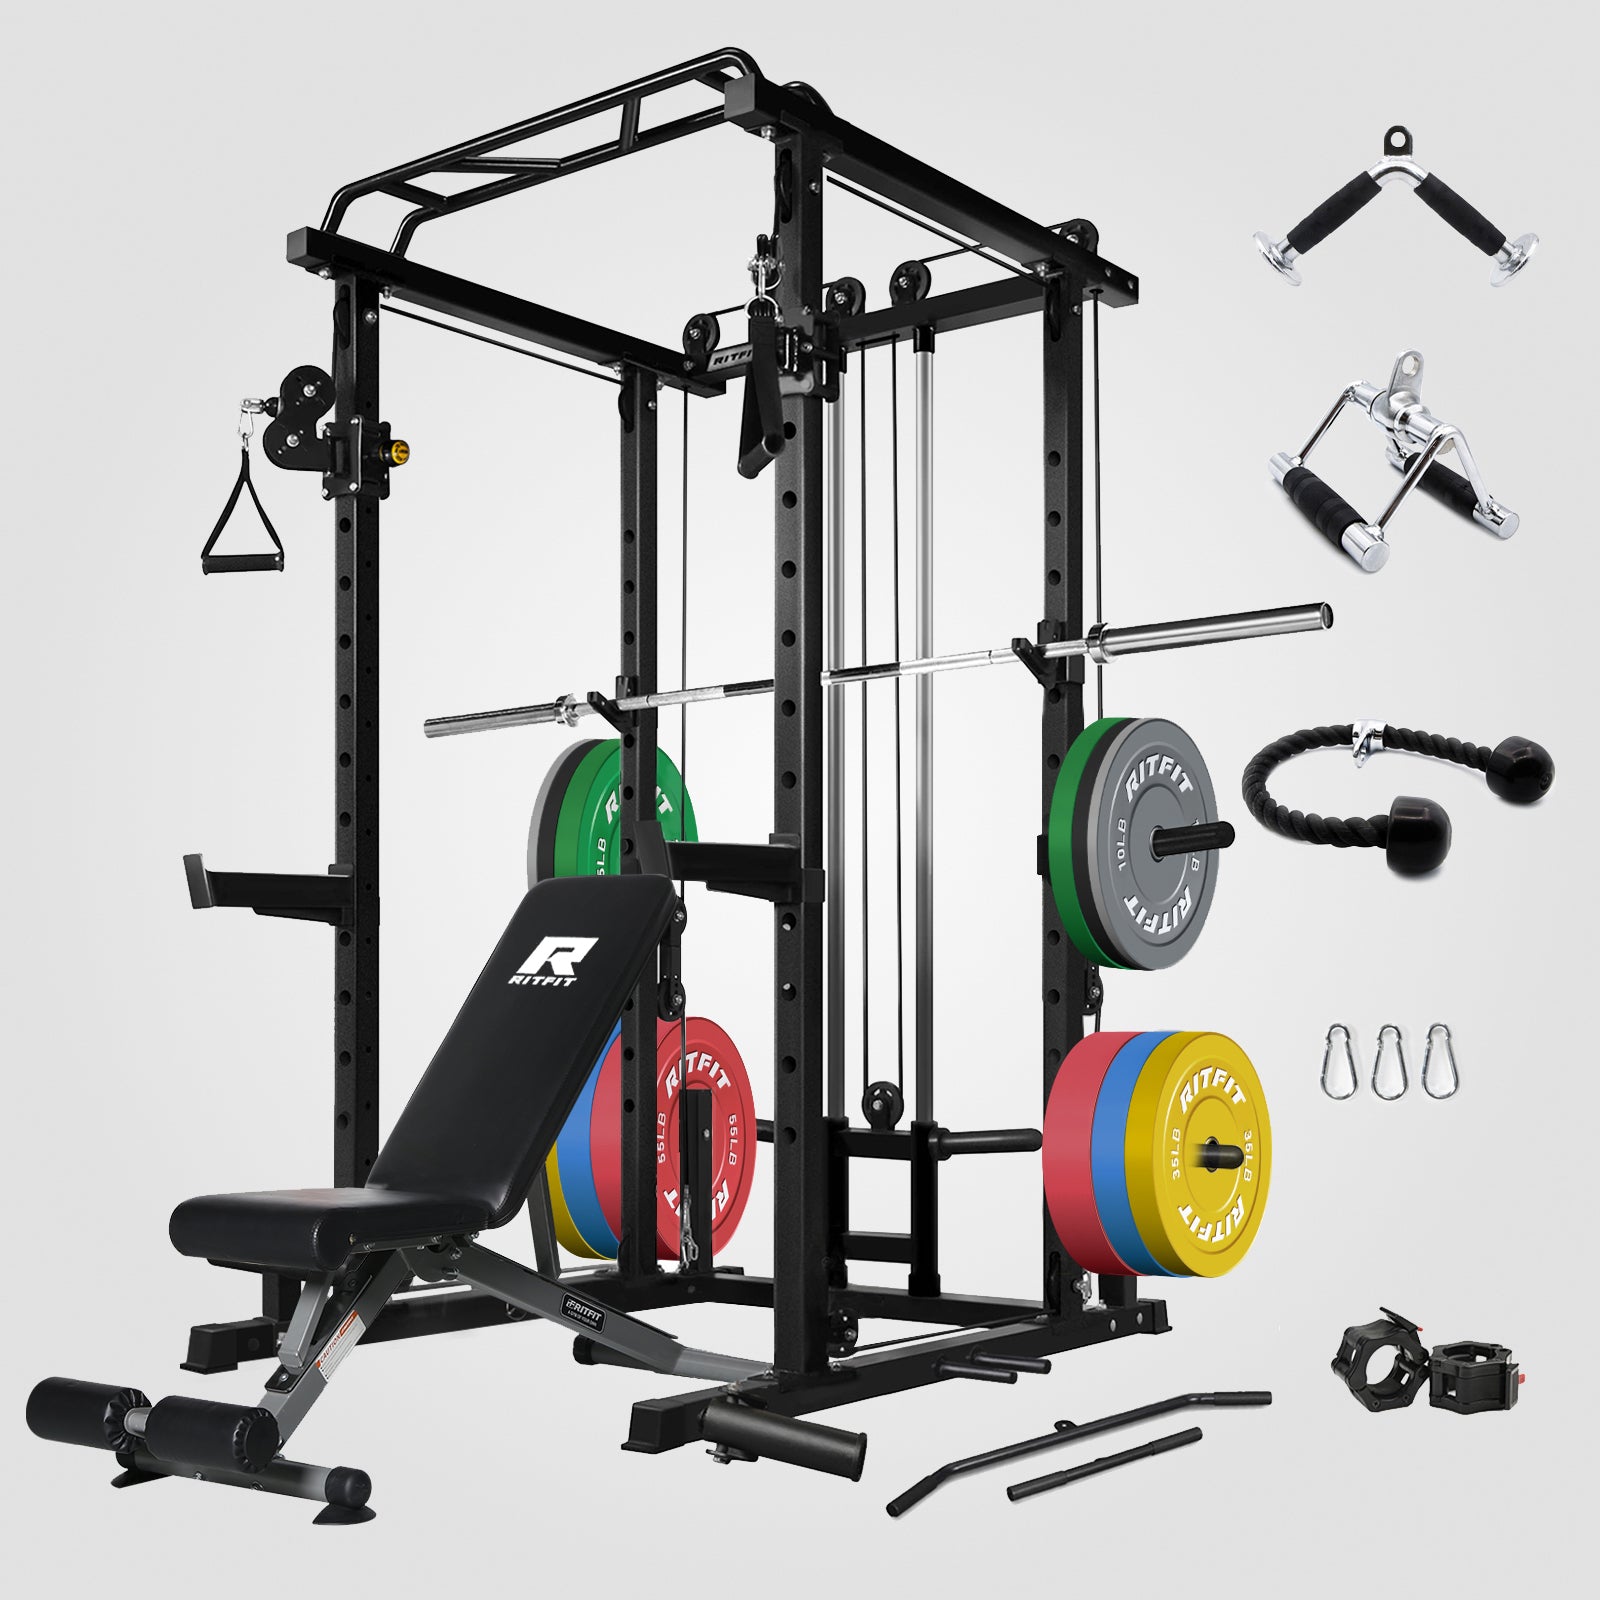
The advent of the "all-in-one" trainer combining a power rack, Smith machine, and pulley system changed this landscape. Machines like the RitFit M1 integrate a dual sliding rail structure with high-strength steel wires and roller bearings into a footprint of roughly 64.5" x 68.1". This innovation allows for the execution of cable flys in a home setting, but it requires the user to adapt their technique to a narrower point of origin. Understanding this shift is the first step in mastering the movement.
The "All-in-One" Ecosystem
The modern Smith machine with pulley attachments is not just a rack; it is a complex ecosystem of resistance vectors. The RitFit M1, for example, utilizes a plate-loaded resistance method with a 2:1 pulley ratio. This means that the resistance felt at the handle is half the actual weight loaded, allowing for micro-adjustments in tension, a critical feature for isolation movements like the fly, where small jumps in weight can significantly impact form.
Furthermore, the structural integrity of these machines, built with heavy-duty 2x2 steel uprights and rated for loads up to 1500 lbs, provides the necessary stability for heavy pulls. However, unlike bolt-down commercial units, the center of gravity in a home unit can shift during heavy dynamic movements. The user must therefore act as a stabilizer, integrating core strength and stance mechanics into the lift in a way that is less necessary on commercial machines.
Why the Cable Fly on a Smith Machine is Great for Home Gyms
To understand how to perform the movement, we must first dissect why it is necessary. The chest fly is not merely a shaping exercise; it is a mechanical optimization of the pectoralis major's primary function.
The Physiology of Horizontal Adduction
The pectoralis major is a fan-shaped muscle designed primarily for horizontal adduction, bringing the humerus (upper arm) across the midline of the body. While the bench press involves this movement, it is coupled with elbow extension (triceps) and shoulder flexion (anterior deltoids), making it a compound movement. The fly removes the triceps from the equation, isolating the humerus's movement across the torso.
The Tension Curve Advantage
The primary argument for the cable fly over the dumbbell fly is the concept of constant tension.
- Dumbbell Physics: In a dumbbell fly, the resistance vector is always vertical (gravity). At the bottom of the rep, the moment arm is long, creating maximum tension (and stretch). As the arms come together, the moment arm shortens. At the top, the resistance vector is parallel to the arm, meaning the tension on the pec drops to zero.
- Cable Physics: Cables redirect gravity. Biomechanical analysis confirms that cable pulleys maintain a consistent torque angle throughout the entire range of motion, forcing the sternal fibers to sustain maximal contraction even at the peak squeeze[1].
Hypertrophy Mechanisms: Stretch vs. Squeeze
Muscle growth is driven by mechanical tension, metabolic stress, and muscle damage.
- Stretch-Mediated Hypertrophy: Recent research emphasizes the importance of loading the muscle at long muscle lengths (the stretch). Dumbbells excel here.
- Shortened-Position Hypertrophy: Cables allow for loading in the shortened position (the squeeze). This is unique because the pectoralis major is anatomically capable of shortening further than a barbell or dumbbell allows (due to the bar hitting the chest or the hands meeting over the shoulders). Cables allow the hands to cross, taking the muscle into its fully shortened range.
By performing cable flys on a Smith machine, you are targeting the "inner chest" (sternal fibers) in a way that no pressing movement can achieve, completing the hypertrophic puzzle.
Muscles Worked During a Cable Fly on a Smith Machine
Before touching the handles, we must map the musculature involved. A "mind-muscle connection" is not bro-science; it is the neurological ability to recruit specific motor units.
The Target: Pectoralis Major
The pectoralis major is divided into two (sometimes three) functional heads based on fiber orientation:
- Clavicular Head (Upper Chest): Originates on the collarbone. Fibers run diagonally down. Best targeted by low-to-high cable angles.
- Sternocostal Head (Mid/Lower Chest): Originates on the sternum. Fibers run horizontally and slightly up. Best targeted by mid-height or high-to-low angles.
The Stabilizers: Rotator Cuff and Scapula
The chest cannot fire effectively if the shoulder blade (scapula) is unstable. The serratus anterior and rhomboids work to stabilize the scapula against the ribcage.
- The Safety Mechanism: The rotator cuff (supraspinatus, infraspinatus, teres minor, subscapularis) keeps the ball of the humerus centered in the socket. During a fly, the long lever arm places immense torque on the shoulder joint. Proper form is non-negotiable to prevent impingement or labral tears.
The Core Link
On a standing cable fly, the core (rectus abdominis, obliques, and erectors) acts as a bridge between the ground and the load. If the core is weak, the torso will sway, momentum will take over, and the isolation on the chest will be lost. The obliques, in particular, must resist the rotational forces if the pull is not perfectly symmetrical.
Understanding Your Equipment for the Cable Fly
The RitFit M1 (and similar Smith machines) differs from commercial equipment in critical ways that affect exercise execution.
The "Narrow Rack" Phenomenon
Commercial cable crossovers are often 10+ feet wide. This width ensures that even at full extension, the cable pulls outward (laterally). The RitFit M1 is approximately 68 inches wide.
- The Impact: As you bring your hands together, the angle of the cable relative to your arm becomes more acute. At the very peak of the contraction, the cable might be pulling slightly back rather than purely out.
- The Fix: Cross-Over Reps. Don't just touch the handles; cross the wrists to ensure the cable continues to pull the arm across the midline. Biomechanical studies on resistance vectors support crossing the midline to maximize sternal fiber recruitment[2].
Pulley Ratios and Inertia
The M1 uses a 2:1 ratio.
- Mechanical Advantage: If you load 50 lbs of plates, you feel 25 lbs of resistance.
- Cable Travel: This ratio doubles the length of cable travel. This is advantageous for tall users or those with long arms, as it prevents the weight stack from "topping out" (hitting the top of the carriage) before full extension is reached.
- Smoothness: The 2:1 system reduces the inertia of the moving plates. In a 1:1 system, a fast concentric movement can launch the plates upward, creating slack in the cable and a jarring impact when they land. The 2:1 ratio dampens this, providing the smooth, fluid feel described as "commercial grade."
Carriage Adjustability
The M1 features 15 adjustment positions along the uprights. This granularity allows for precise alignment with the muscle fibers.
- High Setting: Hits lower pecs.
- Mid Setting: Hits sternal pecs.
-
Low Setting: Hits upper pecs.
The sliding mechanism typically uses a pop-pin or spring-loaded handle. Crucial Safety Tip: Always give the carriage a firm "shake" after adjusting to ensure the pin is fully seated in the upright hole. A carriage slipping under load can be disastrous.
Stance and Setup for a Safe Cable Fly on a Smith Machine
A great set is determined before the first rep is performed. In a home gym environment, you are often working solo, meaning you don't have a spotter to hand you the cables.
Handle Selection
The standard attachment is the D-handle (stirrup).
- Material Matters: The M1 often comes with nylon strap handles. Upgrading to aluminum handles (available as accessories) provides a rigid frame that doesn't collapse on the hand, allowing for a more consistent grip and better force transfer.
- The Wrist Cuff Hack: For those with wrist pain or tennis elbow, using ankle straps around the wrists is a game-changer. By removing the grip requirement, you reduce forearm activation and "cuff" the weight directly to the lever (the arm), creating a purer chest isolation.
The Stance Strategy
Stability is the limiting factor in a standing fly.
-
The Split Stance (Staggered): This is the gold standard. Place one foot forward and one foot back.
- Mechanics: The rear leg acts as a distinct anchor against the backward pull of the weights. The front leg provides balance.
- Torso Angle: A slight forward lean (10-15 degrees) helps engage the core and aligns the pecs against the resistance.
- The Square Stance: Feet shoulder-width apart. This requires more core stiffness and is often the limiting factor for heavier loads. It works best for lighter “shape” sets. Evidence suggests that a staggered stance generally improves force transfer through the kinetic chain compared to a square stance[3].
- Seated Variation: Placing a bench in the center of the Smith machine creates the most stable environment possible. With the back braced, 100% of neural drive can go to the chest. However, on narrow machines like the M1, ensure the bench doesn't block the path of the elbows.
Bench Positioning (For Seated/Lying Flys)
If using a bench:
- Centering: The bench must be perfectly centered to ensure symmetrical loading. Use the knurling on the Smith machine bar (if visible above) or the center crossbar as a visual guide.
- Depth: For a flat bench fly, the bench should be positioned so that the pulleys are in line with the chest. If the bench is too far back, the cables will rub against your shoulders. If too far forward, you lose tension at the stretch.
Step-by-Step Guide to Performing the Smith Machine Cable Fly
We will now break down the standard mid-chest standing cable fly step-by-step. This is the foundational movement from which all variations stem.
The Entry (The Solo Walk-Out)
Getting into position with heavy weights is the most dangerous part of the lift for the shoulder joint.
- Grip the First Handle: Stand near the left pulley. Grab the handle and pull it close to your chest, tucking your elbow into your side. Keep it there.
- Traverse: Walk to the right pulley, keeping the left arm tucked tight. Grab the right handle.
- Center Up: Move to the center of the machine. You are now holding both handles close to your armpits, elbows bent.
- The Step Out: Take a decisive step forward into your split stance.
- The Press: Use a "chest press" motion to extend your arms forward to the starting position. NEVER try to start with your arms wide open in the stretched position. This places extreme shear force on the anterior capsule of the shoulder.
The Setup
- Soft Elbows: Unlock your elbows. They should be bent at approximately 10-15 degrees. This bend must remain frozen throughout the entire rep. If the elbows bend and straighten, you are pressing, not flying.
- Scapular Retraction: Pinch your shoulder blades together and down. Imagine trying to hold a pencil between your shoulder blades. This "proud chest" position protects the shoulders and maximizes pec recruitment.
- Head Position: Keep your head neutral. Do not jut your chin forward.
The Eccentric (The Stretch)
- Open the Doors: Slowly allow the cables to pull your arms back and out. Visualize opening a set of double doors.
- Tempo: Take 3 full seconds to reach the bottom. Control is key.
- The Limit: Stop when your hands are slightly behind your shoulders or when you feel a deep, comfortable stretch. Going too far (hyperextension) shifts tension onto the shoulder ligaments and increases injury risk without adding muscle benefit.
- Inhale: Take a deep breath as you open up, expanding the ribcage.
The Concentric (The Squeeze)
- Hug the Tree: Initiate the movement by imagining you are hugging a large tree or barrel. Do not think about "pushing" the handles; think about bringing your biceps together.
- Circular Path: Your hands should travel in a wide arc, maintaining that fixed elbow bend.
- Exhale: Blow the air out forcefully as you bring the hands together.
- The Crossing (Crucial for Narrow Machines): As your hands approach the center, do not just touch them. Continue the arc until your wrists cross over each other (e.g., left wrist over right). This compensates for the narrower width of the Smith machine, ensuring peak tension is maintained.
The Peak Contraction
- The Isometric Squeeze: Hold the crossed position for 1 full second. Squeeze the chest as hard as possible.
- Alternating: On the next rep, cross the right wrist over the left. This ensures balanced development.
Angles and Variations for the Cable Fly on a Smith Machine
The beauty of the adjustable pulley system is the ability to hit every fiber of the chest.
Low-to-High Fly (Upper Chest)
- Setup: Move the pulleys to the bottom position (Hole 1).
- Stance: Step forward significantly.
- Path: Scoop the hands forward and up, ending at eye level.
- Why: This vector aligns with the clavicular fibers. It fills in the "shelf" of the upper chest, giving the torso a thick, powerful look.
High-to-Low Fly (Lower Chest)
- Setup: Move pulleys to the top position.
- Stance: Lean the torso forward 30-45 degrees.
- Path: Press down and in, bringing the hands together near the belt buckle.
- Why: This targets the costal fibers and helps carve the lower line of the pecs.
Mid-Chest Fly
- Setup: Pulleys at shoulder height.
- Path: Horizontal adduction. Hands meet at sternum height.
- Why: Maximizes overall chest thickness and recruits the largest portion of the muscle belly.
The Single-Arm Variant
For narrower machines, the single-arm fly is often superior.
- Setup: Stand sideways to the machine or at a 45-degree angle. Use only one pulley.
- Benefit: This allows you to drag the arm distinctly across the midline without the other arm obstructing the path. It also increases the effective range of motion and core recruitment.
How to Adjust the Cable Fly on a Smith Machine for Narrow Widths
Owners of equipment like the RitFit M1 often worry that their machine is "too narrow" for effective flies. While commercial crossovers are wider, the narrow rack is not a death sentence for gains; it just requires adaptation.
The Geometry of Tension
On a 10-foot-wide machine, the cable angle at peak contraction is nearly 90 degrees to the arm. On a 5-foot-wide Smith machine, that angle might be 45 degrees.
- The Consequence: Less lateral tension at the very end of the rep.
-
The Solution:
- Step Further Forward: By moving your body further away from the machine, you effectively change the cable angle and often improve peak tension—especially on narrow frames.
- Cross-Over Reps: As mentioned, crossing the hands allows the arm to travel further, re-engaging the tension.
- Unilateral Training: By turning your body, you can artificially create a "wide" angle of pull using a single pulley.
Stability Management
Narrow machines are lighter. A 200 lb user doing heavy flys creates a significant tipping moment.
- Counterweight: Ensure your Smith machine has ample weight stored on the rear storage pegs. The RitFit M1 includes plate storage horns for this purpose. Load them up with your heaviest plates to anchor the unit.
Fixing Common Mistakes in the Smith Machine Cable Fly
Even with the best equipment, form breakdown is common.
The "Tricep Press" Error
Symptom: You feel the burn in your arms, not your chest.
Cause: You are straightening your arms during the concentric phase.
Fix: Lock the elbow angle. If you can't keep them bent, the weight is too heavy.
The "Shoulder Roll"
- Symptom: Shoulder pain or clicking.
- Cause: Protracting the scapula to force the hands together.
- Fix: Keep the chest "proud." If you can't touch hands without rolling shoulders, stop the rep early. Range of motion is useless if tension shifts to the joint.
The "Ego Lift"
Symptom: Swinging the torso to start the rep.
Cause: Weight is too heavy.
Fix: Drop the weight by 20%. The fly is a leverage-disadvantaged movement. You will never fly as much as you press. Leave the ego at the door.
How to Include the Smith Machine Cable Fly in Your Workout Routine
How do you fit this into your routine?
Placement in the Workout
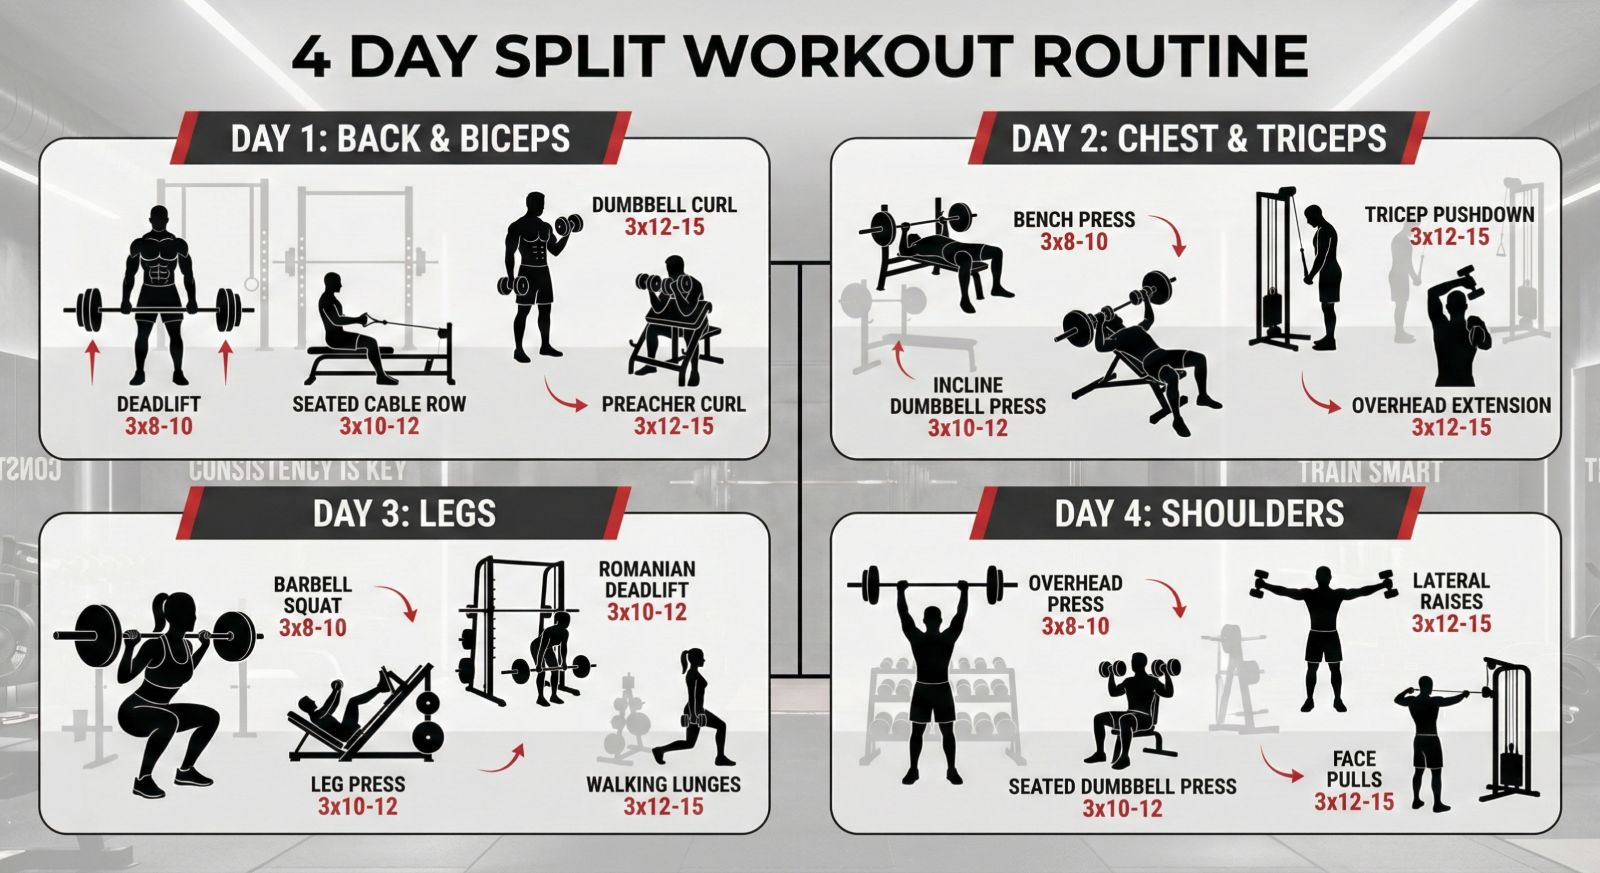
- Post-Compound: The standard approach. Do your heavy bench pressing first, then move to flys to fully exhaust the muscle fibers without the triceps being the limiting factor.
- Pre-Exhaust: Do flys first. This fatigues the pecs so that when you bench press, the pecs fail before the triceps. Excellent for those with dominant arms and lagging chests.
- Finisher: Use high reps (15-20) at the very end of the session to drive maximum blood flow (the pump) into the muscle.
Sets and Reps
- Hypertrophy Standard: 3-4 sets of 10-15 reps.
- Tempo: 2-1-3 (2 seconds squeeze, 1 second hold, 3 seconds stretch).
- Rest: 60-90 seconds.
Supersets
Smith machines allow for rapid supersets.
- The Mechanical Drop Set: Perform a set of flys to failure. Immediately (without changing weight), switch to a cable press (allows triceps help) to squeeze out 5-10 more reps.
- The Push-Pull: Superset chest flys with reverse flys (rear delts) to work the opposing muscle group and maintain structural balance.
Conclusion:
The cable fly performed on a Smith machine with pulley attachments is a triumph of biomechanical engineering adapted for the home athlete. It overcomes the "gravity gap" of dumbbells, providing the constant, relentless tension necessary for optimal pectoral hypertrophy.
While equipment like the RitFit M1 may have limitations in width compared to commercial behemoths, these can be neutralized through intelligent technique: crossing the wrists, utilizing unilateral variations, and mastering the split stance. By respecting the anatomy of the shoulder, adhering to strict form, and checking your ego at the door regarding weight load, you can turn this movement into the cornerstone of your chest development.
The perfect chest is built not just by pushing weight away from you, but by bringing it together. The cable fly is the physical manifestation of that principle. Master it, and your physique will reflect the precision of your approach.
Reference Guide to Key Technical Terms
| Term | Definition | Context in Flys |
| Concentric | The muscle shortens (lifting). | Bringing the handles together. |
| Eccentric | The muscle lengthens (lowering). | The stretch phase opening the arms. |
| Isometric | Static contraction. | Holding the squeeze at the center. |
| Adduction | Moving limb toward midline. | The primary action of the Pec Major. |
| Supinated | Palms facing up. | Grip used for Low-to-High Flys. |
| Pronated | Palms facing down. | Grip used for High-to-Low Flys. |
| Neutral | Palms facing each other. | Grip used for Mid-Chest Flys. |
| Protraction | Scapula moves forward. | To be avoided during the concentric phase. |
| Retraction | Scapula moves backward. | The required stable starting position. |
Appendix: Quick Setup Checklist for RitFit M1 Owners
- Clearance: Ensure 6 feet of open space in front of the rack.
- Ballast: Check that rear weight horns are loaded to prevent tipping.
-
Pulley Height:
- Low-to-High: Hole 1-3.
- Mid-Fly: Hole 7-9 (approx. rear delts) chest height.
- High-to-Low: Hole 12-15.
- Handle Check: Spin the D-handles to ensure smooth rotation.
- Bench: Remove any bench from the footprint to allow for split stance positioning.
Important disclaimer: This article is for general educational purposes only and is not medical advice. If you have shoulder, neck, back, elbow, or wrist pain, a recent injury or surgery, numbness or tingling, unexplained weakness, or dizziness, consult a qualified clinician before starting. Stop any exercise that causes sharp pain.
References
- Schoenfeld BJ. The mechanisms of muscle hypertrophy and their application to resistance training. J Strength Cond Res. 2010;24(10):2857-2872. doi:10.1519/JSC.0b013e3181e840f3
- Pinto RS, Gomes N, Radaelli R, Botton CE, Brown LE, Bottaro M. Effect of range of motion on muscle strength and thickness. J Strength Cond Res. 2012;26(8):2140-2145. doi:10.1519/JSC.0b013e31823a3b15
- Nelson AG, Kokkonen J, Arnall DA. Acute muscle stretching inhibits muscle strength endurance performance. J Strength Cond Res. 2005;19(2):338-343. doi:10.1519/R-15894.1
