


Table of Contents
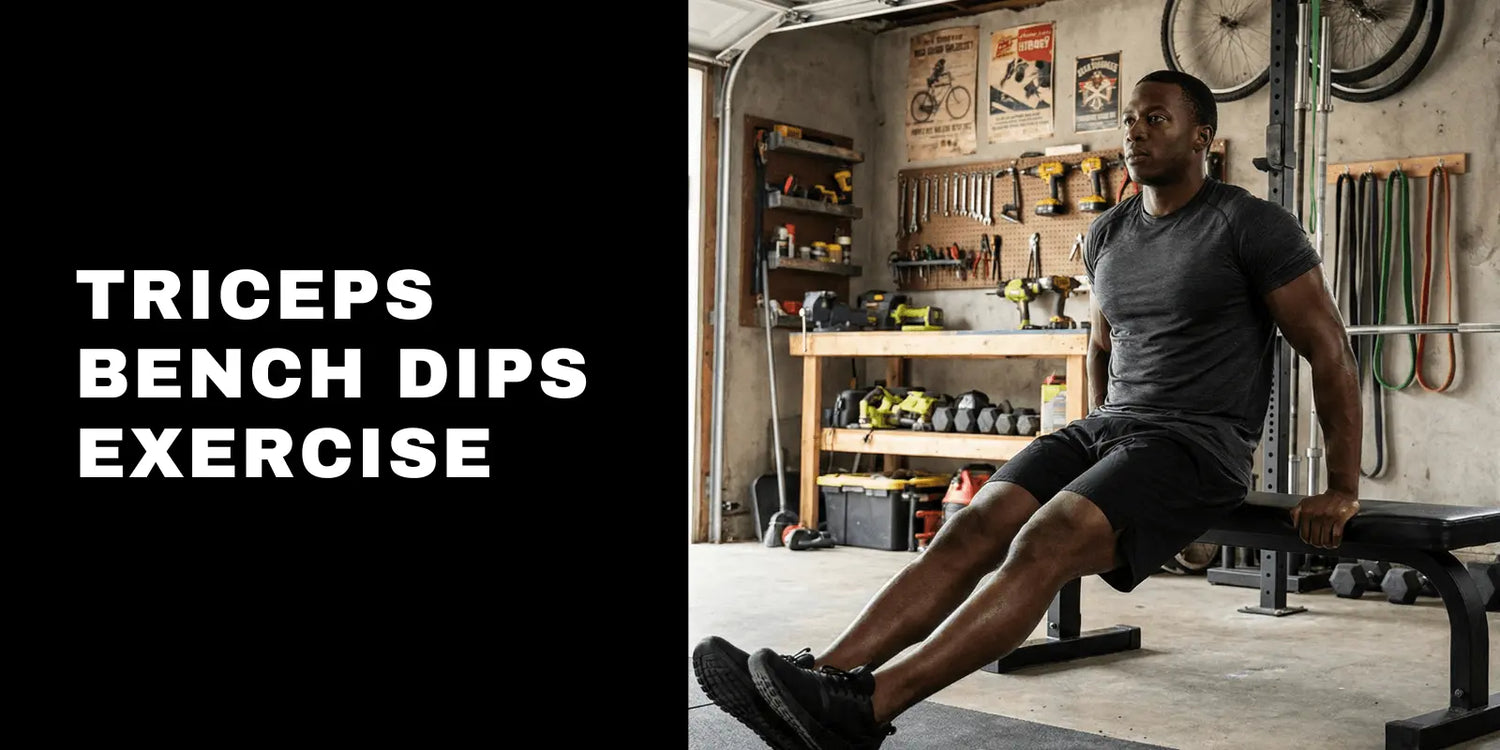
Building a truly impressive set of arms is often a primary goal for many lifters. You want that coveted horseshoe shape on the back of your arm that signals both strength and dedication. People who work out at home or in their garages may find it hard to do this without access to big cable stacks or commercial isolation machines. The triceps bench dips exercise is great for this. It is a basic movement that only needs gravity and a flat surface.
Biomechanics, the bench dip exercise is a great way to build muscle. The movement itself is usually not dangerous; it's the way you do it that is. This simple bodyweight movement can help you unlock elite-level arm growth if you know how your joints work and don't push them too far.
Understanding the Anatomy of the Triceps
Knowing exactly what you're working on will help you get the most out of the bench dips exercise. There are three different heads in the triceps brachii muscle group.
The Long Head
This part goes down the back of your arm and over the shoulder joint. It is in charge of the arm's overall size and weight.
The Lateral Head
This is the outer portion of the muscle. When you see a well-defined arm from the side, the lateral head provides that curved, aesthetic look known as the horseshoe.
The Medial Head
This is the smallest of the three and sits lower on the arm, near the elbow. It is very important for stability and the last part of pressing movements.
Overhead movements usually work the long head, but the triceps bench dips exercise puts a lot of stress on all three heads, with the lateral head getting the most stress because of the arm position.Research confirms that bench dips elicit very high activation of the lateral head, often superior to overhead extensions[1].
This makes it a powerhouse movement for aesthetic development. The challenge is ensuring that the triceps do the work rather than the chest or the anterior deltoid.
How you know the triceps are doing the work:
You feel the burn and tension along the back of the upper arm, you can keep the shoulders packed down, and you can pause near the bottom without shoulder pinching. If you mainly feel the front of the shoulder, you are usually going too deep, letting the shoulders roll forward, or letting the elbows flare.
The Setup: Maximizing Home Gym Efficiency
One of the greatest advantages of this movement is its accessibility. You do not need a gym membership to perform it effectively. Home gym minimalists can achieve a commercial gym-quality pump using basic furniture or a simple utility bench.
The ideal setup requires a flat weight bench. If you do not have a bench, a sturdy chair or a plyometric box can work. The key requirement is stability. The surface must not slide or wobble as you apply force.If the bench is light, place it against a wall or weigh it down so it cannot shift.
Position your bench in an area with enough clearance for your legs. If you are advanced and plan to elevate your feet, you will need a second bench or a box of similar height placed parallel to the first one. This simple arrangement effectively turns your garage gym into a fully functional arm training station.
Optional joint friendly setup tweaks:
- Wrist comfort: Grip the edge with your palms flat, or hold two heavy dumbbells on the bench as handles to keep wrists more neutral.
- Shoulder comfort: Start with knees bent and feet closer to the bench, which reduces load and often reduces how far the shoulder travels.
Step-by-Step Execution Guide
Proper form is the difference between a muscle-building rep and a joint-straining rep. Follow these steps to perform the bench dip exercise safely and effectively.
Step 1: Hand Placement
- Sit sideways on the edge of your bench.
- Place your hands next to your hips with your fingers gripping the edge of the bench.
- Your knuckles should face forward.
- Make sure your hands are about shoulder-width apart.
- Putting them too far apart can put too much stress on the shoulders, and putting them too close together can make you lose your balance.
Step 2: The Starting Position
- Extend your legs out in front of you.
- Start with your heels on the floor and your knees slightly bent.
- Support your weight with your arms and slide your buttocks off the bench.
- At this point, your hips should be directly beside the edge of the bench, and your arms should be fully extended but not hyperextended.
Step 3: Scapular Retraction
- Before you descend, pull your shoulder blades down and back.
- Imagine tucking your shoulder blades into your back pockets.
- This engages the stabilizers and protects the shoulder joint so that scapular depression is the critical mechanism for preserving subacromial space during dips[2].
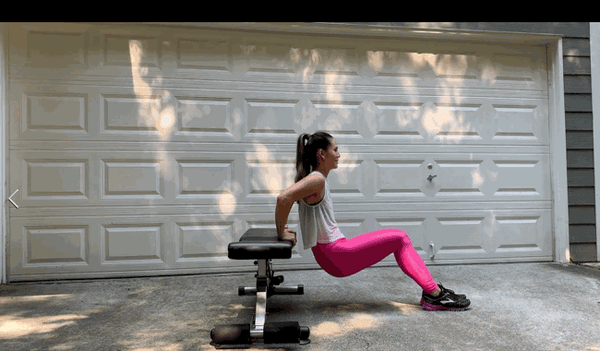
Step 4: The Descent
- Slowly lower your body by bending at the elbows.
- Your goal is to lower your hips straight down towards the floor.
- Keep your back incredibly close to the bench. It should almost graze the upholstery.
- Stop descending when your elbows reach a 90-degree angle.
- Going lower than parallel often shifts tension away from the muscles and onto the joint capsule.
Step 5: The Drive
- Push through the heels of your hands to drive your body back up to the starting position. Focus on squeezing the triceps hard at the top. Exhale as you press up.
- Ensure you do not let your shoulders roll forward at the top of the movement.
- Keep the chest proud and the shoulders packed down.
- At the top, stop just short of locking out hard if your elbows get cranky. Keep tension on the triceps instead of resting on the joints.
Biomechanics and Safety: Protecting the Shoulder
The controversy surrounding the bench dip exercise stems from a position called internal rotation. When the arm is behind the body (extension) and the shoulder rolls forward, the head of the humerus can press against the structures of the shoulder joint. This can lead to impingement or irritation if done carelessly.
However, we can mitigate this risk almost entirely by controlling two variables: posture and range of motion.
Scapular Stability
By keeping the shoulder blades retracted and depressed, you create space in the shoulder joint. This prevents the head of the humerus from gliding forward into a vulnerable position. If you feel your shoulders rising towards your ears during the rep, stop immediately and reset.If you cannot keep the shoulder blades down and back, reduce the difficulty by bending the knees or limiting the range.
Range of Motion
Many lifters believe deeper is better, but excessive shoulder extension (going too deep) increases shear forces on the anterior capsule; limiting ROM to 90 degrees mitigates this risk[3]. Stick to a 90-degree elbow bend for long-term joint health.Your goal is triceps tension, not maximum depth. The deepest rep is not the best rep if it shifts load to the shoulder.
Pain rules you should follow every session:
0 to 2 out of 10 discomfort that resolves quickly can be acceptable for many lifters.
Sharp pain, pinching in the front of the shoulder, or symptoms that linger after the set are not acceptable. Stop, shorten the range, and switch exercises if needed.
- Shoulder friendly alternatives if bench dips do not agree with you:
- Close grip push ups on the floor or hands elevated on a bench. Keep elbows close and shoulder blades controlled.
- Close grip dumbbell press on a flat bench. Neutral grip often feels easier on shoulders.
- Lying dumbbell triceps extensions with a neutral grip. Keep elbows slightly back and use a controlled range.
- Overhead dumbbell triceps extension only if it is pain free. Start light and keep ribs down.
- Cable pressdowns if you have bands or a simple pulley. A neutral grip attachment often feels best.
Common Mistakes and How to Fix Them
Even experienced athletes can fall into bad habits. Watch out for these common errors to ensure you are getting the most out of your training.
The Floating Hips
A frequent mistake is letting the hips drift too far forward away from the bench. This changes the leverage and turns the movement into a strange hybrid bodyweight row. It places immense shearing force on the shoulders.
The Fix: Keep your glutes touching or hovering just millimeters from the bench throughout the entire range of motion.Think of sliding down a wall. Close is safe and triceps focused.
Chicken Winging
This occurs when the elbows flare out to the sides during the descent. This shifts the focus off the triceps and onto the chest and shoulders.
The Fix: Actively try to rotate your elbows inward. Think about pointing your elbows toward the wall behind you rather than the walls to your sides.Film one set from the side. If the elbows drift wide, reduce depth and slow down.
Rushing the Reps
Bouncing out of the bottom position uses momentum rather than muscle tension. This not only robs you of gains but also increases injury risk.
The Fix: Use a controlled tempo. Take two seconds to lower yourself, pause for a brief moment at the bottom, and take one second to push up.If you cannot pause, the rep is too heavy or too deep. Regress the variation and earn clean reps first.
Progressive Overload: Scaling the Movement
The human body is incredibly adaptive. To continue seeing results, you must apply progressive overload. The triceps bench dips exercise offers a clear path for progression that accommodates everyone from beginners to advanced bodybuilders.
- Level 1: Knees Bent This is the starting point. By keeping your feet flat on the floor and knees bent, you reduce the amount of body weight your arms must lift. This leverage advantage allows you to focus strictly on form and the mind-muscle connection.Goal to progress: 3 sets of 12 to 15 smooth reps with zero shoulder pinching and shoulders staying packed down.
- Level 2: Straight Legs Once you can perform 15 to 20 reps with bent knees, extend your legs fully so only your heels touch the floor. This increases the lever arm and places significantly more load on the triceps.Goal to progress: 3 sets of 10 to 15 reps with a controlled pause near the bottom.
- Level 3: Elevated Legs Place your heels on a second bench, chair, or box that is the same height as your dipping surface. This variation forces you to lift a much higher percentage of your body weight. This is the standard version for most intermediate lifters.If shoulder comfort drops with elevated legs, return to straight legs and build more volume first.
- Level 4: Weighted Dips For the advanced trainee, bodyweight might not be enough. Once you can perform 20 clean reps with legs elevated, it is time to add external load. You can place a weight plate, dumbbell, or even a sandbag on your lap (specifically on the upper thighs). This allows you to stay in a lower rep range for maximum strength and hypertrophy.Start small. Add 5 to 10 pounds at a time and keep the same 90 degree depth rule.
Programming: Exactly how to use bench dips for growth
- Frequency: 2 times per week for most lifters, up to 3 times per week if elbows and shoulders feel great and total pressing volume is not excessive.
- Placement: Best near the end of a push day or arm day, after your heavier presses.
- Sets and reps for hypertrophy: 3 to 5 sets of 8 to 15 reps, stopping 1 to 2 reps shy of technical failure.
- Rest: 60 to 120 seconds between sets.
- Progression rule: Add reps first until you hit the top of your target range, then progress to the next level or add a small amount of load.
- Stop set rule: End the set if shoulders roll forward, elbows flare hard, or you lose the packed shoulder position.
The Finisher Routine
The bench dip exercise works exceptionally well as a "finisher" at the end of a push day or arm workout. Because it is a bodyweight movement, it is perfect for high-volume training to drive metabolic stress.
Try this "Mechanical Drop Set" to completely exhaust the triceps:
- Weighted Dips: Perform 8 to 10 reps with a weight plate on your lap. Go to failure.
- Elevated Bodyweight Dips: Immediately remove the weight and keep your feet up. Perform as many reps as possible.
- Floor Dips: Immediately drop your feet to the floor with knees bent. Rep out until you cannot perform another clean rep.
This sequence ensures you recruit every available motor unit in the triceps and induces a massive pump.If your shoulders are sensitive, swap the first two steps for close grip push ups, then finish with knees bent bench dips in a shorter range.
Summary
The triceps bench dips exercise remains one of the most effective tools in the arsenal of a physique-focused trainee. It eliminates the need for expensive machinery and allows for heavy loading in a home gym environment. By prioritizing scapular retraction, controlling your range of motion, and progressing intelligently from bodyweight to weighted variations, you can build thick, powerful arms safely.
Remember that fitness is a journey of consistency. Treat this movement with respect, focus on the quality of every single repetition, and the results will follow. Whether you are working out in a garage or a living room, you have everything you need to build a world-class physique.If bench dips never feel right in your shoulders, that is not a failure. Choose a shoulder friendly triceps option and keep training. Consistency beats any single exercise.
Important disclaimer: This article is for general educational purposes only and is not medical advice. If you have shoulder, neck, back, elbow, or wrist pain, a recent injury or surgery, numbness or tingling, unexplained weakness, or dizziness, consult a qualified clinician before starting. Stop any exercise that causes sharp pain.
References
- McKenzie A, Crowley-McHattan Z, Meir R, Whitting J, Volschenk W. Bench, Bar, and Ring Dips: Do Kinematics and Muscle Activity Differ?. Int J Environ Res Public Health. 2022;19(20):13211. Published 2022 Oct 14. doi:10.3390/ijerph192013211
- Muraki T, Yamamoto N, Sperling JW, Steinmann SP, Cofield RH, An KN. The effect of scapular position on subacromial contact behavior: a cadaver study. J Shoulder Elbow Surg. 2017;26(5):861-869. doi:10.1016/j.jse.2016.10.009
- Goetti P, Denard PJ, Collin P, Ibrahim M, Hoffmeyer P, Lädermann A. Shoulder biomechanics in normal and selected pathological conditions. EFORT Open Rev. 2020 Sep 10;5(8):508-518. doi: 10.1302/2058-5241.5.200006. PMID: 32953136; PMCID: PMC7484714.
