


If you want to do face pulls without a cable station, the Smith machine gives you two practical options, a high pull bodyweight row and a band anchored to the rack. The bodyweight version builds more total body tension, while the banded version feels closer to a traditional cable face pull and usually lets your hands move more freely.
Key Takeaways
- Smith machine face pulls work best as a home gym alternative when you do not have a cable station.
- The bodyweight version is really a high inverted row, so your pull target should be your forehead or eyes, not your chest.
- The banded version is the closer match to a classic face pull because it allows hand separation and external rotation at the finish.
- Your top form rules are elbows high and wide, a brief upper back squeeze, and a controlled return.
- Progress by changing bar height, body angle, tempo, pause length, or band tension, not by chasing sloppy reps.
Why Lifters Use Face Pull Variations
Face pull variations are popular because they train the rear delts, upper back, and shoulder external rotators that help balance heavy pressing and desk heavy lifestyles. Exercise based approaches are commonly used to improve rounded shoulder posture and upper quarter function, but one exercise alone should not be framed as a medical cure.[1]
Can You Do Face Pulls on a Smith Machine
Yes, but the best version depends on your goal. A high pull bodyweight row is the stronger whole body substitute, while a band attached to the rack is the closer match to the classic cable pattern.
If you are new to the movement, start with the banded option because it is easier to learn the finish position. If you want a tougher upper back accessory, the bodyweight version is the better long term progression.
Why the Smith Machine Works for This Exercise
The Smith machine works because it gives you a fixed bar height, a stable pulling point, and easy progression from very beginner friendly to surprisingly hard. If you need a refresher on what a Smith machine is, or want to browse a full Smith machine collection, RitFit already has deeper guides that pair well with this tutorial.
Method One: The Bodyweight Smith Machine Face Pull
This version is best when you want more loading, more trunk stiffness, and a stronger back focused accessory. It is not a pure isolation move, because your abs, glutes, and torso have to stay locked in while you pull.
Proper Setup
Set the bar around waist height to start, then get under it so a straight pull brings the bar toward your forehead or eye line rather than your mid chest.
- Grip Width: Use a pronated grip slightly wider than shoulder width. This makes it easier to flare the elbows and keep the pull high.
- Body Line: Keep your body in a straight line from head to heels. Squeeze your glutes and brace your abs so the rep does not turn into a loose hanging row.
- Foot Position: Keep your heels on the floor for the standard version. Bend the knees if you need an easier entry point.
- Bar Security: Lock the Smith bar in place before every set. Test it with a firm pull before you hang underneath it.
How to Do It
Pull your upper body toward the bar by driving the elbows up and back, then lower with control until the arms are straight again. Rowing patterns that emphasize scapular retraction can also recruit the shoulder complex and torso stabilizers, which is one reason this version feels like a full body accessory instead of a simple rear delt burn.[2]
- Step 1: Set Your Position: Lie under the bar with your head, ribs, and hips stacked in one line. The closer your body is to horizontal, the harder the rep becomes.
- Step 2: Start the Pull: Begin by moving the elbows out and back, not by curling the bar with your arms. Think about opening the chest and pulling the upper arms behind the body.
- Step 3: Pull High: Aim your forehead, nose, or eyes toward the bar. If the bar keeps reaching your sternum, you are doing more of a standard row than a face pull substitute.
- Step 4: Pause the Finish: Hold the top for a brief count and squeeze the area between your shoulder blades. This is where the upper back usually becomes much easier to feel.
- Step 5: Lower Under Control: Return to the start without dropping your hips or losing tension. A slow lowering phase keeps the rep honest and makes lighter setups more effective.
If you want more detail on the row pattern itself, see RitFit guides for the Smith machine inverted row and the Smith machine row. If you want more programming ideas, this also fits naturally inside broader Smith machine back workouts.
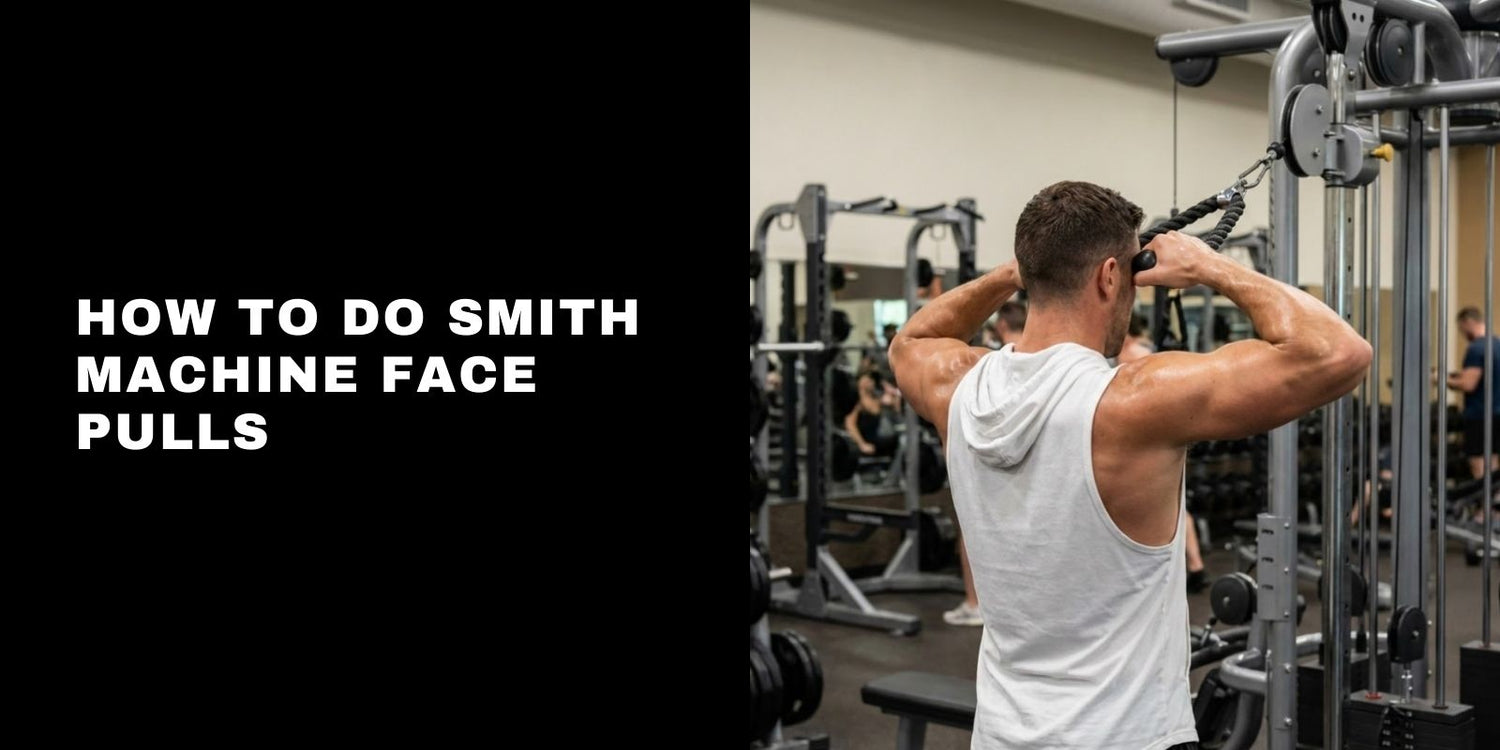
Method Two: The Banded Smith Machine Face Pull
This version is best when you want a movement that feels closer to the classic cable face pull. It is also the better choice if a straight bar bothers your wrists or you want a lighter warm up or finisher.
Proper Setup
Loop a resistance band around the Smith frame at about upper face height or slightly above, then step back until the band is already pulling on your hands before the first rep.
- Band Choice: Start with a light or moderate loop band. Face pulls work better with controlled shape and a clean finish than with brute load.
- Stance: Use a square stance or a gentle split stance. The goal is a stable torso, not a dramatic lean backward.
- Hand Path: Begin with straight arms in front of you. Finish with the hands separating beside the ears instead of stopping in front of the chest.
- Anchor Height: Keep the anchor at face height or slightly higher. A low anchor often turns the rep into more of a row or pulldown hybrid.
How to Do It
Pull the band toward your face, then finish by separating the hands while the elbows stay near shoulder height. Scapular retraction work done with the arm more abducted and externally rotated can better emphasize upper back mechanics, and selective external rotation work can increase infraspinatus contribution, which is why this version often feels closer to a true face pull.[3][4]
- Step 1: Stand Tall: Brace your abs and keep your ribs stacked over your pelvis. You do not need a dramatic lean to make the rep effective.
- Step 2: Lead with the Elbows: Pull the elbows out and back so the upper arms rise roughly in line with the shoulders. This keeps the movement from drifting into a low row.
- Step 3: Separate the Hands: As the band reaches your face, move the hands apart. This finish usually gives the movement its clearest rear delt and external rotation feel.
- Step 4: Hold Briefly: Pause at the end and keep the neck relaxed. If your upper traps take over, reduce tension and slow the rep down.
- Step 5: Return Smoothly: Let the band pull you forward under control, then repeat. Keep every rep identical instead of turning the set into a speed drill.
If your machine includes pulleys and attachments, you can compare this version with a true cable setup in RitFit’s Smith machine with cable system guide. Home gym users who want more vertical pulling options can also pair this exercise with a lat pulldown on a Smith machine.
Where You Should Feel It
You should mostly feel Smith machine face pulls in the rear delts, mid traps, lower traps, rhomboids, and the muscles around the back of the shoulder. If your biceps or lower back dominate the set, your setup, pull height, or torso position usually needs to change.
Comparison Table: Which Method Is Better for You
| Feature | Bodyweight Version | Banded Version |
|---|---|---|
| Best Goal | Upper back strength and full body tension | Classic face pull feel and shoulder friendly finish |
| Main Limitation | Fixed hand path on a straight bar | Less total loading than bodyweight rows |
| Difficulty Curve | Progresses fast as the bar gets lower | Progresses by band tension and finish quality |
| Wrist Comfort | Can bother some users on the fixed bar | Usually more forgiving because the hands move freely |
| Programming Use | Main accessory movement | Warm up, skill work, or higher rep finisher |
Common Mistakes to Avoid
Most bad reps come from pulling too low, shrugging too hard, or using momentum to fake range of motion. Exercises that create better scapular stabilizer ratios generally reward controlled mechanics, not rushed reps.[5]
- Pulling to the Chest: Pulling low turns the movement into a row. Keep the pull target at your upper face or eye line.
- Dropping the Elbows: Low elbows shift more work away from the rear delts and upper back. Keep them high and wide without forcing pain.
- Shrugging into the Neck: Letting the shoulders climb toward the ears dumps too much work into the upper traps. Keep the neck long and the chest open.
- Overusing Momentum: Swinging the torso hides weak positions instead of improving them. Slow the rep down and earn the finish position.
- Losing Body Tension: On the bodyweight version, sagging hips turns the set into a broken chain. Stay rigid from shoulders to heels.
How to Make Smith Machine Face Pulls Easier or Harder
Progression is simple once you know what changes the movement. You do not need to guess, because bar height, body angle, pause length, and band tension all change the difficulty in predictable ways.
- Easier: Raise the bar, bend the knees, shorten the range, or use a lighter band. These options help you learn the right elbow path before the movement gets demanding.
- Harder: Lower the bar, straighten the legs, elevate the feet, add a longer pause, or slow the lowering phase. These changes usually work better than forcing sloppy reps with bad body position.
How to Fit This Exercise into Your Routine
Smith machine face pulls work well at the start of an upper body session, in the middle of a back workout, or at the end of a pressing day. The best slot depends on whether you want activation, clean volume, or fatigue resistant upper back work.
- Warm Up: Do 2 sets of 12 to 15 banded reps before pressing. This is usually the best option for lifters who want a cleaner shoulder position before benching or overhead work.
- Main Accessory: Do 3 sets of 8 to 12 bodyweight reps after rows or pull ups. This works well when you want more upper back strength and strict control.
- Finisher: Do 2 to 3 sets of 15 to 20 banded reps with a pause. Higher reps are useful when the goal is quality contraction, not maximal loading.
Who Should Use Smith Machine Face Pulls
This exercise is a strong fit for home gym users, lifters who do a lot of pressing, and anyone who wants more rear delt and upper back volume without complicated setup. It is also useful for beginners who want a repeatable pulling pattern they can scale with simple equipment changes.
Safety Tips
Smith machine face pulls should feel challenging, but they should not create sharp joint pain. Stop the set if you feel pinching at the front of the shoulder, sudden wrist pain, or neck strain that does not improve with lighter tension and cleaner form.
FAQs
Can a Smith machine face pull replace cable face pulls?
Yes. A Smith machine face pull can replace cable face pulls when you do not have a cable station, but the match depends on the variation. The banded version feels closer to the classic cable pattern, while the bodyweight version behaves more like a high inverted row with extra torso tension.
What muscles does a Smith machine face pull work?
Smith machine face pulls mainly train the rear delts, mid traps, lower traps, rhomboids, and upper back stabilizers. The banded version also adds more shoulder external rotation demand, while the bodyweight version asks your glutes, abs, and torso to stay rigid throughout the set.
How high should I pull during a Smith machine face pull?
Pull toward your forehead, eyes, or upper face, not your chest. A high finish keeps the elbows wide and shifts more of the work toward the rear delts and upper back, while a low finish usually turns the movement into a more standard row.
Is the banded Smith machine face pull better than the bodyweight version?
Yes. The banded Smith machine face pull is usually the better choice if you want a truer face pull feel and freer hand motion. The bodyweight version is better when you want more loading, more full body tension, and a stronger progression path over time.
How do I make a Smith machine face pull easier or harder?
Make it easier by raising the bar, bending your knees, or using a lighter band. Make it harder by lowering the bar, slowing the lowering phase, pausing at the top, elevating your feet, or choosing a band that lets you finish with strong control.
Why do I feel Smith machine face pulls more in my biceps than my upper back?
No. If your biceps dominate the rep, your setup or elbow path usually needs work. Use a wider grip, pull higher, drive the elbows out and back, slow the rep down, and think about squeezing the upper back instead of curling with the arms first.
Final Thoughts
Smith machine face pulls are worth using when your home gym does not include a dedicated cable face pull setup. Start with the version you can control best, master a high elbow path and a clean finish, then progress range, angle, and tempo before you chase harder variations.
Disclaimer. This article is for general education only and is not medical advice. If you have current shoulder, neck, elbow, or wrist pain, a recent injury or surgery, numbness, tingling, unexplained weakness, or dizziness, speak with a qualified clinician before trying these exercises.
References
- Chang MC, Choo YJ, Hong K, Boudier-Revéret M, Yang S. Treatment of Upper Crossed Syndrome: A Narrative Systematic Review. Healthcare. 2023;11(16):2328. doi:10.3390/healthcare11162328
- Youdas JW, Kleis M, Krueger ET, Thompson SG, Walker WA, Hollman JH. Recruitment of Shoulder Complex and Torso Stabilizer Muscles With Rowing Exercises Using a Suspension Strap Training System. Sports Health. 2021;13(1):85-90. doi:10.1177/1941738120945986
- Fennell J, Phadke CP, Mochizuki G, Ismail F, Boulias C. Shoulder Retractor Strengthening Exercise to Minimize Rhomboid Muscle Activity and Subacromial Impingement. Physiother Can. 2016;68(1):24-28. doi:10.3138/ptc.2014-83
- Ha SM, Kwon OY, Cynn HS, Lee WH, Kim SJ, Park KN. Selective Activation of the Infraspinatus Muscle. J Athl Train. 2013;48(3):346-352. doi:10.4085/1062-6050-48.2.18
- Schory A, Bidinger E, Wolf J, Murray L. A Systematic Review of the Exercises That Produce Optimal Muscle Ratios of the Scapular Stabilizers in Normal Shoulders. Int J Sports Phys Ther. 2016;11(3):321-336.


