


The Smith machine shoulder press is a safe and effective way to build muscle, improve your posture, and make your upper body stronger, all while keeping your form locked in and your confidence high. You don't have to fight with wobbly barbells or wait for a spotter to get strong, sculpted shoulders.
Because the bar path is guided, you can focus on pressing mechanics, consistent reps, and progressive overload without balancing a free barbell.
Have you ever wondered if your shoulder press form is keeping you from getting stronger? The Smith machine takes the guesswork out of it so you can focus on what really matters: getting stronger, lifting heavier, and pressing smarter. Let's go over how to master this move so you can get a lot stronger in your next shoulder workout.
If your Smith machine is angled instead of perfectly vertical, your “best” bench position and bar path will feel slightly different, so use the setup cues below rather than forcing a one size fits all position.
Benefits of the Smith Machine Shoulder Press
The Smith Machine Shoulder Press is a prime exercise for building full, rounded shoulders. If you're a beginner who wants to start from the ground up with a movement pattern that just about everyone can feel safe doing.
It is also a strong option for lifters who train alone and want a reliable way to press with safeties in place.
For an experienced lifter looking for small ways to clean up and tweak their pressing form, this movement gives you many benefits that add to strength (and safety), including muscle growth.
Enhanced Stability and Safety
The Smith machine's fixed rail system keeps the bar moving in a straight line, so you can concentrate on pressing power instead of balance. This built-in stability makes it less likely that you'll drop the bar or get out of alignment, which makes it a safer choice, especially when you're lifting heavy weights or working out without a spotter.
Set the safety stops just below your lowest comfortable position so a missed rep ends safely.
Targeted Muscle Activation
The Smith machine shoulder press lets you better isolate the deltoids, triceps, and upper chest by getting rid of unnecessary stabilizers. This targeted muscle recruitment makes it easier to get balanced shoulder development and increase muscle size in the areas that matter most.
Perfect for Beginners and Injury Recovery
For novices or for people re-entering lifting after an injury, the Smith machine is a safe and user-friendly environment. It teaches you correct pressing mechanics and reduces joint stress.
If you are returning from an injury, keep the range of motion pain-free, start light, and progress gradually, since a fixed bar path is not automatically “pain-proof” for every shoulder.
Easier Progressive Overload
A 2023 study found that machine-based exercises (like those on a fixed path) allow higher loads to be lifted compared to free-weights, due to increased stability[1]. You don't have to worry about stabilizing it. This makes the Smith machine a great tool for progressive overload, which is an important part of gaining muscle, strength, and overall performance.
Use small jumps first, such as 2.5–5 lb per side, and only increase load when all reps look the same.
Consistency Across Workouts
Because the machine is stable, each rep follows the same motion pattern. This lets you focus on keeping your form consistent and tracking your progress. This predictability is very important for keeping track of progress and improving technique over time.
Improved Shoulder Health and Function
A stronger shoulder press means better posture, stronger joints, and more functional strength in everyday life. The Smith machine shoulder press helps you move and feel better both in and out of the gym by making you more stable and lowering the risk of injury.
Good pressing form also reinforces strong scapular control, which supports comfortable overhead motion during training and daily tasks.
How to Master the Smith Machine Shoulder Press
Read on, and you will get to learn how to do the Smith machine shoulder press properly and safely, build strong shoulders, and build overall upper body strength!
Get Ready
Set the Smith machine bar at an appropriate height, then double-check that your bench or seat is in place underneath for proper shoulder alignment. Make certain there is a little room around you for a full range of activity without limitation.
Quick setup checklist (30 seconds):
- Bench angle: Set the back pad close to upright, around 75–85°, so the press stays shoulder-focused without excessive back arching.
- Bar height: Set it so you can unrack with elbows slightly in front of your torso, without shrugging.
- Safeties: Set them just below your lowest comfortable bar position.
- Rail style: If your Smith is angled, slide the bench slightly so the bar travels over mid-foot and stays stacked over your wrists and elbows.
Warm-up (2–4 minutes):
- 8–12 band pull-aparts or cable face pulls
- 8–12 scapular wall slides
- 1–2 lighter ramp-up sets before your first working set
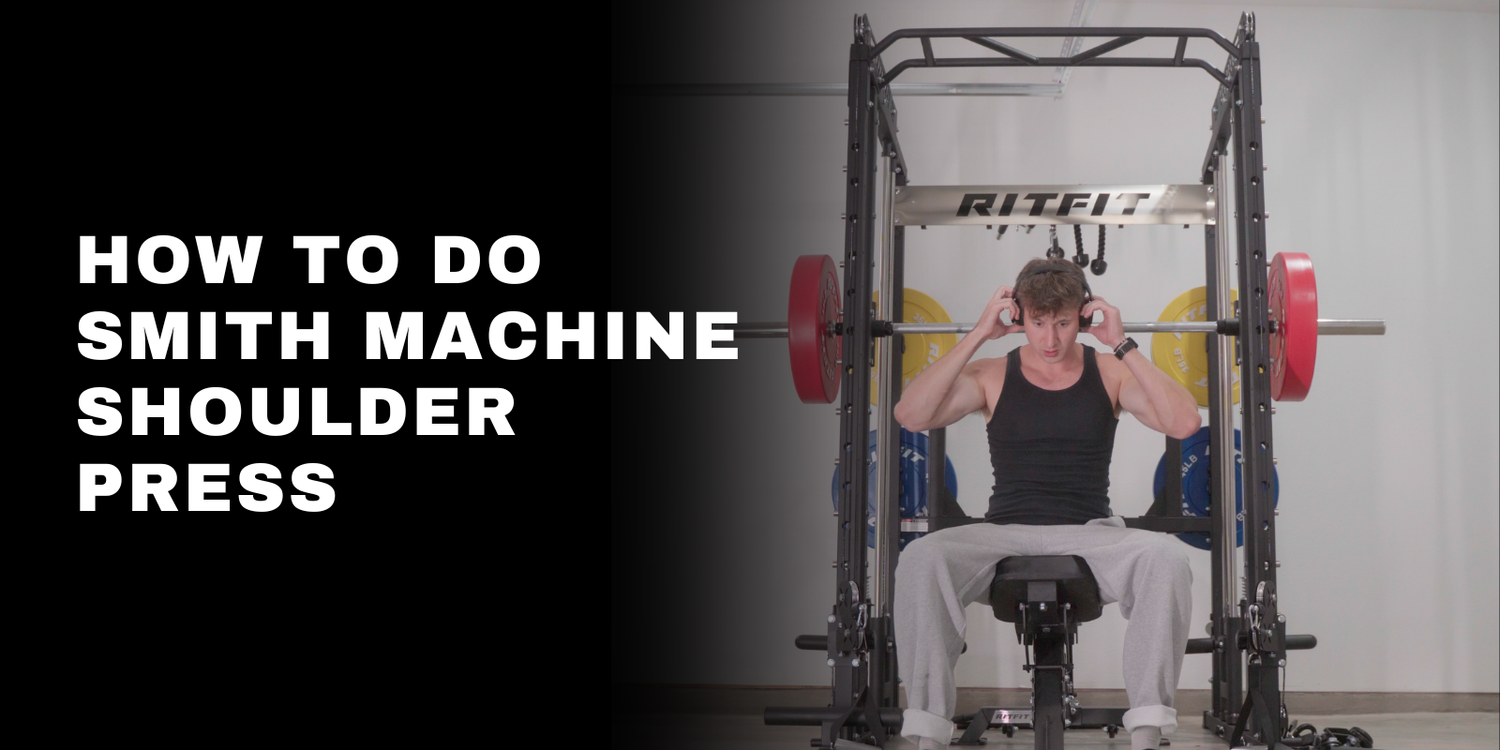
Step 1: Take Your Starting Position
Position: Sitting on the bench with your back pressed comfortably against the support and feet on the floor. Take the bar with a shoulder-width grip and palms facing forward, and have your elbows very slightly bent.
Keep your wrists stacked over your elbows, and keep your elbows slightly in front of the bar (not flared straight out to the sides).
Step 2: Unrack the Bar
Rotate the hooks to unrack, then bring the bar to your start position around upper chest to chin level, where your forearms stay close to vertical.
Stabilize your head, back, and core before you press.
Think “ribs down, glutes tight, brace,” so you press with your shoulders instead of your lower back.
Step 3: Press Overhead
Lift the bar up in a controlled manner until your arms are straight above your head. Don't lock your elbows too tightly; slight bending is good to avoid any jarring on your joints.
Finish with the bar over your upper chest and shoulders, roughly in line with your ears, and avoid shrugging hard at the top.
Step 4: Lower the Bar
Lower the barbell slowly until your arms are level with your shoulders. Concentrate on controlled movement; do not allow the bar to roll too far forward or backward.
Lower to your lowest pain-free point, typically to chin level or just below, while keeping your wrists stacked and your elbows slightly forward.
Step 5: Repeat and Progress
Do as many of these exercises as you can with perfect form. Add more weight or sets as you become stronger and more comfortable.
Use a simple progression rule: when you hit the top of your rep range for all sets with solid form, increase the load next session.
Starter programming:
- Muscle growth: 3–4 sets of 8–12 reps, rest 60–120 seconds
- Strength focus: 4–6 sets of 3–6 reps, rest 2–3 minutes
- Beginner: 2–3 sets of 10–15 reps, stop with 1–2 reps in reserve
This structure keeps the movement controlled, repeatable, and shoulder-focused, so you can train hard while staying consistent.
What Muscles Does The Smith Machine Shoulder Press Work?
The Smith machine shoulder press is a great way of working your shoulders and arms all at once, promoting strong, stable, and big muscles.
Primary Muscles:
Deltoids
The shoulder press primarily trains the deltoids (front, side, and rear portions), with the front and side delts doing most of the work as you drive the bar overhead.Research shows that the shoulder press exercise elicits higher activation of the anterior and medial deltoids compared to bench press and fly movements[2].
Triceps
The triceps help to extend your elbows as you press. Active engagement with them helps drive the bar up while keeping control, which adds definition to your arms.
Upper chest and clavicular fibers
Although it's not the main mover, the upper chest also plays a role with your shoulders in the press. This synergistic activation provides an overall fuller upper-body aesthetic and promotes shoulder stability.
Accessory Muscles:
Rotator cuff
The rotator cuff helps stabilize the shoulder joint so your deltoids can produce force with better control.
A stronger, well-coordinated cuff supports smoother reps and can help reduce unwanted shoulder “pinching” during pressing.
Core and upper back
Presses need a solid base, and that starts with a tight core and strong upper back. These muscles help maintain your spine in the correct position and enable you to safely generate more strength, particularly when lifting heavier loads.
Forearms and grip
This is often a gripping exercise, with forearms holding and controlling the bar. A solid hand placement helps keep the bar stable and eliminates unnecessary stress at the elbows and wrists.
If you know which muscles are involved in the Smith machine shoulder press, then your training efforts can be better directed to maximize shoulder development. This information also assists with form correction and injury prevention, along with making each rep count.
Common Mistakes to Avoid
Mastering the Smith machine shoulder press means knowing not just what to do, but also what to avoid to keep your shoulders safe and strong.
Arching the Back Excessively
Hunching forward or arching your back causes unnecessary strain on the spine, neck, and shoulders. During the press, keep your core tight and your lower back down to uphold proper alignment.
According to a 2010 study, insufficient core stability during overhead lifts can lead to compensatory movements such as excessive lumbar extension (arching the back), increasing injury risk[3].
If you feel your ribs popping up, lower the load, tighten your brace, and keep your glutes lightly squeezed against the bench.
Flaring Elbows Too Wide
Excessive elbow flaring can worsen the risk of shoulder impingement. Elbows stay a bit in front and under the bar for safe, efficient muscle engagement.
Aim for elbows about 30–45° in front of your torso rather than directly out to the sides.
Dropping the Bar Too Quickly or Too Low
Bringing the bar down rapidly or below your chin decreases stability and may compromise the shoulder joint. Control your motion and do not drop the bar all the way down to your eyes; get it just far enough so that you can be fully focused on it.
Slow the lowering phase to about 2–3 seconds and stop where your shoulders still feel strong and stable.
Looking Up or Forward Incorrectly
Holding your head down too much or looking far ahead puts the neck into an uncomfortable and unnatural position. Maintain a neutral head position (only a slight tuck of the chin) to prevent strain.
Keep your eyes forward and your neck long, as if making a “double chin” gently.
Applying Too Much Pressure Without Control
Lifting excessively heavy without good form will squash your gains and spike your injury risk. Concentrate on smooth, controlled pressing up to a safe limit of range of motion rather than lifting the maximum amount of weight possible each set.
A good default is to finish most sets with 1–2 reps in reserve, especially if you train alone.
Neglecting Shoulder Engagement
Failing to engage your shoulder may cause the work to transfer over to your chest or triceps. Pay attention to the feel of the shoulder muscles contracting both on the way up & down; full rotation motion for best results. These simple tweaks will eliminate mistakes and allow you to have safe, strong, and balanced shoulders.
Think “drive up and slightly back,” keeping the bar stacked over your wrists and elbows the whole time.
Technique Tips for an Effective Shoulder Press
Learning how to do a shoulder press on the Smith machine is about more than simply setting up and getting going. This exercise, done incorrectly, can be dangerous, but with the proper form, you'll not only keep your shoulders safe but also engage your deltoids effectively.
Feet Position
Plant your feet flat and slightly behind your knees so you feel stable and can keep light leg drive without lifting your hips.
If your bench is narrow or you feel wobbly, widen your stance a little and keep your heels down.
Bar path
The bar should move in a straight line, directly above the face or slightly out in front of it, to avoid undue stress on the shoulders and ensure a 90-degree angle. Do not allow the bar to move forward or backward very much.
Use the “stack” cue: wrists over elbows, elbows under the bar, bar over your upper chest and shoulders.
If your Smith machine is angled, the bar may travel slightly forward or back, so adjust the bench position until the stack still feels natural.
Grip Width
Use a grip just wider than shoulder-width to work your deltoids effectively and minimize wrist/elbow stress. Ease if necessary to be comfortable and make pressing easy.
If your wrists bend back, narrow your grip slightly and squeeze the bar hard to keep the wrist neutral.
Core Activation
Contract your core at all times during the press to protect your back and keep it from arching too much. This promotes better balance and minimizes the chances of injury.
Exhale through the sticking point, then inhale as you lower, keeping the brace consistent.
Head and Elbow Position
Maintaining a neutral head position, a slightly forward position of the elbows (not flared elbows) can be very effective to help protect the shoulder joint in overhead movements. Make sure to keep your elbows under the bar every step of the way.
If you feel shoulder pinching, try a slightly more forward elbow position and shorten the bottom range by 1–2 inches.
Controlled Reps
Don't try to jerk or bounce the bar; bring it down smoothly and control each rep. Breathe out as you press the bar up and breathe in as you lower it for more muscle engagement.
A simple tempo that works for most lifters is: lower 2–3 seconds, press up 1–2 seconds, no bouncing.
Smith Machine Shoulder Press vs Smith Machine Overhead Press
Bar Path and Pressing Angle
The slightly forward bar path is a characteristic of the Smith machine shoulder press and helps to keep your elbows under the bar, so you limit shoulder wear and tear.
On the other hand, a lot of lifters do a more vertical bar path on the Smith machine overhead press, which may stimulate all-around deltoid stimulation but can be tough on your shoulder joint if form isn't perfect.
In practice, the “best” path is the one that keeps the bar stacked over your wrists and elbows without pain, especially on angled-rail Smith machines.
Grip Width and Position
The shoulder press grip is typically narrower, meaning slightly outside shoulder-width, to really hit those anterior delts hard. The grip for the overhead press can be slightly wider or more neutral to engage the delts more fully and enhance overhead mobility.
Range of Motion
Perhaps the most effective coaching of the traditional shoulder press you often hear is to "cease at eye level or top," which keeps safety in mind and promotes control through shoulder engagement.
For many lifters, stopping around chin level on the way down is a shoulder-friendly default, then pressing to a stable lockout without overextending the low back.
The Overhead Press: This generally brings the bar all the way overhead, which helps to maximize activation of your upper shoulders and triceps, but you're sacrificing a little stability and mobility at the shoulder.
Muscle Emphasis
The shoulder press hits the anterior and medial delts without involving your lower back. Overhead press hits more upper chest, traps, and core, along with all three heads of the delts, giving a full upper body workout.
If you want more delt isolation, keep the bench more upright and keep the ribs down; if you want more whole-body challenge, the overhead press style can be a better fit.
Safety and Joint Stress
The Smith machine shoulder press is often safer for novice trainees and lifters working around injuries, as the bar path is fixed and the range of motion shortened.
If pain shows up, do not push through it; reduce load, adjust range of motion, and consider switching to dumbbells or a neutral-grip press.
The overhead press, while effective for strength and size, requires focus on form to keep excessive pressure off the shoulders and lower back.
Practical Application in Training
Leverage the shoulder press for high-rep 'tension' and form mastery to build big shoulders. It is a great exercise to develop overall pressing strength, increase full-body stability with overhead movements, and prepare the body for lifting free weights on other lifts.
A simple weekly plan is to use the Smith shoulder press for controlled hypertrophy work, then add dumbbell presses or lateral raises for extra volume.
Both variations have their own advantages, and using them in a strategic manner may develop stronger shoulders with minimal risk of injury.
Final Thoughts
The shoulder press on the Smith machine is a safe, efficient way to increase shoulder strength and development while improving upper body posture and stability. It ensures even muscle development and allows you to access your maximum strength at all times by specifically targeting deltoids, triceps, and the upper chest.
For best results, keep the reps controlled, set the safeties, and progress with small load jumps only after your form stays consistent.
Advantages of the Smith machine: Using a Smith machine limits your risk for injury, helps you maintain proper form, and allows for easy progression into higher-weight amounts, which is great for both beginner and advanced weightlifters.
FAQs
References
- Haugen ME, Vårvik FT, Larsen S, Haugen AS, van den Tillaar R, Bjørnsen T. Effect of free-weight vs. machine-based strength training on maximal strength, hypertrophy and jump performance - a systematic review and meta-analysis. BMC Sports Sci Med Rehabil. 2023;15(1):103. Published 2023 Aug 15. doi: 10.1186/s13102-023-00713-4
- Campos YAC, Vianna JM, Guimarães MP, et al. Different Shoulder Exercises Affect the Activation of Deltoid Portions in Resistance-Trained Individuals. J Hum Kinet. 2020;75:5-14. Published 2020 Oct 31. doi: 10.2478/hukin-2020-0033
- Behm DG, Drinkwater EJ, Willardson JM, Cowley PM. The use of instability to train the core musculature. Appl Physiol Nutr Metab. 2010;35(1):91-108. doi: 10.1139/H09-127
