


Table of Contents
The upper back and biceps do much more than make your T-shirt sleeves look fuller. Strong pulling muscles help you carry groceries, climb, row, and stabilize your shoulders during everyday life.
Chin-ups are one of the most efficient bodyweight exercises to build your lats, biceps, and grip strength, yet many lifters either avoid them or feel stuck at “zero reps.”
If you already enjoy chin-ups, you probably use them regularly as a benchmark for strength. If you are a beginner, you might feel intimidated by the movement or confused about where to start.
This guide will walk you through what a chin-up is, how to perform it with safe technique, which muscles it trains, common mistakes to avoid, useful variations and alternatives, plus simple progressions and sample workouts so you can finally add chin-ups to your routine with confidence.
What is a Chin Up?
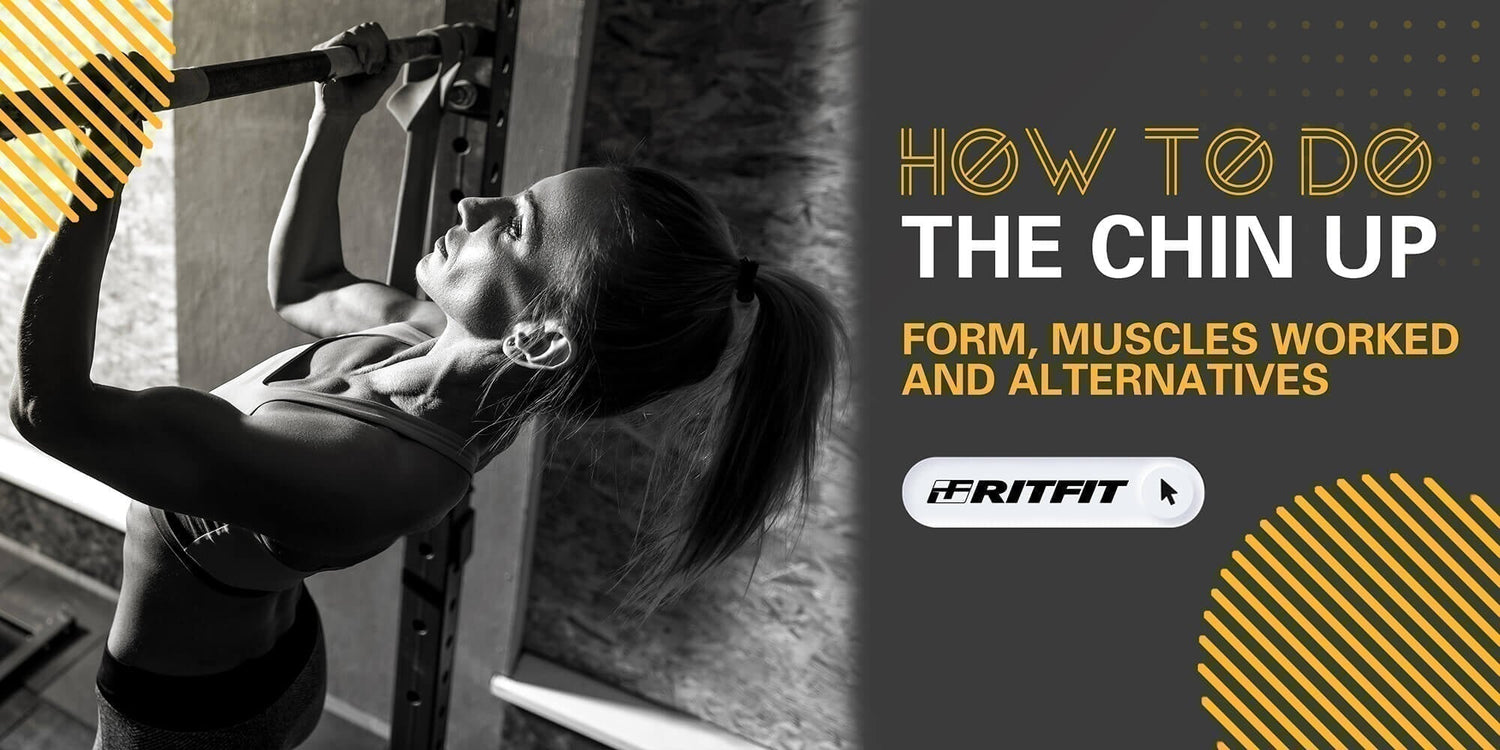
A chin-up is a bodyweight pulling exercise performed by hanging from a bar and pulling your body up until your chin reaches or slightly passes the bar. The defining feature is the supinated grip, which means your palms face toward you. This grip usually feels stronger for many people and often makes it easier to start learning the movement.
Because the palms face you and the grip is usually around shoulder width, chin-ups place a big emphasis on the biceps and the lower portion of the lats while still training the entire upper back and core.Chin-ups elicit significantly higher biceps brachii activation than pull-ups, while latissimus dorsi activation remains high in both variations[1].
By contrast, a pull-up uses a pronated grip, where your palms face away from you. This small change in grip position shifts the emphasis slightly more toward the upper back and lats and a little less toward the biceps, even though both exercises work very similar muscle groups.
Chin Up Form and Technique
How to Do a Chin Up
Follow these step-by-step instructions to perform a standard chin-up with safe and effective technique:
Step 1: Set your grip and body position
Stand under the bar and grab it with a supinated grip that is shoulder-width or a little narrower, with your palms facing you. To keep yourself safe, wrap your thumbs around the bar. Let your body hang freely, with your arms straight, your feet slightly in front of you, and your ribs stacked on top of your pelvis.
Step 2: Set your shoulders first
Before you start pulling, gently pull your shoulders down and back, as if you are trying to move them away from your ears. This little "shoulder set" works your scapular muscles and keeps your shoulder joints safe.
Step 3: Brace your core
Squeeze your glutes lightly, keep your legs together or slightly bent, and brace your abs as if someone is about to poke your stomach. This keeps your legs from swinging and puts your body in a stable "hollow" position.
Step 4: Pull your body toward the bar
Pull your chest toward the bar while pushing your elbows down toward your ribs. Instead of your chin, think about leading with your chest. Don't push your head forward; keep your neck straight.
Step 5: Reach the top and pause
Keep pulling until your chin is clearly above the bar or your upper chest touches it, depending on how comfortable your shoulders are. Stop for one or two seconds at the top and squeeze your biceps and back.
Step 6: Lower under control
Lower yourself slowly back to the starting dead hang position, maintaining control the whole way down. Aim for about two to three seconds on the way down. Do not simply drop. Once your arms are straight again and your shoulders are still active, start the next rep.Evidence confirms that eccentric-only training (negatives) can generate higher muscle tension than concentric training, building the strength required for full reps[2].
Quality is more important than quantity. It is better to perform three to five controlled reps with good form than to rush through ten sloppy reps that stress your shoulders and elbows.
Chin Up Progression for Beginners
If you cannot yet perform a full chin-up, use this simple progression to build strength safely. Treat it as a guideline and adjust the difficulty up or down based on how your body feels.
Phase 1: Dead hangs and scapular pulls (1–3 weeks)
- Dead hangs: 3 sets of 15–30 seconds
Hang from the bar with your chosen grip, keep your shoulders gently pulled down, and practice breathing while staying tight. - Scapular pulls: 3 sets of 6–10 reps
From a dead hang, perform small “shrugs” by pulling your shoulders down and slightly back without bending your elbows. This teaches you to engage your upper back before pulling.
Phase 2: Negative chin-ups (2–4 weeks)
- Use a step or bench to start at the top position with your chin over the bar.
- Slowly lower yourself for three to five seconds until your arms are straight.
- Perform 3–5 sets of 3–5 controlled negatives, resting well between sets.
Phase 3: Assisted chin-ups (bands or machine)
- Attach a resistance band to the bar and place one or both feet in the loop, or use an assisted pull-up machine.
- Perform 3–4 sets of 4–8 reps where you could still do one or two more reps with good form. Increase difficulty by using a lighter band or less assistance over time.
Phase 4: Full chin-ups
- Start sessions by attempting one or two sets of as many clean bodyweight chin-ups as you can perform without cheating.
- After these “test sets,” finish your volume with assisted or negative reps so you continue building strength without overstraining your joints.
Most people will move back and forth between phases depending on sleep, stress, and overall fatigue. That is normal. Progress is rarely perfectly linear, so focus on consistent practice and good technique.
Chin Up Common Mistakes to Avoid
Not Going Full Range
A common mistake is using only part of the available range of motion. Many lifters stop the pull well before their chin reaches the bar or they fail to fully straighten their arms at the bottom. This limits muscle activation and long-term progress.
Aim to straighten your arms at the bottom without letting your shoulders collapse, then pull until your chin clearly passes the bar or as high as your shoulders comfortably allow. Fewer high-quality reps with full range will build more strength and muscle than many half reps.
Not Engaging Your Shoulders
Chin-ups heavily involve your scapular and shoulder stabilizing muscles. If you start from a passive, shrugged dead hang and immediately yank yourself up with your arms, the load shifts toward the tendons and joints instead of the muscles that should be doing the work.
Always think “shoulders down and back” before you start pulling. Picture sliding your shoulder blades into your back pockets. This small adjustment can dramatically improve your power, shoulder comfort, and long-term joint health.
Not Engaging Your Core
When the core is relaxed, the legs swing forward and backward, turning a strict chin-up into a kipping version that is harder to control and less effective for muscle growth. Excessive swinging also increases stress on the lower back and shoulders.
Keep your ribs stacked over your pelvis, lightly squeeze your glutes, and maintain tension in your abs. You can imagine holding a gentle plank position while you move up and down. If you still swing, shorten your range of motion slightly or regress to band-assisted or negative reps until you can control the movement.
Chin Up Muscles Worked
The chin-up is a challenging exercise that involves multiple muscles simultaneously. Let's look at all the muscles involved in the process.
Trapezius

The trapezius muscles, often called “traps,” support and stabilize your shoulder blades during the chin-up. The upper, middle, and lower portions of the traps work together to keep your shoulders in a safe position while you pull your body upward. Well-trained traps are important for posture, shoulder health, and overall upper back strength.
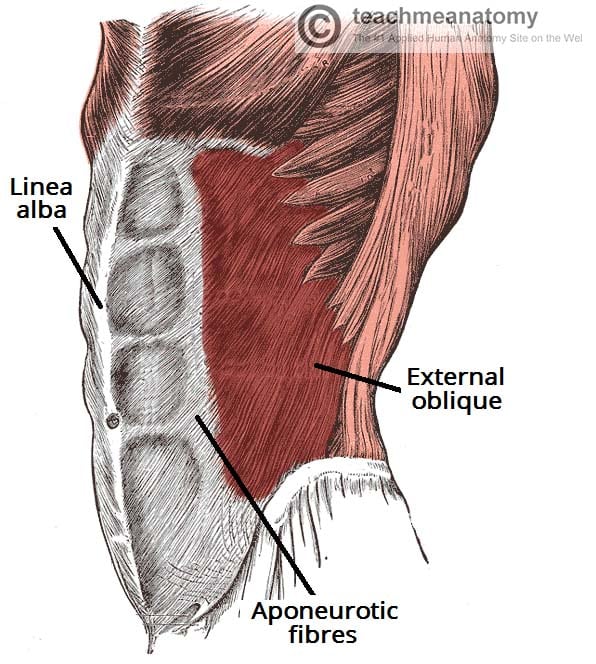
Latissimus Dorsi

The latissimus dorsi, or “lats,” are the large muscles that give the back its V-shape. They play a major role in pulling your arms down and in toward your body, which is exactly what happens during a chin-up. Because the grip is supinated and usually shoulder-width, some people feel slightly less lat involvement compared with wide-grip pull-ups, but the lats are still heavily engaged and remain one of the primary drivers of the movement.
Biceps

The biceps are strongly activated in chin-ups because the palms-up grip places them in a very favorable mechanical position. This is why chin-ups often feel more “bicep-heavy” than traditional pull-ups. While the lats and upper back are still doing a lot of work, the biceps contribute significantly to elbow flexion and can grow very well when chin-ups are trained consistently. For many lifters, chin-ups are an efficient compliment or even a partial replacement for traditional biceps curls.
Abdominals
Your abdominal muscles, including the deeper core muscles, work isometrically during chin-ups to keep the torso stable and prevent your legs from swinging. Even though you are not bending or twisting your spine, the core must stay active to maintain that solid “hollow” position. If you consciously brace your abs, you will likely feel a significant core challenge by the end of a set, especially on slower, controlled reps.
Chin Up Variations
Assisted Chin Up
Assisted chin-ups reduce the amount of bodyweight you need to lift so you can practice full-range reps with good form. You can use an assisted chin-up machine, a resistance band attached to the bar, or a partner gently supporting your legs.
- Step 1: Set the level of assistance so that you can complete at least three to five smooth reps without straining or losing form.
- Step 2: Place your knees or feet on the pad or band, grab the handles or bar with a supinated grip, and set your shoulders down and back.
- Step 3: Pull yourself up until your chin reaches bar height while keeping your core braced and your body stable. Pause briefly at the top.
- Step 4: Lower yourself slowly back to the starting position. Increase difficulty over time by reducing assistance or using a lighter band.
Weighted Chin Up
Weighted chin-ups are an advanced variation used once you can perform at least eight to ten strict bodyweight reps. Adding weight challenges your back and biceps further and is excellent for building maximal strength.
- Step 1: Attach plates to a dip belt, hold a dumbbell between your feet, or use a weight vest. Start with a light load to test comfort and form.
- Step 2: Grip the bar with a shoulder-width supinated grip, set your shoulders, and brace your core.
- Step 3: Pull yourself up under control, aiming to bring your chin above the bar or your upper chest to the bar if your shoulders tolerate it well.
- Step 4: Lower slowly back to a strong dead hang, maintaining tension so the added weight does not pull you into a loose, unstable position.
Negative Chin Up
Negative chin-ups focus on the lowering portion of the movement and are one of the best ways to build strength if you cannot yet complete full reps.
- Step 1: Use a bench, box, or low bar setting to start at the top position with your chin over the bar and your shoulders engaged.
- Step 2: Brace your core and slowly lower yourself, taking at least three to five seconds to reach the bottom dead hang.
- Step 3: Gently step back onto the support or the ground, reset your shoulders, and repeat.
- Step 4: Perform multiple low-rep sets, stopping the set if your form or lowering speed starts to break down.
Close Grip Chin Up
Close-grip chin-ups are performed with the hands placed closer than shoulder width, sometimes only a few inches apart. This grip often increases biceps involvement and can feel slightly different on the shoulders and wrists.
- Step 1: Jump or step up to grab the bar with a narrow supinated grip and your thumbs almost touching.
- Step 2: Keep your body straight, brace your core, and pull yourself up, focusing on driving your elbows down in front of your torso.
- Step 3: Pause briefly at the top, then lower with control. Use this variation if it feels comfortable on your joints and you want extra emphasis on your arms.
Neutral Grip Chin Ups
Neutral grip chinups are usually performed to focus entirely on your back while keeping the contribution of other muscles to a minimum. Here's how to perform this movement accurately.
- Step 1: Hold the bar in a neutral rather than a supinated grip. In a neutral grip, your palms face inwardly.
- Step 2: Pull your body up using your back and arms. Make sure you focus on your back throughout the movement.
- Step 3: Hold a few seconds on top of the movement and bring your body down
- .Step 4: Start again and do the maximum possible repetitions.
Chin Up vs Pull-Up
Chin-ups and pull-ups look very similar from the outside, but the grip difference creates subtle changes in muscle emphasis and difficulty. Understanding these differences helps you choose the best option for your goals.
What is a Pull-Up?
A pull-up is another vertical pulling exercise where you hang from a bar and pull your body upward. The key difference is that you use a pronated grip, with your palms facing away from you. This usually places a bit more emphasis on the upper back and lats and a bit less on the biceps compared with chin-ups.
Similarities between Chin Ups & Pull Ups
- Both require a sturdy bar that can support your full bodyweight.
- Both are upper-body pulling exercises that train your lats, upper back, biceps, forearms, and core.
- Both benefit from a full range of motion and controlled tempo for strength and muscle growth.
- Both are demanding and often used as a test of upper-body relative strength.
Differences between Chin Ups & Pull Ups
- Grip: Chin-ups use a supinated, palms-toward-you grip, while pull-ups use a pronated, palms-away grip.
- Muscle emphasis: Chin-ups tend to emphasize the biceps and lower lats slightly more, whereas pull-ups place a bit more emphasis on the upper back and mid-to-upper lats.
- Perceived difficulty: Many beginners find chin-ups a little easier because the supinated grip often allows a stronger pulling position and more biceps assistance.
- Joint comfort: Some people feel more comfortable performing neutral or chin-up grips if they have a history of shoulder issues, while others prefer the feel of a pronated pull-up. Individual anatomy matters.
Chin Up vs Pull Up Muscles
Both exercises train nearly the same muscle groups. Chin-ups usually feel more arm-dominant because the biceps are heavily involved. Pull-ups often feel more “back-dominant” because the wider, palms-away grip challenges the lats and upper back in a slightly different way. For balanced development, many lifters benefit from including both over the course of a training cycle.
Chin-Up vs Pull-Up Technique
If you mix up the technique of chin-ups and pull-ups, you may overload certain joints, reduce muscle activation, or stall your progress. Use these simple cues to keep both movements clean and effective.
Chin-up technique recap:
- Grab the bar with a shoulder-width supinated grip and set your shoulders down and back.
- Brace your core, keep your body stable, and pull your chest toward the bar until your chin clearly passes it.
- Pause briefly at the top, then lower slowly back to a strong, active dead hang.
Pull-up technique recap:
- Grab the bar with a shoulder-width or slightly wider pronated grip.
- Allow your body to settle into a controlled dead hang, then set your shoulders and brace your core.
- Pull your chest toward the bar, keeping your body straight and avoiding excessive swinging.
- Lower under control until your arms are straight again before starting the next rep.
Chin Up Alternatives
If you are not yet ready for chin-ups, or if you want to add extra pulling volume without overtaxing your joints, these alternatives can help build similar strength and muscle patterns.
Inverted Rows
Inverted rows train the upper back, rear delts, and core with your feet on the floor, making them more accessible than full chin-ups. They are especially useful for beginners and for home gyms with a bar or Smith machine.
How to perform an inverted row:
- Set a bar in a rack or Smith machine at about hip height. Lie underneath it with your heels on the floor and your body in a straight line from head to heels.
- Grab the bar with an overhand or underhand grip, slightly wider than shoulder width, and set your shoulders down and back.
- Pull your chest toward the bar, squeezing your shoulder blades together at the top.
- Lower yourself under control until your arms are straight again. Adjust the bar height to make the movement easier (more upright) or harder (closer to horizontal).
Dumbbell Rows
Dumbbell rows are a great free-weight alternative that allows you to train each side independently, which can help correct strength imbalances and improve shoulder stability.
Basic one-arm dumbbell row:
- Place one hand and the same-side knee on a bench, with your other foot on the floor and your spine in a neutral position. Hold a dumbbell in your free hand.
- Let the dumbbell hang straight down with your shoulder relaxed, then set your shoulder by gently pulling it down and back.
- Row the dumbbell toward your hip, keeping your elbow close to your body and your torso stable.
- Lower the weight slowly until your arm is straight again. Perform the desired reps, then switch sides.
Sample Chin-Up Workouts
Here are simple ways to plug chin-ups into your weekly training based on your current level. Adjust volume and frequency according to your recovery and overall program.
Beginner (working toward first full chin-up)
- 2–3 times per week
- A1: Negative chin-ups – 4 sets of 3–5 slow reps (3–5 seconds down)
- A2: Inverted rows – 3 sets of 8–10 reps
- Core finisher: Plank variations – 3 sets of 20–30 seconds
Intermediate (can do 3–8 bodyweight chin-ups)
- 2 times per week
- Day 1:
- Chin-ups – 4 sets of 3–6 reps
- Dumbbell rows – 3 sets of 8–12 reps per arm
- Day 2:
- Assisted or banded chin-ups – 3 sets of 6–10 reps
- Face pulls or rear delt work – 3 sets of 12–15 reps
Advanced (can do 8 or more strict chin-ups)
- 1–2 times per week
- Weighted chin-ups – 4–5 sets of 3–5 reps
- Bodyweight chin-up back-off set – 1 set to near-technical failure (stop when form starts to break down)
- Additional rowing work as needed to balance your program
Safety Tips and When to Avoid Chin-Ups
Because chin-ups load the shoulders, elbows, and wrists, it is important to respect your current ability and any past injuries.
- Warm up your shoulders, elbows, and wrists before heavy chin-up work. Use light band pull-aparts, scapular pulls, and easy rows to increase blood flow.
- Stop the set immediately if you feel sharp or unusual pain in the shoulder, elbow, or wrist. Muscle burn and mild fatigue are normal; stabbing or catching sensations are not.
- If you have a history of shoulder impingement, rotator cuff injury, or elbow tendinopathy, start with neutral-grip or assisted variations and progress slowly.
- Do not jump straight into weighted chin-ups if you cannot yet do strict bodyweight reps without swinging. Build a solid base first.
- This guide is for general information only and does not replace personalized medical advice. If you have ongoing joint pain or medical conditions, consult a qualified healthcare professional before starting or progressing chin-ups.
Chin Ups FAQs
Who should do the chin up?
Chin-ups are excellent for people who want stronger arms, upper back, and grip without relying only on machines or isolation work. If you can hang from a bar without pain and you are willing to start with assisted or negative variations, you are a good candidate. Those with current shoulder or elbow injuries should focus on pain-free regressions and professional guidance.
How often should I do chin ups?
Most lifters do well with chin-ups two to three times per week, depending on total training volume and recovery. Beginners may start with one to two sessions per week focusing on negatives and assisted reps, while advanced lifters might include them more frequently in different variations. Always listen to your joints and adjust if you feel excessive fatigue or soreness.
How many reps and sets should I do for the chin-up?
There is no single perfect prescription, but these general ranges work well for most people:
- Strength focus: 3–6 sets of 3–6 challenging reps
- Muscle growth focus: 3–4 sets of 6–10 controlled reps
- Skill or technique focus: several easy sets of 2–5 clean reps, staying far away from failure
How can I program chin ups into my training program?
You can treat chin-ups as a primary upper-body pulling exercise on back days, pull days, or full-body sessions. Place them near the start of your workout when you are fresh. Pair chin-ups with pushing movements like bench presses or push-ups, and add rowing and rear delt work to build a balanced upper body.
Are chin-ups bad for your shoulders?
For most people with healthy shoulders, strict chin-ups performed with good technique are safe and beneficial. Problems usually arise when people use excessive swinging, rush into heavy weighted reps, or ignore existing pain. If you already have shoulder issues, start with neutral-grip or assisted variations and stop if pain increases.
What equipment do I need for chin-ups at home?
At minimum you need a stable bar that can safely support your bodyweight, such as a doorway bar, wall-mounted pull-up bar, or a pull-up bar built into a power rack or Smith machine. Resistance bands, a sturdy bench, or an assisted pull-up machine can make progressions much easier, especially if you are just starting out.
Summary
Chin-ups are a powerful, efficient way to build upper-body strength, add size to your back and biceps, and improve your grip and shoulder stability using only your bodyweight and a sturdy bar. By learning proper technique, avoiding common mistakes, and using smart progressions, almost anyone can work toward their first clean rep.
Start with dead hangs, scapular pulls, negatives, and assisted variations, then gradually progress to full and eventually weighted chin-ups if your shoulders and elbows feel good. Combine chin-ups with rows, presses, and lower-body training, and you will have a simple, effective foundation for long-term strength and muscle gains.
References
- Youdas JW, Amundson CL, Cicero KS, Hahn JJ, Harezlak DT, Hollman JH. Surface electromyographic activation patterns and elbow joint motion during a pull-up, chin-up, or perfect-pullup™ rotational exercise. J Strength Cond Res. 2010;24(12):3404-3414. doi:10.1519/JSC.0b013e3181f1598c
- Tanimoto M, Sanada K, Yamamoto K, et al. Effects of whole-body low-intensity resistance training with slow movement and tonic force generation on muscular size and strength in young men. J Strength Cond Res. 2008;22(6):1926-1938. doi:10.1519/JSC.0b013e318185f2b0


