


The Mammoth Belt Squat is a heavy cable based belt squat setup that lets you train legs hard while placing less load through the spine than a traditional barbell back squat. It is best for home gym lifters who want quad focused strength training, controlled depth, and a rack based setup that does not require a dedicated commercial belt squat machine.
Key Takeaways
- The Mammoth Belt Squat loads the hips instead of the upper back: This makes it a strong option for lifters who want heavy leg work with reduced spinal loading.
- It is not a replacement for every squat variation: Back squats, front squats, Smith machine squats, and leg presses still offer different strength and muscle building benefits.
- Setup matters more than load: A secure belt, stable attachment point, clear cable path, and controlled stance are required before adding weight.
- The main muscles are quads, glutes, hamstrings, and calves: Stance width, depth, torso angle, and foot pressure change the training emphasis.
- A rack based home gym can make belt squats practical: The right attachment, power rack, plates, and cable path can create a compact lower body training station.
What Is the Mammoth Belt Squat?
The Mammoth Belt Squat is a high tension belt squat variation where the resistance is attached to a dip belt around the hips instead of a bar across the shoulders. The goal is to train the squat pattern with strong leg loading while reducing the need for upper back support.
In this guide, Mammoth describes a heavy home gym setup using a power rack, belt squat attachment, cable system, or plate loaded anchor. It should not be confused with a single universal machine name.
Why Belt Squats Are Useful for Home Gym Leg Training
Belt squats are useful because they let you train the lower body without placing the main load on the shoulders and spine. In a 2020 study, Joseph and colleagues found that belt squats reduced lumbar erector impulse by 45.4 percent and peak lumbar erector activation by 52.0 percent compared with parallel back squats.[1]
- Reduced spinal loading: The load hangs from the hips, which can make the movement feel more comfortable for lifters who do not want a barbell on their back.
- Strong quad stimulus: The upright torso and vertical loading path can make it easier to keep tension through the thighs.
- Lower upper body demand: Lifters with shoulder, wrist, or elbow discomfort may find the setup easier than front squats or back squats.
- Useful volume builder: Belt squats can add leg training volume after heavy squats, deadlifts, or Smith machine work.
- Home gym efficiency: A rack based attachment can save space compared with a full standalone belt squat machine.
Muscles Worked by the Mammoth Belt Squat
The Mammoth Belt Squat primarily trains the quadriceps, glutes, hamstrings, and calves. Squat biomechanics are strongly affected by stance, trunk position, joint angles, and depth, so small setup changes can shift the training emphasis.[2]
- Quadriceps: The quads extend the knees and usually receive the strongest stimulus when the torso stays upright and the knees travel forward under control.
- Glutes: The glutes extend the hips and become more involved when you reach full depth and drive up with strong hip extension.
- Hamstrings: The hamstrings assist hip extension and help stabilize the lower body during the descent and ascent.
- Calves: The calves help stabilize the ankle and maintain pressure through the foot during each rep.
- Core: The core still braces the torso, but it does not carry the same loading role as it does during a barbell back squat.
Best RitFit Setup for Belt Squats at Home
The best RitFit setup for belt squats starts with a secure rack attachment and enough open floor space to squat without the belt, chain, or cable rubbing against your body. For rack based setups, the RitFit AT03 Belt Squat Attachment is the most directly relevant option because it is built for belt squat training on compatible 2x2, 2x3, and 3x3 racks.
If you are building a larger strength station, the RitFit P3 Power Cage with Smooth Cable System can support a broader home gym training layout. You can also browse RitFit rack attachments to match your rack size, training goals, and accessory needs.
- Attachment: Use a dedicated belt squat attachment when possible because it keeps the load path more predictable than a DIY anchor.
- Belt: Use a dip belt or belt squat belt that sits low around the hips and does not ride into the lower back.
- Weight source: Use Olympic plates, a cable stack, or a plate loaded pin that moves smoothly through the full range of motion.
- Platform height: Use enough elevation so the plates or cable do not hit the floor before you reach your target depth.
- Clearance: Keep the area around your feet, belt, cable, and rack free from loose plates or accessories.
How to Set Up the Mammoth Belt Squat
Proper setup makes the belt squat safer, smoother, and easier to progress. Before loading heavy, confirm that your rack, attachment, belt, and floor space are stable.
- Step 1: Secure the attachment: Mount the belt squat attachment according to the product instructions. Check that the pins, bolts, and contact points are locked before adding weight.
- Step 2: Attach the belt low on your hips: Position the belt around the upper glutes and front of the hips. Avoid wearing it high on the waist because that can make the pull feel unstable.
- Step 3: Set your feet around the load path: Stand so the cable, chain, or loading pin travels between your legs without rubbing. Your stance should feel balanced before you begin the first rep.
- Step 4: Test the range of motion: Perform a bodyweight rep with the belt attached and no heavy load. Stop if the plates touch the floor, the cable drags, or the belt shifts.
- Step 5: Add weight gradually: Start with a light load and build only after the movement feels smooth. A clean setup matters more than chasing a heavy first set.
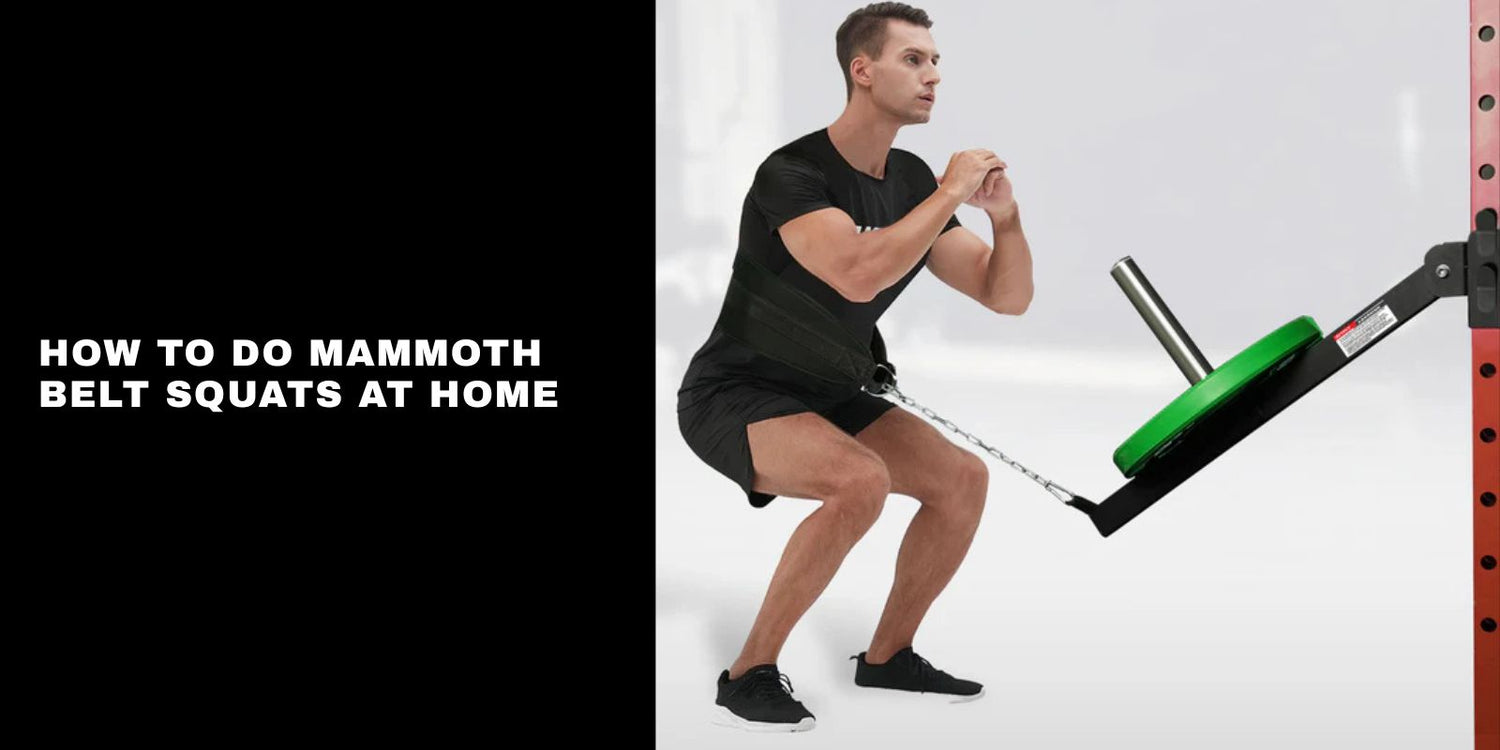
How to Do the Mammoth Belt Squat with Proper Form
The correct Mammoth Belt Squat feels like a controlled squat with the load pulling down from the hips. Keep your torso tall, feet planted, and reps smooth from top to bottom.
- Step 1: Stand tall and brace: Set your feet about shoulder width apart and brace your core before unlocking the knees. Keep your chest lifted without leaning back against the belt.
- Step 2: Descend straight down: Bend your knees and hips together while keeping pressure through the midfoot. Let the knees track in the same direction as the toes.
- Step 3: Reach a controlled bottom position: Squat to the deepest position you can control without pain or pelvic collapse. Pause briefly if you want to improve depth and position awareness.
- Step 4: Drive up through the floor: Push through the midfoot and return to standing without bouncing. Keep the belt path vertical and avoid swinging the load.
- Step 5: Reset before the next rep: Rebrace at the top and confirm that the belt is still centered. Stop the set if the attachment shifts or your stance becomes unstable.
Common Mammoth Belt Squat Mistakes
The most common belt squat mistakes come from poor setup, rushed reps, and excessive load. Fix these issues before increasing weight.
- Wearing the belt too high: A high belt position can pull on the lower back instead of loading the hips. Keep the belt low and snug around the pelvis.
- Standing too far from the load path: A forward or backward cable angle can make the movement swing. Center your body so the resistance travels vertically.
- Using too much weight too soon: Heavy loading with poor control reduces the value of the exercise. Add load only when every rep looks consistent.
- Cutting depth without purpose: Short reps may limit quad and glute stimulus. Use a range of motion that is deep enough to train the legs and controlled enough to stay safe.
- Relaxing the brace: The belt squat reduces spinal loading, but it does not remove the need for trunk control. Keep your ribs stacked over your hips throughout the set.
Mammoth Belt Squat Variations
Close Stance Belt Squat
The close stance belt squat places more emphasis on the quadriceps by increasing knee travel and keeping the torso upright. Use a controlled tempo because the narrower stance can feel less stable.
Wide Stance Belt Squat
The wide stance belt squat can shift more demand toward the glutes and adductors. Keep the knees tracking over the toes and avoid letting the arches collapse.
Paused Belt Squat
The paused belt squat builds control and strength at the bottom of the movement. Hold the bottom position for one to three seconds without relaxing into the joints.
High Rep Belt Squat
The high rep belt squat is useful for leg volume after heavy compound work. Keep the load moderate and stop the set before your form breaks down.
Belt Squat vs Back Squat
The belt squat is better for reducing upper body and spinal loading, while the back squat is better for total body bracing and barbell strength practice. Both can be valuable, but they solve different training problems.
- Choose belt squats when: You want heavy leg work with less upper back, shoulder, wrist, or spinal loading.
- Choose back squats when: You want to build barbell squat skill, total body bracing, and sport specific strength under a bar.
- Use both when: You want back squats for strength practice and belt squats for extra lower body volume.
If you also train with a Smith machine, read the Smith Machine with Cable System Complete Workout Guide for full body programming ideas. For squat specific work, the best Smith machine squat exercises guide can help you compare fixed bar squats with belt squat variations.
How to Program Belt Squats for Strength and Muscle
Belt squats work best when they support a complete lower body plan rather than replacing every leg exercise. Modern resistance training evidence supports progressive training for improving strength, muscle size, power, endurance, and physical function.[3]
- For beginners: Start with 2 to 3 sets of 8 to 12 reps. Use a light load and focus on setup, depth, and balance.
- For muscle growth: Use 3 to 5 sets of 8 to 15 reps. Add weight or reps over time while keeping tension high and technique stable.
- For strength: Use 3 to 5 sets of 4 to 8 reps. Rest longer between sets and avoid grinding every rep.
- For joint friendly volume: Use 2 to 4 sets of 12 to 20 reps after heavier squats or leg presses. Keep the load moderate and the tempo controlled.
Sample Mammoth Belt Squat Workouts
Beginner Belt Squat Workout
Use this workout to learn the movement and build baseline leg strength. Perform belt squats for 3 sets of 10 reps, Romanian deadlifts for 3 sets of 8 reps, calf raises for 3 sets of 15 reps, and planks for 3 sets of 30 seconds.
Muscle Building Leg Day
Use this workout when your goal is quad and glute hypertrophy. Perform belt squats for 4 sets of 10 to 12 reps, split squats for 3 sets of 10 reps per side, leg curls for 3 sets of 12 reps, and calf raises for 4 sets of 12 to 15 reps.
Heavy Lower Body Accessory Day
Use this workout after your main squat or deadlift day. Perform belt squats for 4 sets of 6 to 8 reps, hip thrusts for 3 sets of 8 reps, hamstring curls for 3 sets of 10 reps, and loaded carries for 4 short rounds.
How Belt Squats Fit into a Complete Home Gym
A belt squat station becomes more valuable when it connects to a broader home gym ecosystem. The same training space can support rack squats, cable work, Smith machine training, leg press movements, and free weight accessories.
For a larger all in one setup, the RitFit M1 PRO Smith Machine Weight Stack Home Gym Package can support cable based and guided bar training in one station. If your goal is more machine based leg training, the RitFit GAZELLE PRO 3 In 1 Leg Press and Hack Squat Machine offers a dedicated leg press, hack squat, and calf raise path.
For plates and loading accessories, explore RitFit barbells and weight plates to match your belt squat setup. A stable loading system helps make progressive overload easier to track over time.
Safety Tips Before You Go Heavy
Safe belt squat training starts with conservative loading and consistent setup checks. Advanced resistance training methods can support hypertrophy, but the foundation is still progressive overload, enough recovery, and repeatable technique.[4]
- Check compatibility: Confirm that your attachment matches your rack size before training.
- Inspect the belt and chain: Do not use worn straps, damaged carabiners, or unstable loading hardware.
- Warm up first: Use bodyweight squats, light belt squat reps, and controlled mobility drills before heavy sets.
- Stop for sharp pain: Muscle fatigue is normal, but sharp pain in the knees, hips, back, or ankles is not a signal to push harder.
- Progress gradually: Add weight only when your range of motion, balance, and rep speed stay consistent.
FAQs
Is the Mammoth Belt Squat better than a back squat for lower back comfort?
Yes. The Mammoth Belt Squat can feel better for lower back comfort because the load hangs from the hips instead of resting on the shoulders. It still requires bracing, controlled depth, and proper setup, so lifters with back pain should get professional guidance before training heavy.
Can beginners do Mammoth Belt Squats at home?
Yes. Beginners can do Mammoth Belt Squats at home when the setup is stable and the load is light. Start with short sets, learn the belt position, and practice a smooth vertical path before adding more plates or using harder variations.
What equipment do I need for a Mammoth Belt Squat setup?
You need a compatible power rack, a belt squat attachment or cable anchor, a secure dip belt, and weight plates. A raised platform may also help if the plates or loading pin hit the floor before you reach full controlled depth.
How heavy should I go on Mammoth Belt Squats?
Start lighter than your back squat and increase load only when your reps stay stable. Belt squats can feel easier on the upper body, but heavy loads still stress the knees, hips, and ankles, so progress in small jumps.
What muscles does the Mammoth Belt Squat work most?
The Mammoth Belt Squat mainly works the quadriceps, glutes, hamstrings, and calves. A narrower stance usually increases quad emphasis, while a wider stance can involve more glutes and adductors, but individual mobility and depth also affect muscle demand.
Does the Mammoth Belt Squat replace leg press training?
No. The Mammoth Belt Squat does not fully replace leg press training because each movement has a different path, stability demand, and loading feel. Use belt squats for upright squat pattern training and leg presses for supported high volume lower body work.
Should I use a belt squat attachment or a cable pulley setup?
Use a belt squat attachment when you want a more dedicated and predictable setup. A cable pulley setup can work for some home gyms, but the cable angle, floor clearance, and anchor stability must be checked before each training session.
How often should I train Mammoth Belt Squats?
Most lifters can train Mammoth Belt Squats one or two times per week. Use one heavier session and one moderate volume session if recovery allows, and reduce frequency when knee, hip, or lower back fatigue affects form.
Conclusion
The Mammoth Belt Squat is a practical way to train legs hard at home while reducing the need to load a barbell across your back. Use a secure rack based setup, keep the belt low on the hips, progress gradually, and combine belt squats with other lower body movements for a complete strength program.
Disclaimer
This article is for general fitness education only and is not medical advice. If you have back pain, knee pain, hip pain, a recent injury, high blood pressure, or a medical condition, consult a qualified healthcare professional before starting belt squats or any heavy resistance training program.
References
- Joseph L, Reilly J, Sweezey K, Waugh R, Carlson LA, Lawrence MA. Activity of Trunk and Lower Extremity Musculature: Comparison Between Parallel Back Squats and Belt Squats. J Hum Kinet. 2020;72:223-228. doi:10.2478/hukin-2019-0126
- Straub RK, Powers CM. A Biomechanical Review of the Squat Exercise: Implications for Clinical Practice. Int J Sports Phys Ther. 2024;19(4):490-501. doi:10.26603/001c.94600
- Currier BS, D Souza AC, Fiatarone Singh MA, Lowisz CV, Rawson ES, Schoenfeld BJ, et al. American College of Sports Medicine Position Stand. Resistance Training Prescription for Muscle Function, Hypertrophy, and Physical Performance in Healthy Adults: An Overview of Reviews. Med Sci Sports Exerc. 2026;58(4):851-872. doi:10.1249/MSS.0000000000003897
- Krzysztofik M, Wilk M, Wojdala G, Golas A. Maximizing Muscle Hypertrophy: A Systematic Review of Advanced Resistance Training Techniques and Methods. Int J Environ Res Public Health. 2019;16(24):4897. doi:10.3390/ijerph16244897


