


Table of Contents
A hamstring workout chart helps you train your glutes and hamstrings with a clear plan instead of guessing exercise order, reps, and rest time.
This guide gives you four bench friendly moves for home training, plus a simple 2 to 3 day weekly structure for building posterior chain strength with better control.

Key Takeaways
- Train both hip extension and control: Use hip thrusts and reverse hyperextension variations for strength, then use hamstring walks and donkey kicks for stability.
- Start with bodyweight first: Add load only after you can control every rep without lower back compensation.
- Use 2 to 3 weekly sessions: Train on nonconsecutive days so your hamstrings and glutes have time to recover.
- Progress gradually: Add difficulty through slower lowering, pauses, bands, dumbbells, or a small weight increase.
- Stop for warning symptoms: Sharp pain, numbness, tingling, or worsening back symptoms are not normal training soreness.
Safety Disclaimer
This article is for general fitness education and is not medical advice.
If you have severe back pain, leg weakness, numbness, tingling, recent surgery, pregnancy related concerns, or symptoms that worsen during exercise, speak with a qualified healthcare or fitness professional before training.
What You Need
- Stable bench: Use a bench that does not wobble when your upper back, hips, or torso are supported.
- Floor space: Keep enough room around the bench so your feet and legs can move without hitting furniture.
- Optional resistance: Use a mini band, long resistance band, dumbbell, or ankle weight only after bodyweight reps feel controlled.
- Training surface: Use a mat if your knees or elbows feel uncomfortable during floor based exercises.
Recommended Bench Setup
A stable adjustable bench makes this hamstring workout easier to set up because it supports hip thrusts, reverse hyperextension variations, and full body home strength training.
For a dedicated bench option, explore the RitFit GATOR 1600LB Adjustable Weight Bench, or compare more options in the RitFit weight benches collection.
Hamstring Workout Chart
This hamstring workout chart gives beginners and intermediate lifters a simple weekly structure for home training.
Research on resistance training commonly supports 2 to 3 weekly sessions with recovery between hard sessions, so this plan uses nonconsecutive training days.[1]
| Plan | Exercise Order | Sets and Reps | Rest | Best For |
|---|---|---|---|---|
| Beginner | Hip Thrust, Elevated Hamstring Walk, Donkey Kicks, Reverse Hyperextension | 2 to 3 sets of 8 to 12 reps | 45 to 90 seconds | Learning control, building glute activation, and avoiding overload too soon. |
| Intermediate | Hip Thrust, Reverse Hyperextension, Elevated Hamstring Walk, Donkey Kicks | 3 to 4 sets of 8 to 12 reps | 60 to 120 seconds | Adding tempo, pauses, bands, or light dumbbell resistance. |
Progression rule: When you can finish every set at the top of the rep range with clean form, increase difficulty in the next session.
Good options include adding 5 to 10 lb, using a band, adding a 2 second squeeze at the top, or lowering for 3 seconds per rep.
Quick Warm Up
A short warm up prepares your hips, glutes, and hamstrings before loaded or higher tension work.
Keep the goal simple, move smoothly, raise body temperature, and avoid long painful stretching before strength work.
- Hip hinge drill: Do 8 slow reps with your hands on your hips.
- Bodyweight glute bridge: Do 10 reps with a 1 second squeeze at the top.
- Dynamic hamstring reach: Do 6 controlled reps per side without forcing the stretch.
- Bodyweight squat to stand: Do 6 reps to open the hips and ankles before the workout.
Why Bench Hamstring Exercises Work
Bench hamstring exercises work because they let you train hip extension, pelvic control, and posterior chain strength without needing a full gym machine setup.
Hamstring activation can vary by exercise type and intensity, so combining hip thrusts, bridge walks, and supported hip extension gives the workout broader training value.[4]
For more lower body ideas, pair this routine with leg workouts at home with a bench or a full full body workout with a home workout bench.
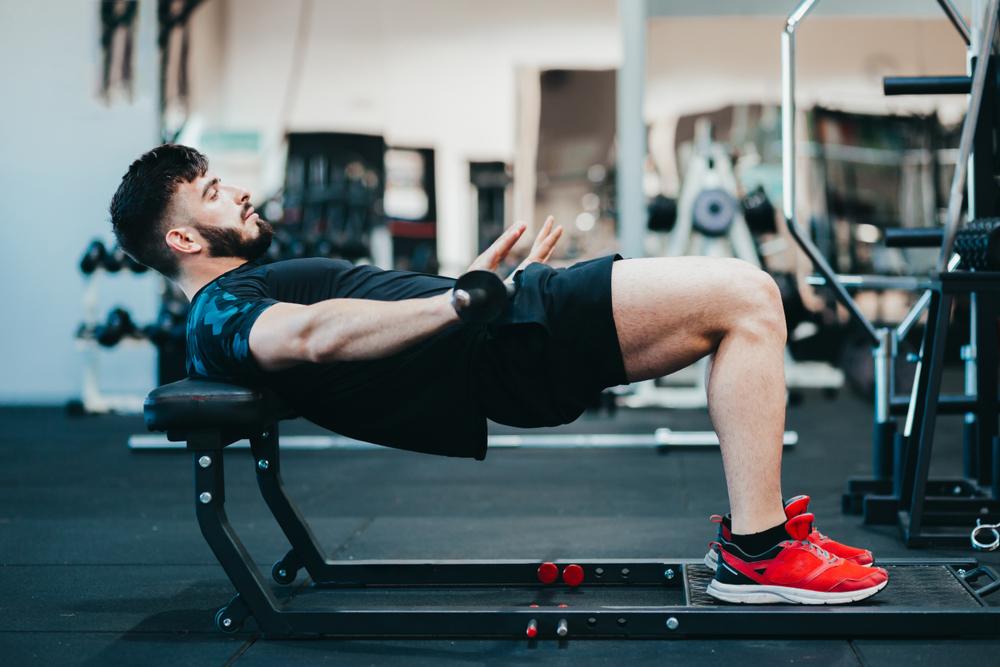
Hip Thrust

Best for: Glute strength, hip extension, and beginner friendly posterior chain training.
Muscles worked: Glutes, hamstrings, hip abductors, and trunk stabilizers.
- How to do it: Sit on the floor with your upper back against the bench edge, then place your feet flat and keep your shins near vertical at the top.
- Lift: Drive through your midfoot and heels until your torso and thighs form a straight line.
- Control: Pause for 1 second at the top, squeeze your glutes, then lower slowly.
- Form cue: Keep your ribs down and chin slightly tucked so your lower back does not take over.
- Common mistake: Do not over arch at the top, because the goal is strong hip extension, not lumbar extension.
- Make it harder: Add a dumbbell across the hips, use a band above the knees, or slow the lowering phase.
Hip thrust research suggests this pattern can create strong hip extensor demand, which explains why it is commonly used for glute focused strength training.[2]
To build this move further, see the full dumbbell hip thrust guide.
Elevated Hamstring Walk

Best for: Hamstring control, pelvic stability, and glute endurance.
Muscles worked: Hamstrings, glutes, hip stabilizers, and core muscles.
- How to do it: Place your upper back or shoulders on the bench, plant your feet, and lift your hips into a strong bridge.
- Walk: Take small steps forward and backward while keeping your hips lifted.
- Control: Move slowly and keep your pelvis level from side to side.
- Form cue: Small steps usually give better control and reduce strain.
- Common mistake: Do not let your hips sag, because that shifts tension away from the hamstrings and glutes.
- Make it easier: Hold a static bridge for 20 to 30 seconds before adding steps.
- Make it harder: Add a mini band above the knees or increase the walking distance.
Bridge based research shows that single leg and modified bridge patterns can create meaningful hip muscle activity, which supports their use in controlled home training.[3]
Reverse Hyperextension Bench Variation

Best for: Supported hip extension, glute strength, and hamstring engagement.
Muscles worked: Glutes, hamstrings, and lower back stabilizers.
- How to do it: Lie face down on the bench with your hips near the edge and your legs free to move.
- Set position: Hold the bench firmly and keep your neck neutral.
- Lift: Raise your legs by squeezing your glutes and hamstrings until your legs are close to torso level.
- Control: Lower slowly and avoid swinging your legs.
- Form cue: Stop before your lower back arches hard, because control matters more than height.
- Common mistake: Do not kick with momentum, because momentum reduces muscle tension and increases compensation.
- Make it harder: Add a light band or hold a light dumbbell between your feet only if your setup is stable.
If you want more bench based lower body options, review these weight bench exercises at home.
Donkey Kicks

Best for: Glute control, hip extension practice, and low load accessory work.
Muscles worked: Glutes, hamstrings, core stabilizers, and hip stabilizers.
- How to do it: Start on all fours with your hands under your shoulders and knees under your hips.
- Lift: Flex your foot and raise one heel toward the ceiling while keeping the knee bent.
- Control: Pause for 1 second at the top, then lower with a smooth tempo.
- Form cue: Keep your hips square to the floor as if your hip bones are headlights pointing down.
- Common mistake: Do not rotate your pelvis open, because that reduces glute control.
- Make it easier: Use smaller range of motion and focus on feeling the glute contract.
- Make it harder: Add a mini band, ankle weight, or a light dumbbell behind the knee.
For more home equipment pairing ideas, browse RitFit dumbbells to add small progressive resistance to accessory exercises.
Who Should Modify This Workout?
Modify this workout if you feel sharp pain, numbness, tingling, radiating symptoms, or lower back discomfort that gets worse during the session.
Hamstring rehabilitation literature often includes hip extensor strengthening and progressive loading, but painful or injury related cases need individual assessment from a qualified professional.[5]
- If your lower back takes over: Reduce range of motion and focus on ribs down, slow reps, and a stronger glute squeeze.
- If your hamstrings cramp: Shorten the set, rest longer, and start with glute bridge holds before moving to walking reps.
- If your knees feel irritated: Use a mat, reduce pressure in kneeling exercises, or choose hip thrusts instead.
- If you are new to training: Start with 2 sets per move and leave 2 clean reps in reserve.
How Often Should You Train Hamstrings?
Train hamstrings 2 to 3 nonconsecutive days per week if your goal is general strength, control, and muscle tone.
Keep at least one day between hard lower body sessions, especially when you add load, bands, tempo, or higher volume.
- Beginner schedule: Monday and Thursday, or Tuesday and Friday.
- Intermediate schedule: Monday, Wednesday, and Saturday if recovery feels good.
- Recovery sign: Mild soreness can be normal, but worsening pain is a reason to reduce intensity.
- Progress sign: Your reps should look smoother, your hips should stay more stable, and your lower back should feel less involved.
For a broader training week, combine this session with a bench workout routine or compare equipment in the best adjustable weight bench for home gym guide.
FAQs
What is the best hamstring workout chart for beginners?
The best hamstring workout chart for beginners uses 2 to 3 sets of 8 to 12 controlled reps. Start with hip thrusts, elevated hamstring walks, donkey kicks, and light reverse hyperextensions, then add resistance only when your hips stay stable.
Can I do a hamstring workout at home without machines?
Yes. You can train hamstrings at home with a stable bench, bodyweight, bands, and dumbbells. Hip thrusts, hamstring walks, donkey kicks, and reverse hyperextension variations can build strength when reps are slow, controlled, and progressed over time.
How often should I follow this hamstring workout chart?
Follow this hamstring workout chart 2 to 3 nonconsecutive days per week. Beginners can start with two sessions, while intermediate lifters can add a third session if soreness is mild, form stays clean, and recovery feels strong.
What muscles do bench hamstring exercises work?
Bench hamstring exercises mainly work the hamstrings, glutes, hip stabilizers, and core. Hip thrusts and reverse hyperextensions emphasize hip extension, while hamstring walks and donkey kicks improve pelvic control, glute engagement, and posterior chain coordination.
Should my lower back feel sore during hamstring workouts?
No. Your lower back should not be the main area working during hamstring workouts. Reduce range of motion, slow the movement, keep your ribs down, and focus on glute contraction if your back feels more tension than your hamstrings.
How can I make this hamstring workout harder?
Make this hamstring workout harder by adding tempo, pauses, bands, dumbbells, or longer sets. Increase only one difficulty at a time, and keep every rep controlled so the hamstrings and glutes work without swinging or lower back compensation.
Is a bench necessary for this hamstring workout chart?
No. A bench is not absolutely necessary, but it improves setup for hip thrusts and reverse hyperextension variations. A sturdy couch or ottoman may work for beginners, but a stable adjustable bench gives better support and safer positioning.
Conclusion
A good hamstring workout chart should be simple, repeatable, and easy to progress at home.
Use these four bench friendly exercises 2 to 3 days per week, start with clean bodyweight reps, and increase difficulty only when your glutes, hamstrings, and pelvis stay controlled.
Disclaimer: This content is for general fitness education only and does not replace medical advice, diagnosis, physical therapy, or individualized coaching. Stop exercising and seek professional guidance if you feel sharp pain, numbness, tingling, weakness, radiating symptoms, or worsening back, hip, or knee discomfort.
References
- Yang Y, Bay PB, Wang YR, Huang J, Teo HWJ, Goh J. Effects of consecutive versus non-consecutive days of resistance training on strength, body composition, and red blood cells. Front Physiol. 2018;9:725. doi:10.3389/fphys.2018.00725
- Neto WK, Vieira TL, Gama EF. Barbell hip thrust, muscular activation and performance: a systematic review. J Sports Sci Med. 2019;18(2):198-206.
- Lehecka BJ, Edwards M, Haverkamp R, Martin L, Porter K, Thach K, Sack RJ, Hakansson NA. Building a better gluteal bridge: electromyographic analysis of hip muscle activity during modified single-leg bridges. Int J Sports Phys Ther. 2017;12(4):543-549.
- Tsaklis P, Malliaropoulos N, Mendiguchia J, Korakakis V, Tsapralis K, Pyne D, Malliaras P. Muscle and intensity based hamstring exercise classification in elite female track and field athletes: implications for exercise selection during rehabilitation. Open Access J Sports Med. 2015;6:209-217. doi:10.2147/OAJSM.S79189
- Hickey JT, Opar DA, Weiss LJ, Heiderscheit BC. Hamstring strain injury rehabilitation. J Athl Train. 2022;57(2):125-135. doi:10.4085/1062-6050-0707.20


