


Table of Contents
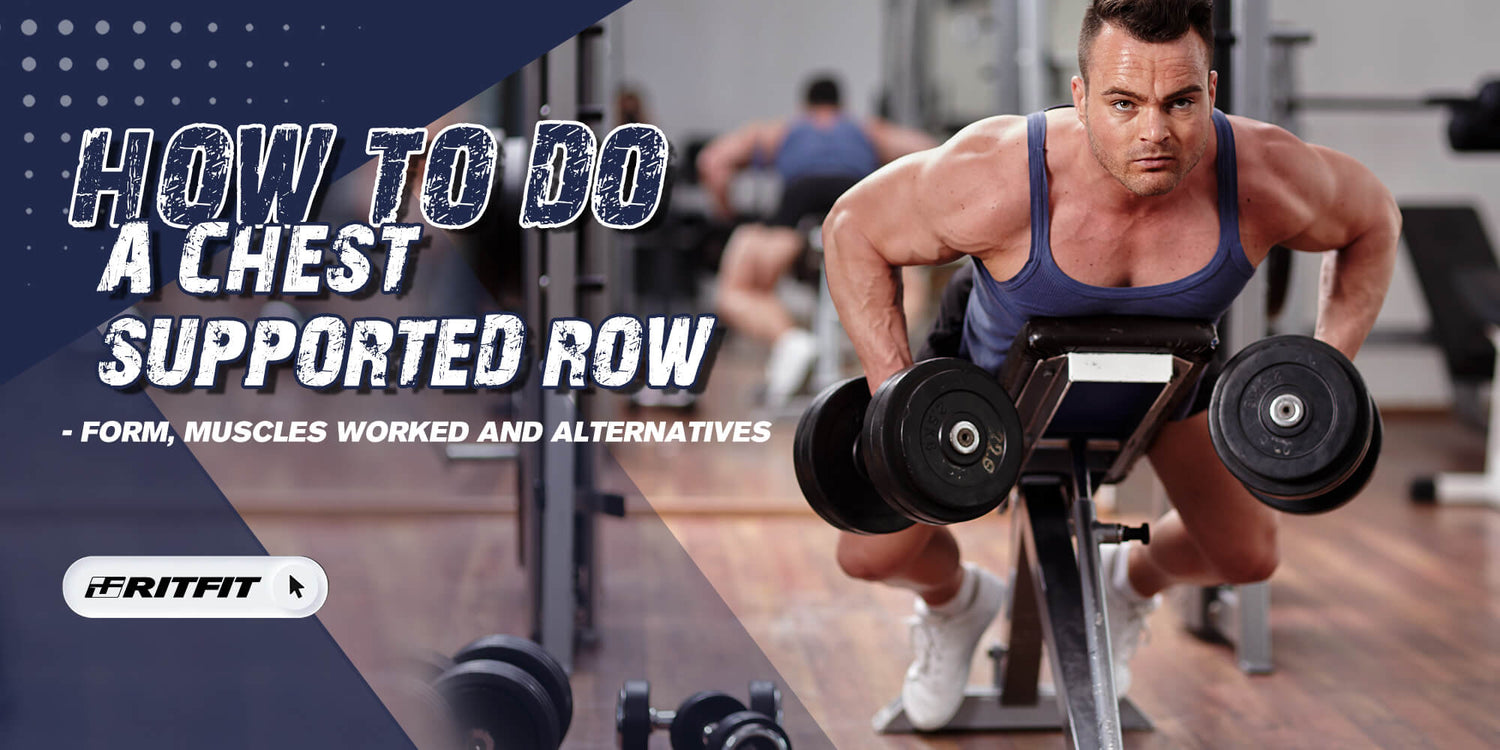
Building a strong, well-balanced back isn’t just about pulling heavy weight—it’s about training with strict form and targeting the right muscles. One of the best exercises for this is the chest-supported row.
Unlike traditional bent-over rows, chest-supported rows remove momentum and reduce stress on your lower back by supporting your torso on a bench or machine. This makes the movement ideal for beginners learning good technique, lifters training around back fatigue, or anyone looking for a safer way to build size and strength in the lats, traps, and rhomboids.
In this guide, you’ll learn how to do a chest-supported row correctly, what muscles it works, its best variations, common mistakes, and smart alternatives if you don’t have the right equipment.
Key Takeaways
- Chest-supported rows are a strict, joint-friendly horizontal pull that builds the lats, mid-back, traps, rhomboids, rear delts, and biceps—without relying on torso swing.
- Set the bench to 30–45°, keep your chest glued to the pad, and row by driving your elbows toward your hips (not flaring out).
- Pause 1–2 seconds at the top, lower in 2–3 seconds, and increase load gradually only when every rep stays controlled.
- If you feel shoulder irritation, reduce load, slow down, and re-check your shoulder position (“down and back”) before pulling.
- For most lifters, 3–4 sets of 6–12 reps 1–3 times per week fits well on pull/upper/full-body days.
What is a Chest Supported Row?

A chest supported row is a rowing variation performed while your chest is braced against a bench or machine pad. Because your torso is fully supported, your lower back doesn’t have to work as hard to stabilize you, allowing you to focus on the mid- and upper-back muscles, rear delts, and biceps.
This makes chest supported rows an excellent choice for:
- Lifters whose lower back fatigues quickly in traditional bent-over rows
- People with a history of low-back irritation who still want to train their back hard
- Anyone who wants strict, no-cheat rowing to maximize back engagement
Most lifters use an incline bench set to about 30–45° for this exercise. If you don’t have an incline bench, you can prop a flat bench on sturdy blocks or a low box to create a similar angle. What matters most is that your chest can rest firmly on the pad while your arms hang freely toward the floor.
Setup Checklist (Before Your First Rep)
- Use this quick checklist to lock in clean form fast:
- Bench angle: 30–45° (stable and not sliding).
- Feet: planted firmly on the floor or foot pads (no tip-toes).
- Chest: pressed into the pad (no “peeling up” to finish reps).
- Neck: neutral (look slightly down, not cranking up).
- Shoulders: set “down and back” before you pull.
- Elbow path: about 30–45° from your torso (not flared straight out).
- Tempo: pause 1–2 seconds at the top; lower in 2–3 seconds.
Benefits of Chest-Supported Row
Isolates back muscles so they can work harder
You can't use hip drive or too much body English to "cheat" the weight up because the bench supports your torso. Research indicates that when stability requirements are reduced (as with chest support), the central nervous system can allocate more neural drive to the prime movers (lats and traps), enhancing hypertrophy stimulus[1].
No lower-back stress
Many classic back exercises, like bent-over barbell rows or heavy deadlifts, demand a lot from your spinal erectors. EMG studies show that chest-supported rowing exercises use your erector spinae muscles less than bent-over rows, which helps lessen strain on your lower back. This allows you to train your back hard even on days when your lower back is fatigued[2].
Allows Safe Training Close to Failure
Chest-supported rows are ideal for pushing sets close to muscular failure because they eliminate the need to balance your torso or worry about your lower back giving out. When form starts to break down, the worst-case scenario is usually just that the weights won’t move—far safer than failing a bent-over row and getting pulled out of position.
Builds More Pulling Power
Even though you eliminate body swing, many lifters find they can eventually use impressive loads on chest-supported rows. You can make a strong base for your lats and upper back to push off of by pressing your chest against the pad and pushing your feet into the floor. As you get stronger here, that strength will often help you with pull-ups, deadlifts, and other big pulling movements.
How to Do a Chest-Supported Row: Form & Technique
To do a classic chest-supported dumbbell row, do the following:
Step 1: Get your bench ready
Set an incline bench to a 30–45° angle. Put your feet firmly on the floor or on the foot pads of the bench. Make sure the bench is stable and won't move when you row.
Step 2: Get ready to go
Put your chest on the pad and your head in a neutral position (looking slightly down, not craning up). Lie face down on the bench. Hold a dumbbell in each hand with a neutral or slightly overhand grip, and let your arms hang straight down.
Step 3: Set your shoulders
Before you pull, gently pull your shoulders “down and back”—think about tucking your shoulder blades into your back pockets. This pre-sets your scapulae and protects the front of your shoulders.
Step 4: Row the weight toward your body
Drive your elbows toward your hips, keeping them about 30–45° from your torso (not flared straight out). Aim to bring the dumbbells roughly to the lower ribs or upper waistline, depending on your limb length and comfort. Avoid shrugging your shoulders up toward your ears.
Step 5: Squeeze and guide the fall
At the top, hold for 1 to 2 seconds and squeeze your shoulder blades together as if you were trying to pinch a pencil between them. Then, over the course of 2–3 seconds, slowly lower the weights until your arms are fully extended again. You should feel a stretch in your lats and upper back. Repeat for the desired reps.
Coaching cues to keep in mind:
- “Push your chest into the pad, not your belly.”
- “Lead with your elbows, not your hands.”
- “Keep your neck long and neutral—no cranking your head up.”
- “Slow down the lowering phase; own the weight on the way down.”
Safety note:
If you feel sharp pain (not normal muscle burn) in your shoulder, neck, or lower back during this movement, stop the set immediately. Persistent joint pain, numbness, or tingling is a signal to consult a qualified medical professional before continuing.
Troubleshooting (Fix These Fast)
Problem: You feel it mostly in your biceps, not your back.
- Fix: Reduce the load, slow the lowering phase to 3 seconds, and think “elbows to hips” instead of “hands to ribs.”
- Fix: Add a 1–2 second pause at the top and focus on squeezing your shoulder blades (without shrugging).
Problem: Front-of-shoulder discomfort or pinching.
- Fix: Re-set your shoulders “down and back” before each rep, and keep elbows 30–45° from your torso (avoid flaring).
- Fix: Try a neutral grip (palms facing each other) and reduce range slightly if you’re forcing the dumbbells too high.
Problem: Your chest lifts off the pad to finish reps.
- Fix: The weight is too heavy—drop 10–20% and keep your chest glued to the bench from first rep to last.
- Fix: Widen your stance and press your feet into the floor for stability.
Problem: Limited range of motion or dumbbells bump the bench.
- Fix: Adjust the bench angle slightly (still within ~30–45°) and let your arms hang fully at the bottom before pulling.
- Fix: Use slightly smaller dumbbells or switch to a barbell/T-bar handle if space is tight.
Chest Supported Row Common Mistakes to Avoid
Using Excessive Weight
Going too heavy is the fastest way to turn a great back exercise into a sloppy, shoulder-irritating movement. If the weight forces you to yank, bounce, or lose contact with the bench, it’s too heavy. Start with a load that lets you complete 8–12 controlled reps while maintaining perfect form, then progress gradually.
Flaring the Elbows
Chest supported rows are designed to target the mid-back and lats with help from the rear delts and biceps. When your elbows flare straight out to the sides, you overload the shoulder joint and shift tension away from the lats. Keep your elbows angled slightly toward your hips, not toward your ears, to protect your shoulders and keep the right muscles working.
Not Squeezing the Shoulder Blades
If you only “arm row” the weight up and never fully squeeze your shoulder blades together, you’re leaving a lot of back development on the table. At the top of each rep, think about pulling your shoulder blades back and slightly down, like you’re trying to put them in your back pockets. This is where the rhomboids and middle traps really kick in.
Lifting the Chest Off the Bench
The whole point of a chest supported row is that your torso stays stable. If you peel your chest off the bench to finish the rep, you start to load your lower back and turn the exercise into a partial, cheating row. Keep your chest glued to the pad from the first rep to the last and let your upper back and arms do the work.
Limited Range of Motion
Half reps deliver half results. Lower the weight until your arms are nearly straight and you feel a stretch through your lats and upper back, then pull until you reach a strong squeeze at the top. If you can’t move through a full range without jerking, reduce the weight and focus on clean execution.
Chest-supporting row muscles worked.

Like all rowing variations, chest-supported rows primarily target the muscles of the upper and mid-back while heavily involving the rear delts and biceps. Supporting your torso allows these muscles to exert more force without experiencing lower-back fatigue.
Latissimus Dorsi (Lats)
Your lats are the primary pulling muscles of the back and the largest muscles in the upper body. They run from the mid- and lower back up to the upper arm, helping create that V-tapered look many lifters want. Chest-supported rows train the lats through shoulder extensions, pulling the upper arm down and back toward the body.
Trapezius
The trapezius (traps) is the kite-shaped muscle that spans from the base of your skull down into the mid-back, stretching across to both shoulders. During chest-supported rows, the mid and lower fibers of the traps work hard to stabilize and move the shoulder blades, especially when you focus on squeezing at the top.
Rhomboids
The rhomboid major and minor sit between your shoulder blades, underneath the traps. Their main job is to retract (pull together) and slightly elevate the shoulder blades. When you perform strict chest-supported rows and deliberately squeeze your shoulder blades at the top, the rhomboids carry out a significant portion of the heavy lifting.
Secondary muscles that assist during chest-supported rows include
- Biceps brachii – flexes the elbow to bend the arm.
- Rear deltoids assist with horizontal abduction, helping to pull the arm back.
- Teres major and teres minor are small upper-back muscles that assist with shoulder extension and stabilization.
Chest Supported Row Variations
Chest Supported Incline Row
- Step 1: Put the bench at a 30–45° angle and lie on your stomach with your chest in the middle of the pad and your feet on the ground for balance.
- Step 2: With your arms fully extended toward the floor, hold dumbbells or a bar.
- Step 3: With your chest on the pad and your elbows slightly bent toward your hips, row the weights toward your lower ribs or upper waist.
- Step 4: Take a break and squeeze your shoulder blades together. Then, slowly lower the weight until your arms are straight again.
Chest Supported Dumbbell Row
- Step 1: Get a pair of dumbbells and lie on an incline bench (30–45°). Your body should be flat, your chest should be supported, and your feet should be stable on the ground.
- Step 2: With a neutral or slightly overhand grip, row the dumbbells toward your sides, aiming for the lower ribs. Instead of curling the weights up with your biceps, try to drive your elbows back.
- Step 3: Stop for a moment at the top, then lower slowly over 2–3 seconds to keep the tension in the set.
Chest Supported Barbell Row
- Step 1: Put an incline bench over a rack or use a special chest-supported row station. Put your face down and grab the barbell with an overhand grip that is about the same width as your shoulders or a little wider.
- Step 2: Pull the bar toward the space just below your chest. Try to keep your shoulders down and back, even if you can't reach as far as with dumbbells.
- Step 3: Keep the top position for 1–2 seconds, then slowly lower the bar until your arms are straight and your back muscles are stretched.
Chest Supported T-Bar Row
- Step 1: Lie on your stomach on the T-bar row bench and hold the handles with either an overhand or a neutral grip. If you hold the bar with a narrower grip, it will put more stress on your lats. If you hold it with a wider grip, it will put more stress on your upper back and rear delts.
- Step 2: Push your elbows back while keeping your chest against the pad. Don't jerk the weight off the ground.
- Step 3: Stop at the top, then slowly and carefully lower the weight. Put the handles back on the support instead of dropping them when the set is over.
Chest Supported Machine Row
- Step 1: Sit on the machine and move the chest pad so that your chest touches it all the way when you lean forward and your arms can reach the handles all the way.
- Step 2: Stand with your feet planted, hold on to the handles, and start each rep by gently pulling your shoulders back and down.
- Step 3: Pull the handles toward your body, squeeze your shoulder blades together, and then lower the weight slowly and carefully so that it doesn't slam against the stack.
Chest Supported Rear Delt Row
- Step 1: Lie down on the bench with your face down and hold lighter dumbbells with a wider, slightly pronated (palms-down) grip.
- Step 2: To start the movement, pull your elbows out and back, about in line with your shoulders. This will focus on the upper traps and rear delts.
- Step 3: While keeping your chest on the pad, squeeze at the top and then lower slowly. Do 10 to 20 reps with strict control.
Chest Supported Row Alternatives
These alternatives can work the same muscle groups as chest-supported rows, but in a slightly different way. They can also give you some variety if you don't like chest-supported rows or don't have the right bench setup.
Seated Bent-Over Row
Equipment: bench or sturdy chair + dumbbells.
- Step 1: Sit on the bench's edge with your feet flat and dumbbells beside you.
- Step 2: With a straight back, bend forward from the hips until your chest is over your thighs and your arms are hanging straight down.
- Step 3: Row the dumbbells to the sides of your body while keeping your back straight and your shoulder blades pulled back and together. Slowly lower and do it again.
Single-Arm Row
Equipment: dumbbell/kettlebell + flat bench or sturdy surface.
- Step 1: Put one knee and the same-side hand on the bench, and the other foot firmly on the floor. With your free hand, hold the weight out to the side.
- Step 2: Hold your core tight and row the weight toward your hip while keeping your elbow close to your side. Don't twist your body to "help" the weight up.
- Step 3: Stop at the top and feel your lat and mid-back tighten. Then, slowly lower. Do all of the reps on one side before switching.
This one-sided version is excellent for fixing imbalances between the left and right sides and strengthening the mind-muscle connection with each lat.
Lat Pulldowns
Equipment: lat pulldown machine or cable station.
- Step 1: Sit on the seat and put your thighs under the leg pads. Then, with an overhand grip, grab the bar with your hands a little wider than shoulder-width.
- Step 2: Before you bend your elbows, lean back a little (10–15°), keep your chest up, and pull your shoulder blades down.
- Step 3: Pull the bar down toward your upper chest, stop, and squeeze. Then, without letting the bar pull your shoulders up, bring it back to the starting position.
Lat pulldowns aren't exactly the same as a chest-supported row, but they go well with it in a back workout, especially if you want to build vertical pulling strength.
Chest-Supported Row FAQs
Q: Can beginners perform chest-supported rows?
Yes. Beginners often find chest-supported rows safer and easier to learn than traditional bent-over rows because your torso is supported. Use light dumbbells or even just your body weight to practice the movement pattern. Instead of lifting heavy weights, focus on doing slow, controlled reps.
Q: How often should I perform chest-supported rows?
Most people who lift weights will get the best results from doing chest-supported rows 1–3 times a week, depending on their overall program. As a general rule, do them once on any "pull" or "back" day, or in full-body workouts where you want a joint-friendly horizontal pull.
Q: How many sets and reps should I perform?
Here's a simple rule to follow based on what you want to achieve:
- Strength: 3 to 5 sets of 3 to 6 reps with heavier weights and 2 to 3 minutes of rest.
- Muscle growth (hypertrophy): Do 3 to 4 sets of 6 to 12 reps with weights that are moderate to heavy. Rest for 60 to 90 seconds between sets.
- Muscular endurance: 2 to 3 sets of 12 to 20 reps with lighter weights and 45 to 60 seconds of rest.
Pick a weight that lets you keep your form clean for every rep in the range you want to work on.
Q: How much weight should I use?
The right weight for you depends on how strong and experienced you are. In general, start with less weight than you think you need. Only add weight when you can do all of your planned reps with a full range of motion, no jerking, and consistent chest contact with the bench. Small weekly increases (2.5–5 lb per dumbbell) are plenty for most lifters.
Q: How do I implement chest-supported rows into my training?
On a typical push–pull–legs or upper/lower split, chest-supported rows fit perfectly as your primary or secondary horizontal pulling movement on “pull” or “upper” days. Perform chest supported rows after your heaviest compound pulls, such as deadlifts or rack pulls, or use them as the main back movement if you want to avoid straining your lower back that day.
Q: How can I make chest-supported rows more challenging over time?
The easiest way is progressive overload, which means adding weight slowly while keeping perfect form. You can also make it harder by slowing down the eccentric (lowering) phase to 3–4 seconds, adding a 2–3 second pause at the top of each rep, or sometimes pushing a set close to failure in your last working set.
Q: Chest-supported row vs. bent-over row—which is better?
Neither is “always better.” Bent-over rows can load the back heavily but demand more trunk stiffness and typically involve higher low-back loading, while chest-supported rows reduce the need to brace and help keep reps strict when your lower back is fatigued.
Q: Should I use a neutral grip or overhand grip?
Neutral grip is often the most shoulder-friendly starting point. Overhand grip can emphasize upper back involvement, but keep your elbows from flaring and avoid shrugging to protect the shoulders.
Q: What if I can’t feel my shoulder blades moving?
Use a lighter weight, pause at the top for 2 seconds, and think “squeeze shoulder blades together and slightly down” rather than simply pulling the dumbbells higher.
Summary
If your goal is to build a strong, muscular back without beating up your lower spine, chest-supported rows deserve a permanent place in your program. By supporting your torso on a bench or machine, you remove the temptation to cheat and let your lats, traps, rhomboids, and rear delts do their job.
Set your bench to a stable incline, choose a weight you can control, keep your chest glued to the pad, and focus on driving your elbows toward your hips with a powerful squeeze at the top of each rep. Chest-supported rows are one of the best ways to build the strong, flexible back you've always wanted, whether you're a beginner learning how to row properly or an experienced lifter looking to add more thickness to your back.
References
- Aguilera-Castells J, Buscà B, Fort-Vanmeerhaeghe A, Montalvo AM, Peña J. Muscle activation in suspension training: a systematic review. Sports Biomech. 2020;19(1):55-75. doi:10.1080/14763141.2018.1472293
- Fenwick CM, Brown SH, McGill SM. Comparison of different rowing exercises: trunk muscle activation and lumbar spine motion, load, and stiffness. J Strength Cond Res. 2009;23(2):350-358. doi:10.1519/JSC.0b013e3181942019

