Single leg extensions on a leg extension curl machine turn a familiar quad exercise into a left-right test, because one leg now handles the whole load while the pelvis has to stay level. The movement is simple, but the setup, the load, and the rep cap all change once you remove the stronger side from the equation.
This guide covers how to measure your strength gap, where to put the working shin pad and the free leg, how to keep the hips quiet, how to load the weak side, and when to return to two-leg work.
Quick Answer: Single leg extensions are done one leg at a time with the shin pad on the working leg, the hips pinned to the seat, and the free foot resting on the floor or frame. Start with the weak side, cap the strong side at the same reps, and use a load you can control for 10 to 12 reps.
Key Takeaways
- Measure first: A one-leg rep test turns your left-right gap into a number instead of a feeling.
- Weak side sets the load: The strong leg matches reps, not weight, until the gap closes.
- One hand is fine: A hand on the handle keeps the torso square and does not count as cheating when the arm is not lifting the weight.
- Pelvis first: If a hip lifts or rotates, the set is over even when the quad could do more.
- Return to two legs: When the gap stays near 10% across two tests and the hips stay quiet, single-leg work becomes an accessory instead of the main lift.
What One Leg Changes About the Exercise
A single-leg extension removes the stronger leg, so the working quad produces the full force while the hip keeps the pelvis level. That is a different job from a two-leg set, where the stronger side can quietly cover for the weaker one. The quadriceps still extend the knee, but the stabilizers now have a real job.
Unilateral training also creates a small transfer to the untrained side. A review of cross-education research cites a typical 7.6% strength gain in the untrained limb, roughly half of the gain seen in the trained limb.[1]
Most running, stair climbing, and change-of-direction work happens one leg at a time, so single-leg training mirrors how those tasks are built. The hip and trunk also have to keep the knee tracking over the foot, which is the stability part of the lift.
The tradeoff is load. One leg cannot move the same stack as two, so the numbers on the pin will drop even when the effort is high.
- Bilateral set: Two legs share the load, and the stronger side can dominate the rep without you noticing.
- Unilateral set: One leg takes the whole load, and any hip shift shows up immediately.
- Best use: Single-leg work is a check on symmetry and control, not a replacement for every bilateral leg exercise.
That difference is often called the bilateral deficit, and it helps explain why the two-leg number is not simply the sum of the two single-leg numbers. Keep both in the program, because the single-leg set tells you what the two-leg set is hiding.
If you want the other half of the machine, this guide to prone leg curls on the same machine covers the hamstring setup.
Measure Your Left-Right Gap Before You Train It
A rep test on each leg gives you a repeatable left-right number in about ten minutes, using the machine you already have. Warm up first, set the seat and pad once, and write the settings down so the next test matches. The test is a training reference, not a diagnosis.
- Step 1: Warm up. Ride an easy bike for five to ten minutes or do two light sets with both legs.
- Step 2: Lock the setup. Set the seat so the knee lines up with the pivot, set the shin pad just above the ankle, and note both settings.
- Step 3: Pick a test load. Use a load you can lift for about 10 to 12 clean reps on the stronger leg.
- Step 4: Test the strong leg. Stop at the last rep where the pad still rises smoothly, then rest two minutes.
- Step 5: Test the weak leg. Use the same load and stop at the same technical limit.
- Step 6: Do the math. Subtract weak reps from strong reps, divide by strong reps, and multiply by 100.
A 10% difference is common in healthy young adults, and published reports range from 6% to 19%.[2] That context matters before you treat a small gap as a problem.
The percentage works as a simple limb symmetry index, so you can compare tests without a lab. Log the date, load, reps for each side, and the percentage, then retest every four to six weeks with the same settings.
If the weaker side cannot complete five clean reps at the test load, lower the load for both sides and retest. A strength test should not turn into a grind.
Set Up for the Working Leg, Not the Whole Body
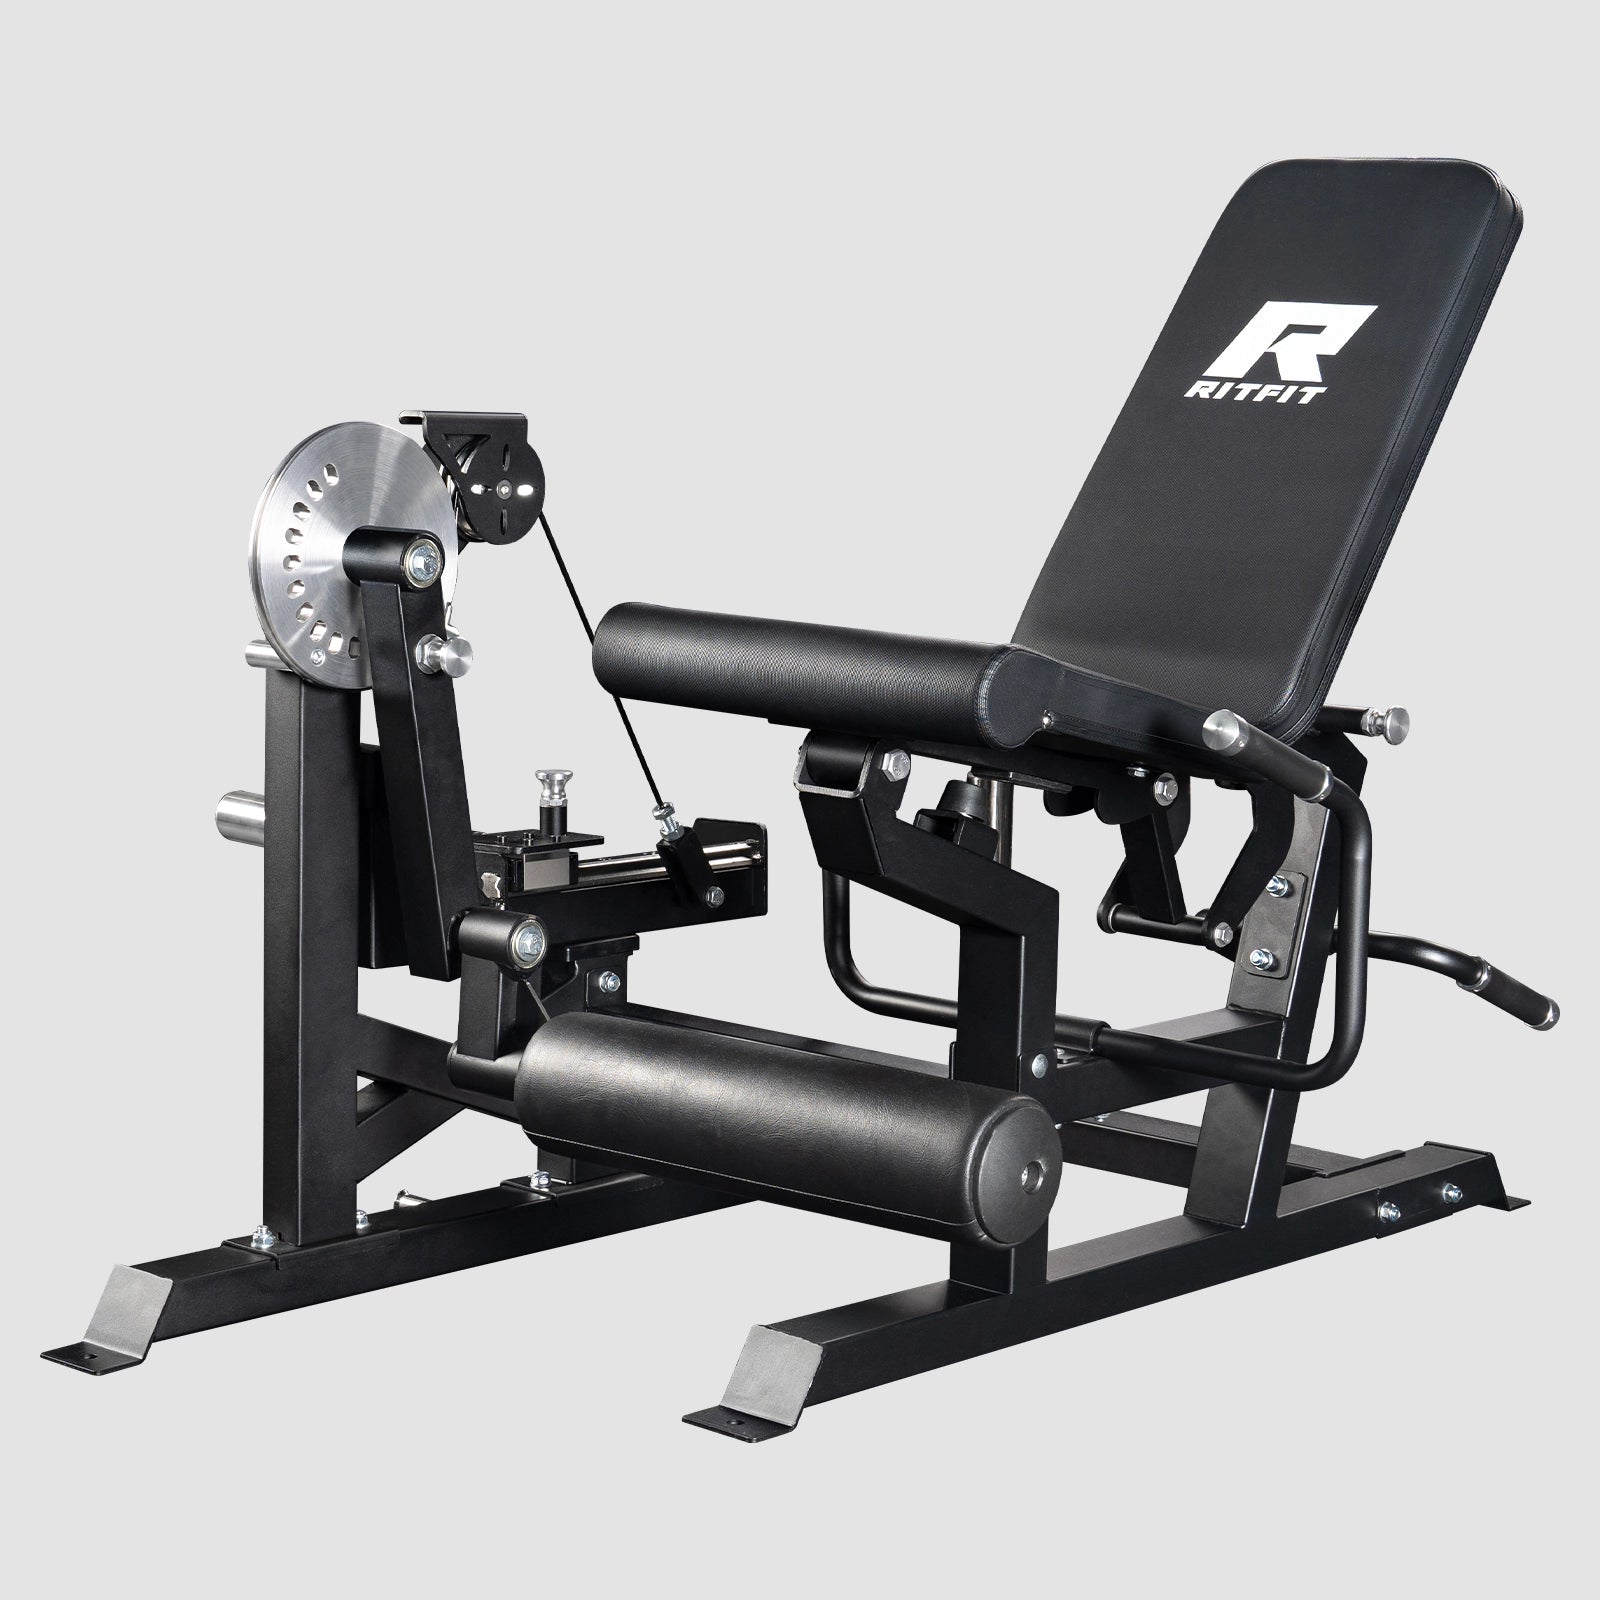
The working leg needs three contact points: a knee lined up with the machine pivot, a shin pad just above the ankle, and a hip that stays against the seat. Set the seat height first, because every other adjustment depends on it.
- Seat height: Line the knee joint up with the pivot point on the side of the machine.
- Back pad: Sit tall with the hips back, and keep the lower back in contact through the set.
- Shin pad: Place it on the lower shin, just above the ankle, not across the top of the foot.
- Working foot: Flex the ankle so the toes point up, and keep the foot relaxed.
- Free leg: Rest the foot flat on the floor if it reaches, or on the base frame if it does not.
- Free leg limit: Do not hook it behind the working leg, push off the floor, or let it swing for momentum.
A single hand on the side handle is allowed. The handle is there to keep the torso square, not to help the weight up.
Both sides use the same seat and pad settings. Changing the setup between legs turns a strength test into a positioning test.
The assembly video shows where the seat, shin pad, and handle sit on the RitFit PLC01, which helps before your first single-leg session.
Keep the Pelvis Quiet While the Knee Moves
A quiet pelvis keeps both hip bones on the seat and the torso against the back pad for the whole rep.
When the load gets heavy, the body looks for help from the hip, the lower back, or the arms.
Three compensations show up most often on a single-leg set.
- Pelvic rotation: One hip lifts or slides toward the working side, and the knee tracks inward.
- Hip extension: The butt lifts off the seat and the lower back arches to push the pad higher.
- Torso lean: The chest pulls away from the back pad, which shortens the lever and the range of motion.
Fix the setup before you fix the weight. Drop one increment, slow the lower to two or three seconds, and pause for one second at full extension.
That adds time under tension without adding load, and it makes a hip shift much easier to feel.
A useful cue is to press the back of the working thigh into the seat while the shin pushes the pad away. The seat should feel planted, not pushed.
If the hips still move at a load you can control, the set is done. Reps after a hip shift train a different movement.
Pick the Load From the Weak Side
The weak leg chooses the load, and the strong leg copies the rep count at that same load. This feels light on the strong side at first, and that is the point. The strong side is the reference, not the driver.
For strength, loads at or above roughly 60% of one-rep max outperform lighter loads, while hypertrophy is similar across a wide range when sets are close to failure.[3]
In practice, single-leg extensions work well in the 8 to 12 rep range, with a controlled eccentric and the last two reps slower but still smooth.
- Start lighter: Use a load that leaves about two reps in reserve on the weak side.
- Do not copy the two-leg pin: A single leg rarely handles the same stack, even when the quads feel ready.
- Add reps before weight: When the weak side hits the top of the range on every set, add the smallest increment and reset to the bottom.
- Rest enough: Take 60 to 90 seconds between sides, and two minutes between test efforts.
If the strong side finishes three or more reps above the weak side at the same load, keep the weight and give the weak side an extra set.
Load is only useful when the reps look the same on both sides. A heavier stack with a shorter range is not progress.
Run the Weak Side First and Log Both
Do every working set on the weak leg first, then match the reps on the strong side so the fresh side is the side you are bringing up. This order also gives you a clean rep cap.
A meta-analysis of 10 studies with 409 participants found a pooled effect size of 0.56 for strength transfer to the untrained limb. The larger effects showed up with 3 sets of 10 and a 2-minute rest.[4]
That does not make 3 sets of 10 a rule. It does support moderate volume, honest rest, and progressive overload through a consistent rep target.
A four-week block can look like this.
| Week | Weak leg | Strong leg | What changes |
|---|---|---|---|
| 1 | 3 x 8-10 | 3 x match | Find a load with two reps in reserve |
| 2 | 3 x 8-10 | 3 x match | Add one rep per set if the hips stay quiet |
| 3 | 4 x 8-10 | 3 x match | The extra set goes to the weak side only |
| 4 | Retest | Retest | Same seat, pad, load, and rest |
Rep ranges are starting points. Match reps, not weight, on the strong side.
Two sessions per week is enough for most lifters, placed at the end of a leg day or on its own day.
Record five things after every session: date, load, reps on each side, seat and pad settings, and whether the hips moved.
The log is what makes the next test useful.
Without it, every session starts from zero.
Five Common Mistakes That Turn It Into a Hip Exercise
The most common single-leg extension mistakes all share one result: the hip does the work the quad was supposed to do. Watch for these five.
- The pelvis rotates or lifts. One hip comes off the seat, and the knee drifts inward. Lower the load and keep one hand on the handle.
- The hips extend to finish the rep. The butt lifts and the lower back arches. Press the thigh into the seat and stop the set when contact is lost.
- The range gets shorter. The pad stops before full extension, or the lower half is rushed. Pause for one second at the top and lower for two or three seconds.
- The two-leg weight comes along. The stack is set from a bilateral personal record, so the hips move on rep one. Cut the load and build reps first.
- The foot pushes instead of the shin. The pad sits on the instep, and the ankle does the work. Move the pad just above the ankle and keep the toes up.
Each fix is a setup change, not a toughness test. If the same mistake returns at a lighter load, end the set.
Should You Choose the RitFit PLC01 for Single-Leg Work?
The RitFit PLC01 suits single-leg work because the seat, shin pad, and handle let you repeat the same setup on both sides without rebuilding the machine between legs. Repeatability matters more than extra features here, and a machine that shifts between sides makes every left-right number unreliable.
Three adjustments do most of the work.
- Seat and back pad: You need enough range to line the knee up with the pivot, not just enough to sit down.
- Shin pad: A pad that adjusts high enough to sit above the ankle keeps the lever on the shin.
- Handle: A side handle within reach lets you brace the torso without leaning forward.
RitFit lists the PLC01 under strength equipment, with a lifetime warranty on the structural frame and welds and a 1-year limited warranty on non-structural parts.
The RitFit PLC01 is one option in the leg machine collection, and the Mustang Pro Leg Extension Curl Machine is another model in the same category for buyers comparing pad and seat packages.
If you are still choosing a machine, the beginner guide and the home gym roundup cover the broader comparison.
The review above is a third-party look at the same machine, which helps you hear the tradeoffs in plain terms.
"The family loves this machine. It is heads and shoulders above the "old" add-on leg apparatus to the end of a bench. Super easy to change positions, add or remove weight. Wish we had bought this years ago"
Robert R. Verified Buyer, RitFit PLC01 Leg Extension Curl Machine
When to Go Back to Two Legs
Return to two-leg work as the main lift when the gap stays near 10% across two tests and the pelvis no longer shifts at your working weight. Single-leg work has done its job when the weak side matches the strong side at the same load and rep count for three sessions in a row.
At that point, keep one single-leg set as an accessory and put the bilateral lift back in front.
- Gap: Two consecutive tests within about 10%, four to six weeks apart.
- Control: No hip lift or rotation at the working load.
- Reps: The weak side matches the strong side without an extra set.
- Recovery: No lingering soreness that changes your next session.
Some lifters should stay bilateral or stop altogether. Sharp knee pain, swelling, or pain that lasts more than a day or two is a reason to get professional advice, not a reason to push through.
"Leg extensions create hypertrophy in the quads and can be overloaded. However, there are some potential safety issues for people with tendonitis or knee issues, as it places a lot of force and tension on the patella. It's a good exercise for some, definitely not all."
Jeff Cavaliere, MSPT, CSCS, Physical Therapist and Strength Coach, Athlean-X, Quad Exercises Ranked
That warning applies to single-leg work too. One leg does not make a leg extension gentler on the knee.
When you do return, a leg press can carry the bilateral load while the single-leg work drops to once a week.
FAQs About Single Leg Extensions
How much weight should I use for single leg extensions?
Start with a load you can control for 10 to 12 clean reps on your weaker leg, with about two reps left in reserve. The stronger leg matches the same rep count rather than the same weight, and you add the smallest machine increment only after both sides reach the top of the range.
Is holding the handle cheating during single leg extensions?
No, one hand on the side handle is a normal part of the setup. The handle keeps your torso square and stops the pelvis from rotating toward the working leg. It becomes cheating only when you pull with the arm to help the weight up or lean away from the back pad.
Should I alternate legs or finish all sets on one side?
Finish all working sets on the weak leg first, then match the reps on the strong side. This order gives the weaker side a fresh effort and turns the strong side into a rep cap, which keeps the gap from widening. Alternate set by set only when you are short on time.
How often should I test my left right difference?
Retest every four to six weeks, using the same seat height, shin pad setting, load, and rest period. Testing more often adds noise without telling you much, because a single session can swing by a rep or two. Keep the notes in your phone so the next test uses the same setup.
Do single leg extensions work the same muscles as two leg extensions?
Yes, the quadriceps still do the work, but one leg now handles the full load and the hip has to stay stable. That stability demand is the main difference, and it is why a single-leg set usually needs less weight than the same rep range done with both legs.
When should I stop single leg extensions?
Stop the set when the shin pad stops moving smoothly, when the hips lift or rotate, or when the knee feels sharp rather than tired. Stop the exercise entirely and get professional advice if pain, swelling, or limping lasts beyond a day or two.
Can single leg extensions close a strength gap?
Single leg extensions can narrow a moderate gap when the weak side gets more sets and the strong side is capped at the same reps. Progress is slow, so expect changes over months rather than weeks. A large or painful difference is a reason to see a clinician, not a reason to add more weight.
Conclusion
Single leg extensions are worth doing when you treat them as a measurement tool: test the gap, keep the pelvis on the seat, let the weak side set the load, and log both sides. The exercise stops being useful when the hips take over or the weight comes from a two-leg set.
Start with two sessions this week and one clean test. If you need a machine first, compare the leg machine options before you buy, and check the RitFit discount guide before checkout.
Disclaimer
This article is general training information, not medical advice. Consult a qualified professional before starting a new program if you have a knee, hip, or back condition, and stop if pain, swelling, or joint instability appears.
References
1. Hendy AM, Lamon S. The Cross-Education Phenomenon: Brain and Beyond. Front Physiol. 2017;8:297. doi:10.3389/fphys.2017.00297. PMCID: PMC5423908
2. Krishnan C, Williams GN. Evoked tetanic torque and activation level explain strength differences by side. Eur J Appl Physiol. 2009;106(5):769-74. doi:10.1007/s00421-009-1057-y. PMCID: PMC4527969
3. Lopez P, Radaelli R, Taaffe DR, et al. Resistance Training Load Effects on Muscle Hypertrophy and Strength Gain: Systematic Review and Network Meta-analysis. Med Sci Sports Exerc. 2021;53(6):1206-1216. doi:10.1249/MSS.0000000000002585. PMCID: PMC8126497
4. Cirer-Sastre R, Beltrán-Garrido JV, Corbi F. Contralateral Effects After Unilateral Strength Training: A Meta-Analysis Comparing Training Loads. J Sports Sci Med. 2017;16(2):180-186. PMCID: PMC5465979