


Table of Contents
- Benefits of Smith Machine Inverted Row
- Muscles Worked
- Equipment and Setup
- Step by Step, How to Do a Smith Machine Inverted Row
- Common Mistakes and How to Fix Them
- Progressions and Regressions
- Variations of Smith Machine Inverted Row
- Programming, Sets, Reps, and When to Use It
- Safety Tips and Best Practices
The Smith machine inverted row is a scalable horizontal pulling exercise that builds back strength, improves body control, and teaches better rowing mechanics. It suits beginners who need an easier path into pulling, and if you are new to the setup, start with what a Smith machine is and whether a Smith machine is good for beginners before you train.
Key Takeaways
- It is a true horizontal pull: The movement trains the upper back, lats, rear delts, and arm flexors while forcing you to hold a rigid body line.
- It is easy to scale: Bar height, foot position, knee bend, and tempo can all change difficulty without changing the basic pattern.
- It is beginner friendly: The fixed bar keeps setup simple and repeatable, which makes it easier to learn pulling mechanics.
- It can support pull up progress: It helps build the horizontal pulling strength and trunk control that many lifters need before harder bodyweight pulls improve.
- Form matters more than ego: Full range reps with a straight body line are more valuable than forcing a lower bar height with sloppy mechanics.
Benefits of Smith Machine Inverted Row
The main benefit of the Smith machine inverted row is that it gives you a stable bar and a repeatable setup, so you can focus on pulling mechanics instead of setup chaos. Related bodyweight pulling research also shows strong activation across the latissimus dorsi, posterior deltoid, biceps brachii, and mid back musculature, which supports the value of well controlled pulling patterns for strength work.[1]
- Builds practical back strength: It trains scapular retraction, elbow drive, and body tension in one movement. That makes it a useful companion to the Smith machine row and other horizontal pulls.
- Bridges simpler and harder pulling: It is easier to learn than many free bodyweight pulls, but still lets you progress over time. That makes it a practical bridge toward harder options such as pull ups on a Smith machine.
- Works in busy gyms and home gyms: You only need a fixed bar and floor space. If you are building a setup at home, you can browse the RitFit Smith machine collection for similar training options.
Muscles Worked
Primary Muscles
The primary movers are the lats, rhomboids, middle traps, and rear shoulder, which together drive the chest toward the bar. Your elbow path and grip width will slightly change emphasis, but the movement should still feel like a back led pull instead of an arm only curl.
- Latissimus dorsi: Helps extend the shoulder and pull the torso toward the bar.
- Rhomboids: Assist with shoulder blade retraction and upper back control.
- Middle trapezius: Supports scapular retraction and helps create a strong finish position.
- Rear deltoids: Assist shoulder extension and help stabilize the upper arm during the pull.
Secondary Muscles
The biceps, forearms, trunk, and glutes support the movement by helping you hold a straight body line from head to heels. A systematic review on core muscle activity also places the inverted row among exercises that require meaningful trunk involvement to keep position.[3]
- Biceps brachii: Assists elbow flexion during the pulling phase.
- Forearms: Help you maintain a secure grip on the bar.
- Core: Resists sagging or piking so the body stays rigid.
- Glutes: Help maintain pelvic position and reduce body line breakdown.
Equipment and Setup
You only need a Smith machine, a stable floor, and enough room to set your body under the bar. If you train at home, a setup such as the RitFit M1 Smith machine gives you a clear fixed bar path and pairs well with related work like the lat pulldown on a Smith machine.
- Bar height: Start with the bar around waist to mid torso height if you are new. A higher bar makes the exercise easier, and a lower bar makes it harder.
- Grip: Use an overhand grip just outside shoulder width for the cleanest starting version. You can later test underhand or wider grips once your base technique is stable.
- Foot position: Put the heels on the floor and line the body under the bar. Move the feet farther forward if you want a more horizontal body line.
- Surface: Use stable shoes and a non slippery floor. If your heels slide, place them on a grippy mat.
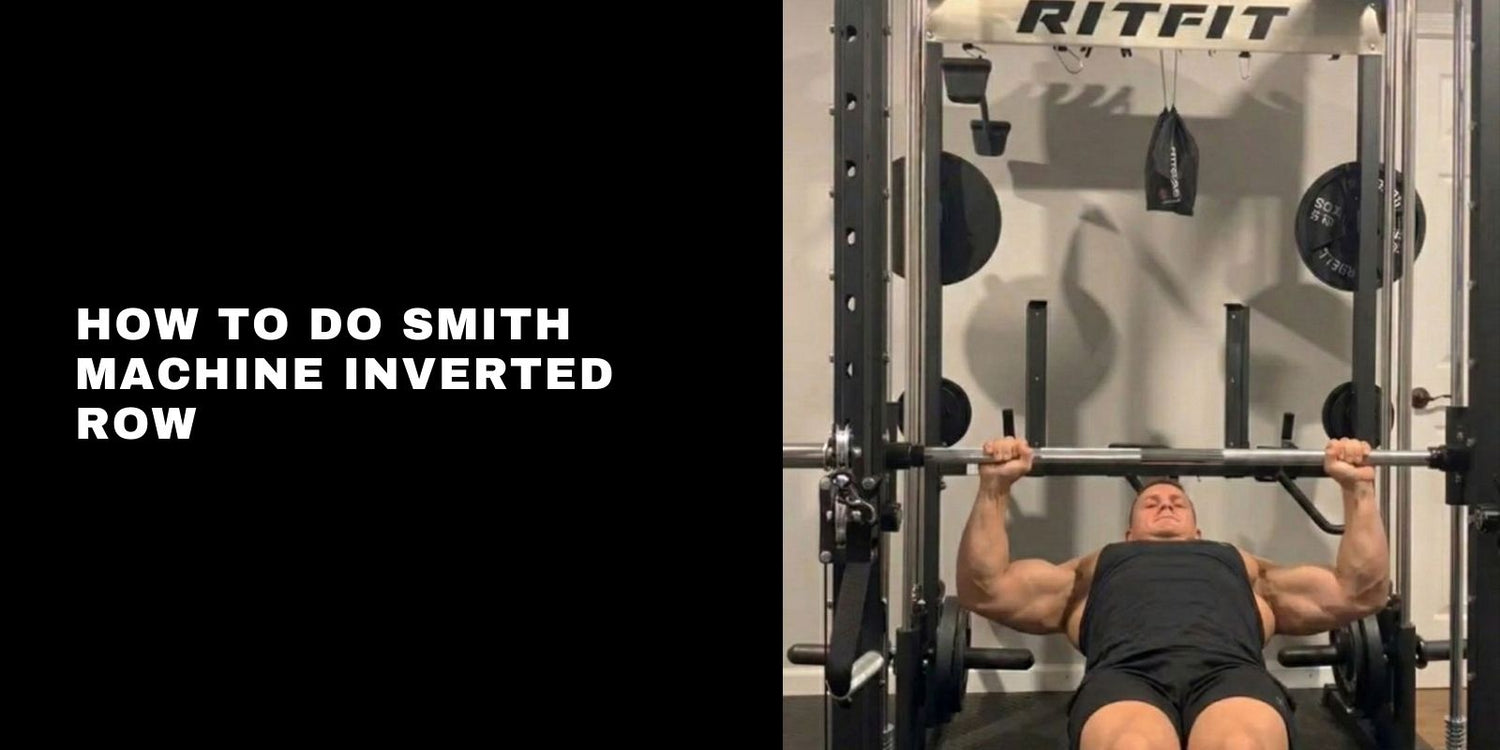
Step by Step, How to Do a Smith Machine Inverted Row
A clean rep starts with a rigid body line and ends with the chest moving toward the bar, not the chin reaching forward. Rowing exercise research also shows that changing row style changes trapezius, posterior deltoid, and torso stabilizer recruitment, so elbow path and shoulder control matter throughout the rep.[2]
- Set the bar and get under it. Lock the bar in place, lie under it, and grab it with an overhand grip just outside shoulder width.
- Create a straight body line. Extend the legs and plant the heels, then brace the abs and squeeze the glutes so the body stays rigid.
- Pull the chest to the bar. Drive the elbows back, keep the shoulders away from the ears, and bring the lower chest or upper ribs toward the bar.
- Pause and own the top. Briefly squeeze the upper back without letting the chin jut forward or the hips drop.
- Lower with control. Extend the arms smoothly and return to the start without losing tension or collapsing at the bottom.
Common Mistakes and How to Fix Them
Most form problems come from losing body tension or turning the exercise into a loose arm pull. Clean reps usually improve fast when you simplify the setup and lower the difficulty slightly.
- Sagging hips: Squeeze the glutes and ribs down before every rep. Think of the movement as a moving plank with a row attached.
- Piked hips: Do not turn the exercise into a half bridge. Lower the bar challenge and return to a straight line from head to heels.
- Elbows flaring too wide: Keep the elbows moving back on a natural path. Extremely flared elbows often shift tension away from the back and make the shoulders feel awkward.
- Pulling with the arms first: Lead by moving the elbows back, not by curling yourself to the bar. If needed, use a slightly higher bar so you can feel the back working through full range.
- Neck reaching forward: Keep the neck neutral and let the chest rise to the bar. If the chin leads the rep, upper back tension usually drops.
- Short range reps: Lower until the arms are straight, then pull until the chest approaches the bar. Partial reps often hide weak setup or poor tension.
Progressions and Regressions
Scaling this exercise works mainly by changing how much bodyweight you have to move and how stable the setup feels. Suspension exercise data also shows that setup variations change body weight distribution and effective loading, which is why bar height and foot position are your best progression tools.[4]
Make It Easier
Use easier regressions when you cannot keep a straight line or complete full range reps with control. The goal is to own the pattern first, then make it harder later.
- Raise the bar: A higher bar makes the body more vertical and reduces the amount of bodyweight you row.
- Bend the knees: Putting the feet flat on the floor with bent knees shortens the lever and reduces total difficulty.
- Slow the setup: Pause before each rep and reset body tension. This often fixes form faster than forcing extra reps.
Make It Harder
Use harder progressions once you can control full range reps with a straight body line and no momentum. Harder does not mean messier, it means more demanding while the shape stays the same.
- Lower the bar: A lower bar makes the body more horizontal and increases the amount of bodyweight you have to move.
- Elevate the feet: Put the heels on a bench or box to increase difficulty and change the pulling angle.
- Add tempo: Use a slow lowering phase or a one second squeeze at the top to increase tension without changing equipment.
- Add load: Use a weighted vest or external load only after you own clean bodyweight reps.
Variations of Smith Machine Inverted Row
Grip and body position variations can shift the feel of the exercise without changing the core pattern. Use them to solve a training need, not just to make the movement look different.
- Overhand grip inverted row: This is the best default version for most lifters. It balances upper back and lat work well and is easy to coach.
- Underhand grip inverted row: This version often feels stronger, but it usually increases biceps involvement. Use it when you want a slightly different elbow path and arm contribution.
- Wide grip inverted row: A wider grip can increase upper back emphasis, but it may reduce range and comfort for some shoulders. Do not go wide just to go wide.
- Feet elevated inverted row: This is a strong progression for advanced lifters who need more total loading without changing the bar setup.
Programming, Sets, Reps, and When to Use It
The Smith machine inverted row works best as a main horizontal pull for beginners or as accessory back volume for more advanced lifters. It also pairs well with vertical pulling, so you can combine it with lat pulldowns on a Smith machine, compare setup choices in Smith machine vs power rack, or rotate it beside harder pull up work.
- Beginners: Start with 2 to 3 sets of 6 to 10 clean reps. Use a higher bar if technique breaks before the target rep range.
- Hypertrophy: Use 3 to 4 sets of 8 to 15 reps with controlled tempo. Aim to feel the back working through full range rather than rushing volume.
- Strength and control: Use 3 to 5 sets of 5 to 8 harder reps with stricter setup and longer rest. Feet elevated versions work well here for advanced lifters.
- Workout placement: Put it early if it is your main horizontal pull. Put it later if you already did heavy rows, pull ups, or machine back work.
Safety Tips and Best Practices
This exercise is usually more lower back friendly than unsupported heavy rows, but it still demands bracing and shoulder control. Rehab literature has described the inverted row as a rowing option with relatively low spinal load while still training the upper back.[5]
- Check bar security: Make sure the Smith bar is fully locked before you put bodyweight on it.
- Warm up first: Prep the shoulders, elbows, wrists, and upper back before hard sets.
- Earn harder progressions: Do not lower the bar if you cannot keep a straight line and full range with the easier setup.
- Stop sharp pain: Muscular effort is normal, but sharp joint pain is not. Regress the movement or stop and reassess.
FAQs
What muscles does the Smith machine inverted row work?
It mainly trains the lats, upper back, rear delts, biceps, and forearms, while the core and glutes help keep your body rigid. The exact emphasis changes with grip width, elbow path, and body angle, but it should still feel like a horizontal pull led by the back.
How do I make a Smith machine inverted row easier or harder?
Raise the bar or bend your knees to make the movement easier, and lower the bar or elevate your feet to make it harder. You can also slow the lowering phase, pause at the top, or add load later, once you can control full range reps.
Can the Smith machine inverted row help with pull up progress?
Yes. The Smith machine inverted row can build the pulling strength, body tension, and scapular control that many lifters need before strict pull ups improve. It is not a perfect substitute for vertical pulling, but it is a useful stepping stone in a complete back program.
Why do I feel the Smith machine inverted row more in my arms than my back?
You are usually bending the elbows first and trying to curl yourself to the bar. Focus on keeping the chest open, driving the elbows back, and finishing with the shoulder blades, then adjust the bar height if full range reps still turn into arm dominant pulls.
Is the Smith machine inverted row good for beginners?
Yes. The fixed bar makes setup simple, repeatable, and easy to scale, which is helpful when learning horizontal pulling mechanics. Beginners can start with a higher bar and bent knees, then progress by lowering the bar as control, range, and confidence improve.
Should I use an overhand or underhand grip for the Smith machine inverted row?
An overhand grip is usually the best starting point because it balances upper back and lat work without making the movement overly arm focused. An underhand grip can feel stronger for some people, but it often increases biceps involvement and changes the pulling path.
Conclusion
The Smith machine inverted row is one of the simplest ways to build horizontal pulling strength with clear progressions and repeatable form. Keep your body rigid, pull your chest to the bar, and adjust the setup over time so the exercise keeps challenging your back instead of turning into a rushed arm dominant rep.
Disclaimer. This article is for educational purposes only and is not medical advice. Stop if you feel sharp pain, and speak with a qualified clinician or coach if you have a shoulder, elbow, wrist, neck, or back injury, limited grip capacity, or unresolved symptoms.
References
- Snarr RL, Hallmark AV, Casey JC, Esco MR. Electromyographical Comparison of a Traditional, Suspension Device, and Towel Pull-Up. J Hum Kinet. 2017;58:5-13.
- Youdas JW, Kleis M, Krueger ET, Thompson S, Walker WA, Hollman JH. Recruitment of Shoulder Complex and Torso Stabilizer Muscles With Rowing Exercises Using a Suspension Strap Training System. Sports Health. 2021;13(1):85-90.
- Oliva-Lozano JM, Muyor JM. Core Muscle Activity During Physical Fitness Exercises: A Systematic Review. Int J Environ Res Public Health. 2020;17(12):4306.
- Vural F, Erman B, Ranisavljev I, et al. Can Different Variations of Suspension Exercises Provide Adequate Loads and Muscle Activations for Upper Body Training? PLoS One. 2023;18(9):e0291608.
- VanGelder LH, Hoogenboom BJ, Vaughn DW. A Phased Rehabilitation Protocol for Athletes With Lumbar Intervertebral Disc Herniation. Int J Sports Phys Ther. 2013;8(4):482-516.


