


An adjustable bench for preacher curls is one of the smartest multi-use setups in any home gym, letting you isolate your biceps with strict form without buying a dedicated preacher station. The key is knowing exactly how to configure your bench: the right incline angle, where your armpit contacts the pad, and how to position your arms to eliminate shoulder momentum.
This guide covers the precise setup steps, five common mistakes intermediate lifters make, and the science behind why the stretched range of motion matters for bicep growth, so you can get dedicated-bench results from the equipment you already own.
Quick Answer: Set your adjustable bench to 30-45 degrees, position your armpit at the top edge of the pad, and use a dumbbell to lower to near-full extension. This setup closely mimics a dedicated preacher bench and effectively isolates the biceps brachii for intermediate home gym lifters.
Key Takeaways
- Optimal angle: Set the backrest to 30-45 degrees to replicate the angled pad of a dedicated preacher bench and keep tension on the biceps throughout the curl.
- Armpit position: Your armpit must sit right at the top edge of the pad so your full upper arm stays flush and no shoulder momentum can assist the lift.
- Stretched ROM matters: A 2023 study found that training the arm curl in the initial, stretched range of motion promoted greater distal bicep hypertrophy compared to training only the shortened range.[3]
- Implement choice: Dumbbells are the most practical option on an adjustable bench, offering wrist freedom and eliminating bar clearance issues; barbell and cable preacher curl variations produce comparable biceps thickness gains.[2]
- Upgrade path: Adding a dedicated preacher curl pad attachment to your existing bench delivers a more consistent pad surface for lifters who train biceps multiple times per week, at a fraction of the cost of a standalone station.
Why Does an Adjustable Bench Work for Preacher Curls?
An adjustable bench works for preacher curls because its inclined backrest provides the same arm-bracing function as a dedicated preacher pad, restricting shoulder involvement and forcing the biceps brachii to do the work. The bench surface supports your upper arm from armpit to mid-forearm, which eliminates the body-English and backward shoulder swing that make standard standing curls easier to cheat.
The Mechanics of Arm Support and Bicep Isolation
When your upper arm is braced on an inclined surface, the shoulder joint is essentially locked out of the movement, and all rotational force must be generated by elbow flexion alone.
- Reduced momentum: With the upper arm pinned to the pad, you cannot initiate the curl with a back swing or hip drive, which is the primary reason preacher curls feel harder with lighter weight than standard curls.
- Lengthened starting position: The inclined surface positions your biceps at or near their fully stretched length at the bottom, which increases mechanical tension at the point in the range of motion where it is most difficult and most productive.
- Stable elbow axis: Pressing your upper arm firmly into the pad creates a stable pivot point, so your elbow tracks a consistent arc every rep rather than drifting forward or back.
- Independent arm training: When using adjustable dumbbells, each arm works independently on an adjustable bench setup, which helps address left-right strength imbalances that a barbell can mask.
How an Adjustable Bench Compares to a Dedicated Preacher Bench
A dedicated preacher bench has a fixed pad angle (typically 45-50 degrees from vertical), a seat that positions your torso correctly, and a wide pad surface designed for the exercise, while an adjustable bench requires you to set the angle manually and positions you differently relative to the pad.
- Pad width: A dedicated preacher bench pad is wider and designed to support both arms simultaneously with a barbell; an adjustable bench pad is narrower and better suited for single-arm dumbbell work.
- Seat position: On a dedicated station you sit with your chest pressed against the vertical side of the pad; on an adjustable bench you kneel beside the bench or stand over it, leaning forward so your armpit meets the top edge.
- Angle precision: Dedicated benches are fixed at the industry-standard angle; adjustable benches require a one-time setup step to find the equivalent setting, but once dialed in the setup repeats identically each session.
- Space efficiency: Your RitFit 1300lb Adjustable Weight Bench already occupies floor space in your home gym; using it for preacher curls eliminates the need for a second dedicated station.
How Should You Set the Angle on an Adjustable Bench for Preacher Curls?
Set your adjustable bench backrest to 30-45 degrees from horizontal for preacher curls. This range places the pad at roughly the same inclined angle as a commercial preacher bench, positioning your biceps in a moderately lengthened posture at the bottom of the curl and allowing a full, controlled arc through elbow flexion.
What Does the Evidence Say About Pad Angle?
The standard commercial preacher bench pad sits at approximately 45-50 degrees from vertical, a design that trainers and equipment reviewers describe as placing peak bicep tension in the most productive zone of the curl, around 70-100 degrees of elbow flexion. A 2023 study published in the Journal of Human Kinesiology confirmed that a preacher curl performed on a 50-degree angled pad produced measurable regional bicep hypertrophy in recreationally trained women over a 9-week training program.[1]
- 30 degrees: A shallower angle stretches the biceps less at the start and is useful if the 45-degree setup causes forearm discomfort during the lowering phase.
- 45 degrees: The most closely matched angle to a dedicated preacher station and the recommended starting point for most intermediate lifters.
- Steeper than 45 degrees: Angles above 50 degrees begin to change the movement pattern significantly and are not recommended for this substitution.
Step-by-Step Angle and Height Setup
Getting the angle right takes about 30 seconds before your first set and should be repeated the same way each session.
- Step 1 - Set the backrest: Lock the bench backrest at the 30-45 degree position (most adjustable benches mark each stop clearly).
- Step 2 - Kneel beside the bench: Kneel on the floor on the side of the backrest, facing the top edge of the pad. Alternatively, stand in a staggered stance and lean forward over the pad.
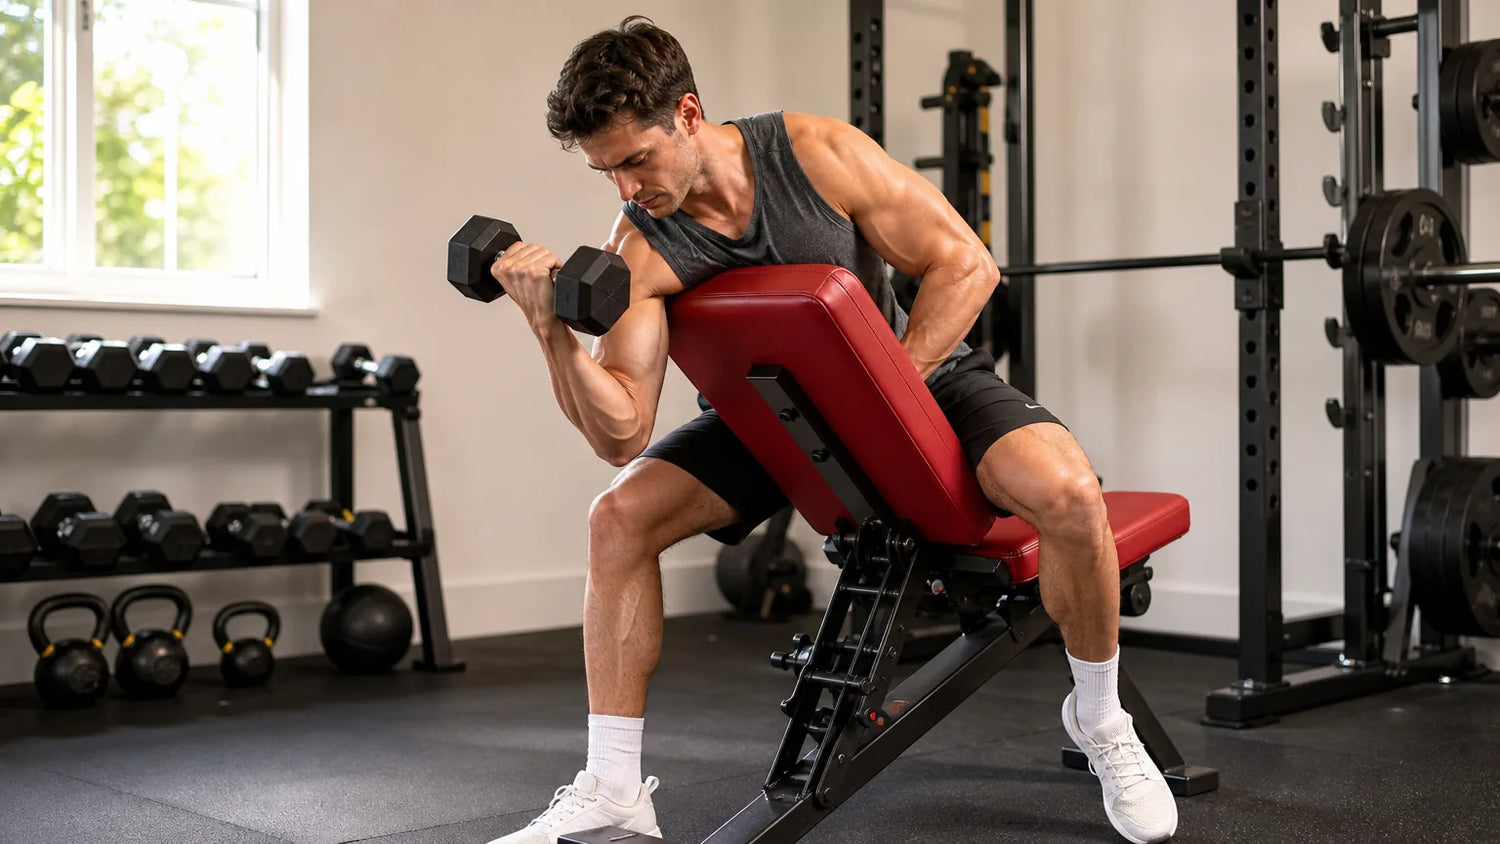
- Step 3 - Check your armpit height: Place your upper arm on the pad and verify that your armpit rests right at the very top edge of the backrest, not several inches below it. If your armpit floats above the pad, raise the backrest angle; if it digs in uncomfortably, lower it slightly.
- Step 4 - Verify full upper arm contact: Your arm from armpit to mid-forearm should lie flush against the pad surface with no gap. Lift the pad with your body weight slightly to confirm firm contact before picking up the weight.
- Step 5 - Place your feet: Plant your feet flat on the floor, hip-width apart, and engage your core to stabilize the torso so you do not rock during the curl.
Explore the full range of adjustable weight benches to find the model with the angle increments that match your training needs best.
Where Exactly Should Your Arm Sit on the Bench Pad?
Your armpit should rest precisely at the top edge of the adjustable bench pad, with the full length of your upper arm lying flush against the inclined surface from armpit down to mid-forearm. This contact position creates the bracing effect that eliminates shoulder drive and locks the elbow into a stable, consistent pivot point for every rep.
Why the Armpit-to-Pad Position Determines Your Results
When the armpit floats even an inch or two above the pad edge, the shoulder can rotate backward at the bottom of the rep, which converts a preacher curl into a partial standing curl with a tilted arm, losing the isolation benefit entirely.
- Armpit at the pad top edge: This is the correct position. It means the entire upper arm is supported, the shoulder joint cannot rotate backward, and the biceps must generate all the force to lift the weight.
- Armpit above the pad edge: If your armpit clears the pad top by more than half an inch, you will feel the shoulder "helping" as you exit the bottom position, which defeats the purpose of the exercise.
- Elbows pressed down into the pad: Actively pressing your elbows into the pad throughout the set, rather than just resting them there, activates the latissimus dorsi for shoulder girdle stability and creates a much stronger base for the curl. This is especially important as weight increases.
- Wrists stay neutral: Keep your wrists in line with your forearms. Allowing the wrists to bend backward under load transfers stress to the joint rather than the muscle and reduces bicep activation at the top of the curl.
Watch this short tutorial to see the proper arm and armpit positioning on an adjustable bench in real time:
Which Implement Should You Use on an Adjustable Bench for Preacher Curls?
A dumbbell is the most practical implement for preacher curls on an adjustable bench, because it allows each arm to move independently, lets you adjust wrist angle for comfort, and avoids the bar clearance issues that arise when using a straight or EZ bar on a narrower pad surface. For lifters who prefer bilateral training, an EZ bar can work if the bench pad is wide enough to support both upper arms.
Dumbbell vs. EZ Bar vs. Straight Bar: Practical Tradeoffs
A 2020 study in the International Journal of Environmental Research and Public Health compared cable and barbell preacher curl training over 10 weeks in young adults and found that both produced comparable biceps thickness gains of approximately 7-8%, suggesting that implement choice does not significantly alter hypertrophy outcomes when technique and effort are controlled.[2]
- Dumbbell (recommended for adjustable bench): Works one arm at a time, allows a neutral or semi-supinated wrist position for those with elbow sensitivity, and fits naturally on any bench width. Intermediate lifters typically start with 15-25 lb and progress based on form.
- EZ bar (conditional): Requires enough pad width for both upper arms to sit flush simultaneously, and the bar path must clear the bench during the lowering phase. Works well on wider adjustable benches; less practical on narrower models.
- Straight barbell (not recommended): Forces a fully supinated grip that strains the wrists during the lowering phase and is very difficult to manage on an adjustable bench pad not designed for bilateral barbell work.
Wrist and Elbow Alignment Tips
Correct wrist and elbow alignment prevents joint stress and ensures the biceps remain the primary driver throughout the full range of motion.
- Keep the wrist stacked over the forearm: A neutral or slightly supinated grip is comfortable for most lifters. Avoid letting the wrist drop backward below the forearm line at the bottom of the rep.
- Elbows stay in contact with the pad: If your elbow lifts off the pad during the concentric (lifting) phase, you are using too much weight. Reduce the load until elbows stay pressed into the surface throughout.
- Grip width for dumbbells: Hold the dumbbell with a shoulder-width grip (standard neutral hold). A wider grip shifts emphasis slightly to the inner bicep head; a closer grip shifts it to the outer head, though the practical difference is small.
- For EZ bar users: Use the inner angled grips of the EZ bar, which reduce forearm pronation stress and are more comfortable for extended sets.
For an in-depth look at how to choose the right adjustable bench for your home gym, see the RitFit adjustable bench Q&A covering setup, angle positions, and accessory compatibility.
How Should You Perform Each Rep on an Adjustable Bench Preacher Curl?
Lower the weight slowly to near-full arm extension, pause briefly at the bottom to eliminate momentum, then curl up under control by squeezing the biceps. A 2023 study in Sports (Basel) found that training the arm curl in the initial, stretched range of motion promoted greater biceps brachii hypertrophy at the distal muscle region compared to training only the shortened, final range, making the full lowering phase the most important part of the rep.[3]
Starting from Full Extension for Maximum Stretch and Growth
Begin each rep with your arm extended to near-full extension, keeping a slight bend at the elbow to maintain tension on the biceps and protect the joint from hyperextension.
- Do not lock out the elbow: Lowering to complete lockout under load places sudden stress on the elbow joint at the bottom of the rep. Stopping just short of full extension maintains bicep tension and keeps the movement safe.
- Pause at the bottom: A one-second pause eliminates any stored elastic energy (bounce) and ensures each concentric rep starts from a dead stop, which is a hallmark of the preacher curl's strict isolation benefit.
- Curl to near-shoulder height: Lift until your forearm is roughly parallel to the floor or slightly above. Going past vertical causes the shoulder to roll forward and reduces tension on the biceps at the top.
- Stop if elbow pain occurs: Sharp pain at the elbow during the lowering phase is a signal to reduce the weight or shorten the range of motion. Discomfort in the bicep tendon at the bottom of the rep is a sign the weight is too heavy for the current range.
Recommended Tempo and Rep Range for Hypertrophy
Trainers typically recommend 3-4 sets of 8-12 reps with a 2-3 second lowering phase for muscle growth. This matches the eccentric-emphasis principle supported by the stretched-ROM research above.
- Eccentric phase (lowering): Take 2-3 seconds to lower the weight. This slow lowering is where the greatest mechanical tension occurs and is the primary growth stimulus in the preacher curl.
- Concentric phase (lifting): Lift in about 1-2 seconds with a deliberate squeeze of the biceps at the top. Do not rush the lift to avoid momentum creeping back in.
- Rest between sets: 60-90 seconds allows sufficient recovery to maintain quality reps on subsequent sets without full central fatigue.
- Training frequency: 2-3 sessions per week targeting the biceps is a practical frequency for intermediate lifters. Preacher curls can be programmed as a primary or secondary bicep exercise within that frequency.
- Load selection: Begin with a weight where the 8th rep feels challenging but form is not compromised. Intermediate lifters commonly use 15-30 lb dumbbells for this movement. Reduce the load if your elbows lift off the pad during any rep.
For more guidance on getting the most from your setup, read our guide to the how to do preacher curls with proper form and progressions.
What Are the Most Common Mistakes When Using an Adjustable Bench for Preacher Curls?
The five most common mistakes when using an adjustable bench for preacher curls are: setting the backrest too flat or too steep, positioning the armpit too high above the pad, letting the wrists bend backward under load, using momentum to escape the bottom stretch, and rushing the eccentric lowering phase. Each mistake reduces bicep isolation and increases joint stress.
Mistake 1: Setting the Bench Too Flat or Too Steep
A backrest angle below 25 degrees barely inclines the surface, which means your arm is nearly vertical and the exercise becomes a standard standing curl with minimal pad support.
- Fix: Set the backrest firmly at 30-45 degrees and test the feel with a light warm-up set. If the bottom stretch feels uncomfortable, move the angle up by one increment toward 40-45 degrees.
- Too steep: Settings above 50 degrees shift the pad too close to vertical, shortening the stretch at the bottom and changing the force curve so it more closely resembles a hammer curl against a wall than a preacher curl.
Mistake 2: Armpit Floating Above the Pad Edge
When the armpit clears the top edge of the pad by more than half an inch, the shoulder rotates backward as you lower the weight, injecting shoulder momentum into the rep and negating the isolation purpose of the exercise.
- Fix: Adjust your body position, not the bench angle, until the armpit contacts the very top edge of the backrest. Kneeling on the floor or adjusting foot placement can help you find the right height quickly.
- Test: Place your upper arm on the pad without a weight and try to shrug the shoulder forward. If you feel resistance from the pad, the position is correct. If the shoulder moves freely with no pad contact, you are too high.
Mistake 3: Allowing the Wrists to Bend Backward Under Load
Wrist hyperextension at the bottom of the rep places compressive stress on the wrist joint and shifts the work away from the biceps toward the wrist flexors.
- Fix: Reduce the load until you can maintain a neutral wrist position throughout the full range. Switching to a dumbbell with a slightly more neutral grip often resolves wrist bending that an EZ bar or straight bar causes.
- Cue: Think of "keeping the dumbbell balanced" throughout the entire rep. If the weight feels like it wants to tip the wrist backward at the bottom, the load is too heavy for your current wrist strength at that range.
Mistake 4: Using a Bounce or Swing at the Bottom
Bouncing at the bottom of the rep uses elastic rebound from the bicep tendon rather than true muscular force, which reduces the growth stimulus and significantly increases the risk of bicep tendon strain at the elbow.
- Fix: Pause for one full second at the bottom of each rep before initiating the curl. This dead-stop technique is non-negotiable for both safety and effectiveness on an adjustable bench, where there is no seat to brace you against the forward momentum.
- Weight check: If you cannot control the lowering phase without bouncing, reduce the load by 5 lb and rebuild with strict tempo before adding weight back.
Mistake 5: Rushing the Eccentric Phase
Dropping the weight quickly on the way down feels like saving energy, but the eccentric phase is where the most mechanical tension is placed on the muscle and where the greatest hypertrophy stimulus occurs.
- Fix: Count "one, two, three" as you lower the weight, keeping your elbow firmly pressed into the pad the whole way down. The 2-3 second eccentric tempo is the single most effective technical change most intermediate lifters can make to get more from preacher curls.
- Mental cue: Imagine you are slowly lowering a full glass of water, controlling the descent so not a drop spills. This creates the right level of intentional resistance in the eccentric.
For a deeper look at which adjustable bench models handle multiple incline positions best, see our best adjustable weight bench for men and best adjustable weight bench for women guides.
When Should You Add a Dedicated Preacher Curl Pad to Your Adjustable Bench?
Consider adding a dedicated preacher curl pad when you train biceps two or more times per week on your adjustable bench and want a more consistent, purpose-built pad surface that does not require angle re-setup each session. A pad attachment is a cost-effective upgrade that preserves your bench's versatility while giving you the feel of a commercial preacher station.
- Who benefits most: Intermediate lifters who have mastered the adjustable bench setup and want to remove the manual angle-setting step before each session.
- RitFit Preacher Curl Pad: The RitFit Preacher Curl Pad attaches directly to compatible adjustable benches, providing an ergonomic biceps support surface with a stable, fixed angle that matches commercial gym preacher stations.
- Space and cost: A pad attachment costs a fraction of a standalone preacher bench and takes up no additional floor space, making it the highest-value upgrade for most home gyms.
- When to stay with the bench setup: If you are a beginner still learning the movement pattern, or if you only train preacher curls once a week as a secondary exercise, the adjustable bench setup described in this guide is fully sufficient and does not require any upgrade.
Browse all compatible options or check out the adjustable workout bench guide for a broader comparison of bench features and training applications.
"Get over the top, drive the elbows back [into the pad] as hard as you can. Now when I'm down, I get a good stretch out there, full extension, and as I curl up, I'm just going to let the weight kind of almost lift straight towards the ceiling."
Jeff Cavaliere, MSPT, CSCS, Physical Therapist and Strength Coach, Athlean-X
FAQs About Adjustable Bench for Preacher Curls
What angle should I set my adjustable bench for preacher curls?
Set the backrest to approximately 30-45 degrees. This range mimics the angled pad of a dedicated preacher bench, placing your upper arms on a stable inclined surface that limits shoulder involvement and keeps constant tension on the biceps throughout the curl. A 45-degree setting most closely matches the standard commercial preacher bench pad angle.
Where should my armpit sit when doing preacher curls on an adjustable bench?
Your armpit should rest right at the top edge of the bench pad, with the full length of your upper arm from armpit to mid-forearm lying flush against the inclined surface. If your armpit floats above the pad, you lose the bracing effect that prevents shoulder momentum and reduces the isolation benefit of the exercise.
Can I use dumbbells instead of an EZ bar for preacher curls on an adjustable bench?
Yes, dumbbells are often the better choice on an adjustable bench because each arm works independently, you can adjust the wrist angle for comfort, and you avoid bar clearance issues on a narrower pad. A 2020 study found that barbell and cable preacher curl variations produce comparable biceps hypertrophy over ten weeks.[2]
Why should I lower the weight slowly during preacher curls?
The eccentric lowering phase places the biceps under the highest mechanical tension at the stretched position. A 2023 study found that preacher curls performed in the initial, stretched range of motion produced greater biceps hypertrophy at the distal muscle region. Taking 2-3 seconds to lower the weight maximizes this growth stimulus and also protects the elbow joint.[3]
Do I need a dedicated preacher bench or can I always use an adjustable bench?
An adjustable bench is an effective substitute for a dedicated preacher bench and is sufficient for most intermediate home gym lifters. If you train preacher curls multiple times per week and want a more consistent setup, adding a dedicated preacher curl pad attachment is a cost-effective upgrade worth considering.
Conclusion
Using an adjustable bench for preacher curls is a practical and effective way to build bicep size and strength at home without a dedicated station. Set the backrest to 30-45 degrees, position your armpit at the top pad edge, and lower each rep over 2-3 seconds to maximize the stretched-position stimulus.
Start with the angle and positioning steps today, then explore the RitFit Gator Adjustable Weight Bench for a stable, multi-angle platform built for exactly this kind of demanding bicep work.
Disclaimer
The information in this article is intended for general educational purposes and does not constitute medical or professional training advice. Consult a qualified fitness or healthcare professional before beginning any new exercise program, especially if you have a history of elbow, shoulder, or wrist discomfort.
Save on your next RitFit order
Tap the button to copy your code, then paste it at checkout.
References
1. Zabaleta-Korta A, Fernandez-Pena E, Torres-Unda J, Frances M, Zubillaga A, Santos-Concejero J. Regional Hypertrophy: The Effect of Exercises at Long and Short Muscle Lengths in Recreationally Trained Women. J Hum Kinet. 2023;87:259-270. doi:10.5114/jhk/163561
2. Nunes JP, Jacinto JL, Ribeiro AS, et al. Placing Greater Torque at Shorter or Longer Muscle Lengths? Effects of Cable vs. Barbell Preacher Curl Training on Muscular Strength and Hypertrophy in Young Adults. Int J Environ Res Public Health. 2020;17(16). doi:10.3390/ijerph17165859
3. Pedrosa GF, Simoes MG, Figueiredo MOC, et al. Training in the Initial Range of Motion Promotes Greater Muscle Adaptations Than at Final in the Arm Curl. Sports (Basel). 2023;11(2). doi:10.3390/sports11020039


