


Table of Contents
- What Is the Banded Hip Thrust?
- Equipment You Need
- How to Do a Banded Hip Thrust Step-By-Step
- How to Use Banded Hip Thrusts in a Workout
- Banded Hip Thrust Common Mistakes
- Safety Tips and Who Should Be Careful
- Muscles Worked in the Banded Hip Thrust
- Variations of the Banded Hip Thrust
- Banded Hip Thrust Alternatives
- How to Choose the Right Band
- Simple FAQ
If you sit a lot, feel your hips are tight, or feel your glutes never really “turn on” during squats, banded hip thrusts are one of the simplest ways to fix that at home.
You only need a resistance band, a stable surface to lean on, and a few minutes to learn the basics.
This guide will walk you step by step through how to do banded hip thrusts with safe form, which muscles they work, useful variations, and how to fit them into a simple lower body workout.
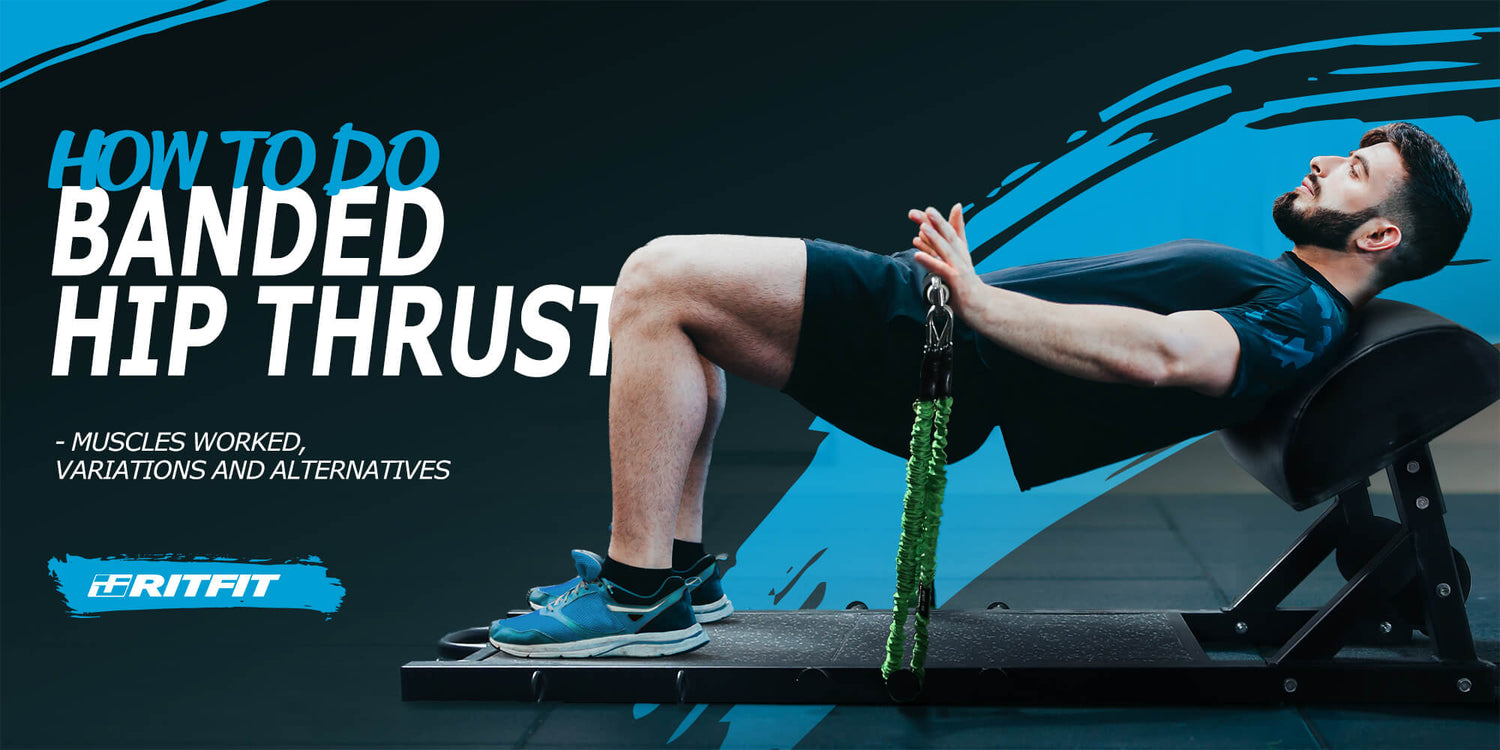
What Is the Banded Hip Thrust?
With a banded hip thrust, you sit on the floor with your upper back against a bench or box, put a band over your hips, and lift your hips up against the band's resistance.
The main goal is to train your glutes to extend your hips strongly while keeping your core stable and your lower back safe.
You can do banded hip thrusts in a gym or in a small home space.
They are a wonderful option if you do not have heavy weights but still want strong, round, and functional glutes.
Equipment You Need
You do not need a full gym to do banded hip thrusts. A simple setup is enough.
-
A resistance band
You can use a long loop band that goes under your feet or under a rack, or a shorter hip circle band that sits just above your knees. -
A bench, box, or sturdy sofa
This is to support your upper back. It should be stable, not slippery, and roughly at knee height. -
Floor space and a mat
A soft mat or carpet will make it much more comfortable to sit and thrust on the floor.
If you train with RitFit equipment, a standard weight bench or a stable plyo box works very well, and a loop resistance band set gives you different strength levels to progress over time.
How to Do a Banded Hip Thrust Step-By-Step
Here's a step-by-step guide to performing a banded hip thrust:
Step 1: Set up your bench and band
- Place your bench or box so it does not move. Put your band within reach. If you use a long loop band, anchor it under your feet or under heavy furniture or a rack so it stays in place.
Step 2: Get into the starting position
- Sit on the floor with your back to the bench. Bend your knees and place your feet flat on the floor about hip width apart.
- Lean back so the edge of the bench rests under your shoulder blades while your head and neck stay free.
Step 3: Position the band and brace your core
- Place the band across the crease of your hips. If it is a long loop, run it under your feet or under a solid anchor and then over your hips. If it is a hip circle above the knees, gently press your knees outward to keep tension.
- Take a gentle breath in, tighten your abs as if someone is going to poke your stomach, keep your ribs down, and feel your whole foot on the floor with a little extra pressure in your heels.
Step 4: Lift, pause, and squeeze
- Press your feet into the floor and squeeze your glutes to lift your hips toward the ceiling. Imagine your pelvis as a bowl of water and tilt it slightly so you are not spilling water from your lower back.
- At the top your body forms a straight line from knees to shoulders. Hold for about one second and squeeze your glutes. If you feel your lower back more than your glutes, lower your ribs slightly and think about pushing through your heels.
Step 5: Lower with control and repeat
- Slowly lower your hips over two to three seconds until your glutes are just above the floor.
- Keep light tension in the band and do not let your knees fall inward. A good beginner target is ten to twelve controlled reps per set, with two or three sets in total.
How to Use Banded Hip Thrusts in a Workout
To get results, you need to use the exercise often enough and with the right effort. Here are simple plans you can follow.
Beginner plan
Goal: Learn the movement and wake up the glutes.
- Two to three times per week
- Two or three sets of ten to twelve reps
- Light or medium band, with one or two reps left in the tank at the end of each set
Intermediate plan
Goal: Build more shape and strength in the glutes.
- Two or three times per week
- Three or four sets of twelve to fifteen reps
- Medium or heavy band, focus on strong squeeze at the top
Example lower body day with banded hip thrusts
You can place banded hip thrusts near the start of your leg workout after a short warm up.
- Bodyweight squats or lunges: two sets of ten as a warm up
- Banded hip thrusts: three sets of twelve to fifteen
- Romanian deadlifts or good mornings: three sets of ten to twelve
- Banded side steps or clamshells: two or three sets of fifteen per side
- Light core work and stretching
Banded Hip Thrust Common Mistakes
Below are some common mistakes people make when performing the banded hip thrust. By avoiding these common mistakes and focusing on proper form, you can get the most out of your banded hip thrusts and effectively target your glutes and hips.
1. Not Keeping the Resistance Band Taut
The resistance band should be taut throughout the exercise to provide consistent resistance and ensure the glutes work hard. So, ensure you're using a band with the right resistance level for your ability. It should provide enough resistance to challenge your glutes but not so much that it's difficult to maintain proper form.
2. Not Using Enough Resistance
Using a resistance band that is too light won't provide enough challenge to your muscles and limit the effectiveness of the exercise. So, use a band that offers enough resistance to make the exercise challenging.
3. Arching Your Lower Back
Arching your lower back during banded hip thrusts can compromise your form and increase the risk of injury. This can put unnecessary strain on your lower back muscles and reduce the effectiveness of the exercise. To avoid arching your lower back, keep your core engaged throughout the exercise. It will stabilize your lower back and prevent it from arching.
4. Not Pushing Through Your Heels
To effectively target your glutes, you need to push through your heels while using your glutes to drive the movement. If you're pushing through your toes or not using your glutes enough, you won't get the maximum benefit from the exercise.
5. Not Pausing at the Top
Pausing at the top of the movement for a second will help you feel the activation in your glutes and ensure that you're using the proper form. Skipping the pause can lead to improper form and limit the effectiveness of the exercise.
6. Overextending Your Hips
While it's essential to extend your hips fully, it's also important to avoid overextending them. This can place unnecessary stress on your lower back and reduce the effectiveness of the exercise. Instead, focus on your glutes contracting and stop when your upper body and upper thighs form a straight line.
Safety Tips and Who Should Be Careful
Banded hip thrusts are generally safe for healthy people, but some groups should take extra care.
- If you have ongoing lower back, hip, or knee pain, talk to a doctor or physical therapist before you start any new glute exercise.
- Stop the exercise right away if you feel sharp pain, numbness, or tingling. Normal muscle burn is fine, but joint pain is a warning sign.
- Keep the bench stable and the band in good condition. Do not use a cracked or very worn band.
- If you are pregnant or recently postpartum, work with a medical or fitness professional who understands your situation before doing loaded hip thrusts.
Muscles Worked in the Banded Hip Thrust
The banded hip thrust is a resistance exercise primarily targeting the gluteal muscles, also known as the glutes. However, the banded hip thrust works other muscle groups besides the glutes. This exercise works the glutes and other important muscle groups to improve lower body strength, power, and stability.
Glutes

The glutes are the largest muscle group in the body that play a key role in walking, running, jumping, and more. During the banded hip thrust, the resistance band provides resistance as you lift your hips off the floor or bench. This resistance activates the glutes and works them to fatigue. The glutes are responsible for extending the hips, and they work to lift the hips off the floor or bench during the movement.
Core

The core muscles, including the abs and lower back muscles, stabilize the spine and keep the body in a neutral position during the exercise. During the banded hip thrust, the resistance band creates resistance as you lift your hips off the floor or bench. This resistance requires the core muscles to work hard to maintain stability, especially as the hips reach full extension. This increased activation of the core muscles improves core strength over time.
Hamstrings

The hamstrings are located on the back of the upper leg and play a crucial role in hip extension. The resistance created by the resistance band during banded hip thrust activates the glutes. While the glutes are responsible for extending the hips, the hamstrings assist the glutes and contribute to this movement. This helps to improve the strength and power of the hamstrings, leading to improved lower body performance and stability.
Quads

The banded hip thrust works the quads, or quadriceps, by involving them as stabilizing muscles during the exercise. The quads are located on the front of the upper leg and play a crucial role in maintaining balance and stability during lower body exercises, including the hip thrust.
Hip Adductors

The adductors are the inner thigh muscles. The banded hip thrust works the hip adductors by involving them in keeping the legs together during the exercise. The hip adductors play a crucial role in maintaining balance and stability, especially as the hips reach full extension. The banded hip thrust requires using the entire body, including the hip adductors, to control the movement and keep the resistance band taut. This engages and strengthens the hip adductors, improving overall lower-body stability.
Variations of the Banded Hip Thrust
Variation #1: Elevated Banded Hip Thrust
The Elevated Banded Hip Thrust is an advanced variation of the standard Hip Thrust exercise and involves using a resistance band to increase the activation and difficulty of the exercise. Here's how to perform the Elevated Banded Hip Thrust:
- Start by sitting on the ground with your shoulders against a bench and your feet flat on the floor. Your knees should be bent, and your hands should be placed on the floor beside your hips.
- Loop a resistance band around your knees and position it so that it is taut.
- Drive your heels into the floor and use your glutes and hips to lift your torso up and off the bench until your body is straight from your knees to your shoulders.
- Pause for a moment at the top of the movement, squeezing your glutes, then slowly lowering your body down to the starting position.
- Repeat for the desired number of reps.
Variation #2: Single-Leg Banded Hip Thrust
Single-Leg Banded Hip Thrust is a strength training exercise commonly used to improve athletic performance, correct muscle imbalances, and prevent injury. It's performed with a resistance band and focuses on one leg at a time. Studies on the "bilateral deficit" confirm that unilateral exercises allow for higher muscle activation per leg than bilateral movements, correcting asymmetries.[1]
Here's how to perform the Single-Leg Banded Hip Thrust:
- Place a resistance band around your legs, just above your knees.
- Sit on the floor with your shoulder blades resting on a bench or sturdy surface while your legs extend in front of you.
- Place your feet on the floor and bend your right knee, keeping your left leg straight.
- Drive your right heel into the ground and raise your hips upward, keeping your left leg extended.
- Pause at the top of the movement and squeeze your glutes.
- Lower your hips back to the starting position.
- Repeat for the desired number of repetitions, then switch legs.
Variation #3: Banded Kneeling Hip Thrust
Banded Kneeling Hip Thrust is a variation of the standard hip thrust exercise but with the added resistance of a band around the hips. The band provides additional resistance as you extend your hips, challenging the muscles to work harder to produce force. To perform a Banded Kneeling Hip Thrust:
- Kneel on the floor with your knees shoulder-width apart and place a bench or stability ball behind you.
- Wrap a resistance band around your hips and position yourself, so your upper back rests on the bench or ball.
- Place your hands on the ground beside you for stability.
- Drive your hips upward, squeezing your glutes at the top of the movement.
- Slowly lower your hips to the starting position, keeping tension on the band throughout the exercise.
- Repeat for the desired number of reps.
Variation #4: Standing Band Hip Thrust
The Standing Band Hip Thrust is another traditional hip thrust exercise variation. It is performed while standing, with the assistance of a resistance band, to increase the intensity of the movement. Here's how to perform the Standing Band Hip Thrust:
- Stand with your feet shoulder-width apart and wrap a resistance band around your legs just above your knees.
- Bend your knees and shift your weight onto your heels, keeping your core tight and chest lifted.
- Drive your hips forward, pushing through your heels and contracting your glutes.
- Pause at the top of the movement for a moment, then slowly lower your hips to the starting position.
- Perform the exercise for as many repetitions as desired.
Banded Hip Thrust Alternatives
Alternative #1: Glute Bridge
The Glute Bridge is a strength training exercise that primarily works the glutes or the buttocks muscles. It's also a good exercise for strengthening the lower back, hips, and core muscles. For increased resistance, the exercise can be performed with just body weight or additional weight, such as a barbell or weight plates.
You can perform this exercise lying on your back, with your knees bent and feet flat on the floor. Then, you lift your hips off the ground and extend them towards the ceiling, creating a bridge-like shape with your body.
Alternative #2: Barbell Hip Thrust
The Barbell Hip Thrust is similar to the banded hip thrust. But instead of a resistance band, you use a barbell to add resistance to the movement. You can perform it by sitting on the ground with a barbell across the hips, then driving the weight up with the hips, extending them towards the ceiling, and lowering the hips back to the ground.
This exercise can improve athletic performance by increasing hip and glute strength and enhancing power, speed, and jumping ability. It can also alleviate lower back pain and improve posture by strengthening the spine-supporting muscles.
Alternative #3: Squats
Squats are a multi-joint exercise that can target the glutes, quadriceps, and hamstrings, making them an excellent alternative to the banded hip thrust. They are a staple exercise in many strength training programs, helpful in improving overall fitness and athletic performance.
The exercise is performed by standing with feet shoulder-width apart, then lowering the body as if sitting back in a chair. Your legs should bend to at least a 90-degree angle, and the hips should go lower than the knees. Then, you push back up to the starting position, extending the legs and straightening the body.
How to Choose the Right Band
Choosing a band that is too light will not challenge your muscles, but choosing one that is far too heavy will make your form worse.
-
Beginners
Start with a light to medium band that allows you to complete ten to fifteen reps with good control and a clear squeeze in the glutes. -
Intermediate lifters
Use a medium or heavy band. Aim for three or four sets of ten to fifteen reps, where the last two reps feel challenging but not sloppy. -
Advanced lifters
Use heavier bands, single leg variations, or tempo work such as slow lowers and long pauses at the top.
If you use a set of RitFit loop bands or hip circle bands, you can move to the next color or level when your current band feels easy for the full set and rep range.
Summary
Banded hip thrusts are a simple, joint friendly way to build strong and shaped glutes at home or in the gym with minimal equipment.
By choosing a suitable band, using the clear steps in this guide, and training two or three times per week, even a complete beginner can safely learn to “feel the glutes” and make real progress over time.
References
- Zhang W, Chen X, Xu K, et al. Effect of unilateral training and bilateral training on physical performance: A meta-analysis. Front Physiol. 2023;14:1128250. Published 2023 Apr 13. doi:10.3389/fphys.2023.1128250
Simple FAQ
Are banded hip thrusts good for beginners
Yes. Banded hip thrusts are very beginner friendly because you can start with light resistance, keep your feet on the floor, and focus on learning to squeeze your glutes without loading your spine heavily.
How often should I do banded hip thrusts for glute growth
Most people do well with two or three sessions per week. Leave at least one rest day between sessions that include heavy or high volume hip thrusts so your glutes can recover and grow.
Can I do banded hip thrusts without a bench
Yes. You can do a banded glute bridge on the floor or a kneeling banded hip thrust if you do not have a bench. You will still get a strong glute workout, especially as a beginner.
What if I only feel my hamstrings and not my glutes
Try moving your feet a little closer to your body, push more through your heels, keep your ribs down, and actively think about squeezing your butt at the top. You may also reduce the band resistance so you can focus on technique.
Are banded hip thrusts enough to grow my glutes
They are an excellent main exercise, especially at home, but you will get the best results when you combine them with other movements such as squats, lunges, and hip hinge exercises, plus a high protein diet and enough rest.


