The hip abduction machine is one of the most consistently misused pieces of equipment in any gym. Most people sit bolt upright, throw the weight, and wonder why they feel it in their hip flexors instead of their glutes.
This guide covers machine setup, proper seated position, the forward-lean cue that changes everything, optimal sets and reps by goal, the most common mistakes to fix, and how this exercise fits into a complete glute training plan.
Quick Answer: To use the abductor machine for glutes, sit with a slight 10-15 degree forward hip hinge, adjust pads to your outer thighs above the knee, and press outward in a slow 2-second arc with a 1-second hold at peak contraction. Perform 3-4 sets of 12-15 reps to target the gluteus medius effectively.
Key Takeaways
- Forward lean is essential: A 10-15 degree forward hip hinge shifts the load onto the gluteus medius and away from the TFL and hip flexors, making it the single most impactful form cue on this machine.
- Slow tempo builds more muscle: Use a 2-second push out, 1-second hold at peak contraction, and 2-3 second controlled return to maximize time under tension in this isolation exercise.
- Meaningful glute activation: A systematic review found the seated hip abduction machine produced gluteus medius activation averaging around 65% of maximum voluntary contraction, above the threshold generally needed for strength adaptation.
- Train it 2-3 times per week: For glute growth, perform 3-4 sets of 12-15 reps with at least 48 hours between sessions, and apply progressive overload by adding reps before adding weight.
- Use it as a complement, not a substitute: The abductor machine builds the gluteus medius and gluteus minimus most effectively when paired with compound glute exercises like hip thrusts and squats.
What Does the Abductor Machine Actually Work?
The abductor machine primarily targets the gluteus medius and gluteus minimus, the muscles on the outer hip and upper glute region responsible for moving your legs away from the midline of your body. A systematic review found the seated hip abduction machine produced gluteus medius activation well above the threshold generally needed to drive strength adaptation.[1]
- Gluteus medius: The largest of the two primary targets, this fan-shaped muscle sits on the outer surface of the pelvis. It is the main driver of hip abduction and stabilizes the pelvis every time you take a step, run, or stand on one leg.
- Gluteus minimus: Located just beneath the gluteus medius, this muscle assists with abduction and hip internal rotation. Training it helps give the outer glutes fuller shape and contributes to pelvic control during dynamic movements.
- Tensor fasciae latae (TFL): This secondary muscle on the outer hip also assists during abduction. Poor setup and positioning can cause the TFL to dominate the movement, which is exactly why the forward-lean cue matters so much.
- What it does not primarily train: The gluteus maximus is minimally recruited during seated abduction. For overall glute size and strength, the abductor machine works best alongside hip thrusts and compound lower body movements that load the gluteus maximus directly.
Think of the abductor machine as the finishing tool for your outer glutes. It isolates the gluteus medius under direct, scalable resistance, which compound exercises like squats and smith machine glute bridges cannot fully replicate on their own.
Why Is the Glute Medius So Often Undertrained?
The gluteus medius is chronically weak in most gym-goers because nearly all popular lower body exercises load the gluteus maximus and quadriceps while leaving the outer hip muscles relatively unchallenged. Weakness in the gluteus medius and minimus is linked to a range of lower body issues including knee tracking problems, IT band tightness, hip instability, and reduced performance in single-leg movements.[1]
Adding direct hip abduction work, whether through a hip abduction machine for glutes or band alternatives, fills the training gap that compound movements leave behind.
How Do You Set Up the Abductor Machine?
Proper machine setup ensures the right muscles are loaded from the first rep. Adjusting seat height, pad position, and starting leg position before you touch the weight stack takes about 30 seconds and makes the difference between feeling this in your glutes versus your hips and lower back.
Seat Height and Pad Position
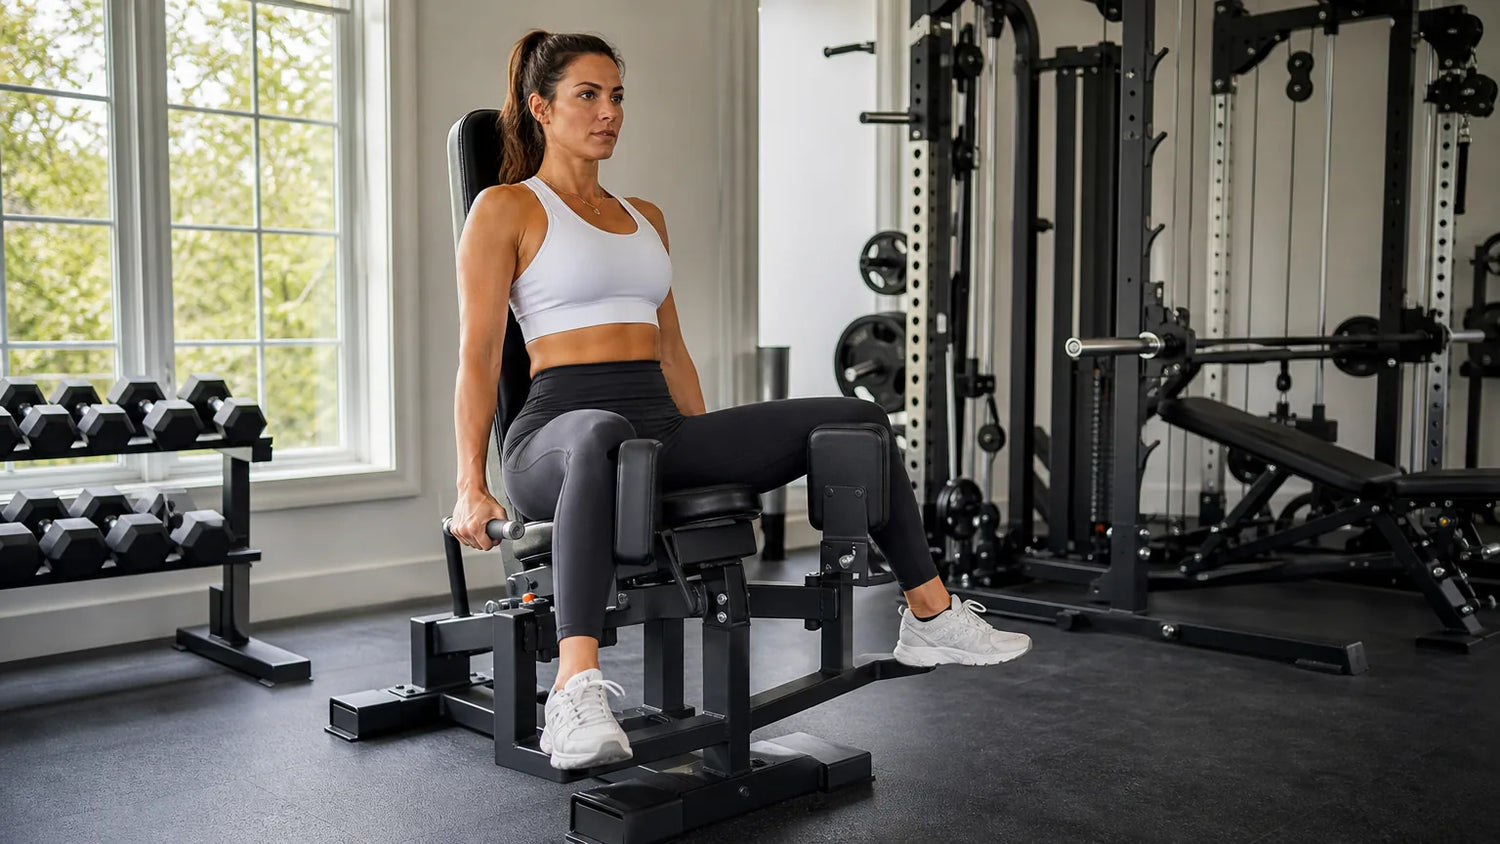
Adjust the seat so your hips sit at approximately 90 degrees with feet flat on the footrests. The resistance pads should contact the outside of your thighs just above the knee, not on the knee joint itself or lower on the shin.
- Seat height: Your knees should align with the machine's pivot point. If the seat is too low, the pads press into the knee rather than the outer thigh, reducing glute activation and potentially stressing the joint.
- Pad width at start: Set the starting pad position so your legs are either together or just inside a comfortable stretch. This is the fully lengthened position for the gluteus medius, where the muscle is under maximum load at the beginning of each rep.
- Handle grip: Hold the handles lightly for support and stability. Do not pull on them or use them to generate momentum during the push-out phase.
The Forward Lean You Cannot Skip
Before you select your weight, hinge your torso approximately 10-15 degrees forward at the hip rather than sitting straight up or leaning back. This single adjustment shifts the line of pull onto the gluteus medius and reduces activation of the TFL and hip flexors, which tend to dominate when you sit fully upright.
- How much to lean: Think of tilting forward just enough to read something on the floor in front of you. You should feel your outer hip muscles pre-activate at this position before you even start the movement.
- Maintain the lean throughout: Do not let your torso drift back as you fatigue. If your back starts pulling into the pad, the weight is too heavy or the set is done.
- Upright versus forward lean: Sitting fully upright often shifts the primary effort to the TFL and hip flexors. Coaches consistently recommend the 10-15 degree forward hinge as the most impactful form change for glute-focused abduction work.
What Is the Correct Form on the Abductor Machine?
Correct abductor machine form means driving the movement from the outer hip with a controlled tempo, reaching full range of motion, and maintaining tension throughout the entire set. The technique is simple but most people rush through it in ways that shift the work away from the glutes.
The Push-Out Phase
Brace your core lightly and initiate the movement by thinking about pushing your outer hips apart rather than pushing with your feet or knees. Drive outward in a smooth, controlled arc over 2 seconds until you reach the widest point the machine allows or you feel a strong contraction in the outer glutes.
- Drive from the hip, not the foot: Think "spread the floor with your hips" rather than pushing with your legs. This mental cue keeps the effort in the gluteus medius rather than the secondary movers.
- Hold at peak contraction: Pause for 1 full second at the widest point before starting the return. This brief isometric hold increases time under tension and improves mind-muscle connection in the outer glutes.
- Stop before your pelvis tilts: If you feel your lower back shift or your pelvis rotate at the end of the range, you have gone too far for your current flexibility and control. Stay within the range where your glutes contract, not your spine moves.
The Return Phase
Guide your legs back together over 2-3 seconds, resisting the pull of the weight rather than letting it drop. The slow eccentric phase on the return is where a significant portion of the training stimulus comes from on smaller isolation exercises like this one.
- Never let the plates crash: Do not allow the weight stack to slam down between reps. Keep a small amount of tension at the bottom so the stack stays just barely lifted and the muscles stay loaded throughout the set.
- Do not let your legs fully snap together: Stop just short of the starting position on each rep to maintain constant muscle tension rather than releasing all load at the bottom.
Breathing Pattern
Exhale through pursed lips as you push your knees outward during the concentric phase. Inhale through your nose as the pads return during the eccentric phase.
- Avoid breath holding: Holding your breath through multiple reps creates unnecessary blood pressure spikes and can leave you light-headed at the end of a set, particularly on higher-rep glute-focused sets.
- Use breath as a pace indicator: When your breathing becomes choppy or your tempo speeds up involuntarily, those are reliable signs the set is close to done. Stop 1-2 reps before form breaks down rather than grinding through sloppy reps.
For a clear look at how a hip machine targets these upper glute muscles, the best smith machine exercises for glutes guide also covers the mechanics behind hip-focused isolation work.
How Much Weight Should You Use and How Do You Progress?
Start with a weight that allows you to complete 12-15 clean reps with a slow, controlled tempo and a 1-second pause at peak contraction, without any bouncing or pelvic shifting. The abductor machine isolates a smaller muscle group, so the training stimulus comes from tension and range of motion rather than absolute load.
- First session rule: Choose a weight where the last 2-3 reps are genuinely challenging but form stays clean throughout. It is better to finish a set with some effort remaining than to grind through sloppy reps and miss the target muscles entirely.
- Add reps before adding weight: Progress by increasing from 12 to 15 to 20 reps per set before increasing the load, even by 5 lb. The gluteus medius responds well to higher-rep ranges with consistent tension, not maximum loads.
- Small weight increments only: When you do increase the load, go up in the smallest increment the machine allows. A jump that is too large often causes the pelvis to compensate and pulls the work away from the glutes entirely.
- Plateau-busting techniques: Once you can complete 4 sets of 15-20 reps with good form, introduce drop sets (immediately reduce weight when you reach failure and continue for more reps), pause reps (hold the peak contraction for 3-5 seconds per rep), or a 3-1-3 tempo (3 seconds out, 1 second hold, 3 seconds back) before increasing the overall load.
- When to increase weight: Add load when you can complete all sets and reps with the same tempo and range of motion you started with, consistently across 2-3 training sessions. Consistent performance over multiple sessions is the signal, not a single good day.
For a broader look at progressive overload principles applied to lower body equipment, the guide on how to use a leg press hack squat machine covers similar progression logic for other leg machines.
How Many Sets and Reps Should You Do?
The right sets and reps for the abductor machine depend on your primary goal, whether that is building glute size, improving hip stability, or using the machine as a warm-up tool before heavier compound work. All three goals call for slightly different programming.
| Goal | Sets x Reps | Frequency | Notes |
|---|---|---|---|
| Glute growth (hypertrophy) | 3-4 x 12-15 | 2x per week, 48 hrs rest | Slow tempo, 1-sec hold at peak |
| Strength and stability | 3 x 8-12 | 2-3x per week | Moderate load, full range of motion |
| Activation warm-up | 2-3 x 15-20 | Before squats or hip thrusts | Light weight, focus on mind-muscle connection |
| Endurance and muscle tone | 1-2 x 15-20 | After main sets, 1-2x per week | Lighter load, shorter rest intervals |
| Beginners | 2-3 x 12-15 | 2x per week | Very light load, master form first |
Programming guidelines based on standard resistance training principles for isolation exercises targeting smaller muscle groups.
Rest Periods
Rest 60-90 seconds between sets for hypertrophy-focused work to maintain muscle tension without full recovery. For strength and stability goals, rest 90-120 seconds to allow more complete recovery between heavier sets.
Where to Place It in Your Workout
Place the abductor machine either early in the session as a 2-3 set activation primer before squats and hip thrusts, or at the end of your lower body session as a 3-4 set accessory finisher after compound movements. Both placements are effective but serve different purposes.
- As activation before compounds: Light sets of 15-20 reps wake up the gluteus medius and improve its recruitment during subsequent heavier lifts, which can improve your squat mechanics and reduce knee valgus.
- As accessory after compounds: Heavier sets of 10-15 reps after your main lifts treat the machine as a real hypertrophy stimulus. At this point your glutes are already warm and your compound work is finished, so fatigue in the abductor does not limit your primary lifts.
- Frequency for beginners: Start with 2 sessions per week with at least one full rest day in between. This is enough stimulus to build the movement pattern and begin strengthening the gluteus medius without overloading a muscle that may be quite underdeveloped.
For a full lower body equipment approach, see the best hip abductor machine for beginners guide, which covers machine selection alongside programming basics.
What Are the Most Common Abductor Machine Mistakes?
Most abductor machine errors fall into four categories: wrong seated position, too much weight, poor tempo, and incomplete range of motion. Each one shifts the work away from the gluteus medius and onto compensating muscles.
Leaning Back Into the Seat
Sitting fully upright or reclining into the backrest is the most common setup error on this machine. When you lean back, the line of pull shifts from the gluteus medius to the TFL and hip flexors, which means you feel the work in the wrong place and build momentum habits rather than glute strength.
- The fix: Set up with a 10-15 degree forward hip hinge before you even select your weight. If your torso drifts back mid-set, end the set and reduce the load.
Using Momentum and Bouncing
Ripping through reps with a fast swing means your hip flexors and gravity are doing most of the work, while the gluteus medius is just along for the ride. Swinging also shortens the time under tension to near zero on both phases of the movement.
- The fix: Slow down to the 2-1-2 or 2-1-3 tempo (2 seconds out, 1 second hold, 2-3 seconds back). If you cannot maintain that tempo with the current weight, the load is too heavy.
Partial Range of Motion
Stopping short on the way out and letting the pads bang together on the return cuts your effective range of motion roughly in half. Both ends of the movement matter: the stretched position at the start and the squeezed position at peak contraction both contribute meaningfully to the muscle-building stimulus.
- The fix: Push to the full comfortable range at peak abduction, and resist all the way back until the pads are just barely touching rather than crashing. Keep the weight stack slightly elevated even at the bottom of the rep.
Too Much Weight
Loading the abductor machine too heavy is the most damaging mistake because it causes the pelvis to rotate and the lower back to take over. At that point you stop training the hip abductors almost entirely, while adding unnecessary stress to the lumbar spine.
- The fix: Drop the weight until you can feel the outer glute contracting through the full range of motion with a forward-leaned torso. The abductor machine is not a machine where heavier always means better results.
When Should You Stop if Something Hurts?
Stop the set immediately if you feel sharp or pinching pain in the hip joint, lower back, or knee during any part of the movement. Discomfort in those areas is a signal that the setup is wrong, the weight is too heavy, or you are working through a range of motion your hip mobility does not currently support.
- Muscle burn is fine: A deep ache or burn in the outer hip and glute region is normal and expected, especially near the end of a set. This is the gluteus medius under load and is a sign the exercise is working.
- Joint pain means stop: Clicking, pinching, or sharp sensations in the hip, groin, or knee joint are different from muscle fatigue. Reduce the range of motion, lower the weight, or consult a qualified fitness professional before continuing.
The abductor machine is covered in more depth alongside other lower body equipment in the hip abductor machine for home gym guide, which compares setup options for training at home.
The hip thrust machine pairs directly with abductor work for a complete upper and lower glute training session, loading the gluteus maximus through the range the abduction machine leaves untrained.
How Does the Abductor Machine Fit Your Full Glute Program?
The abductor machine builds the gluteus medius most effectively as a complement to compound hip extension and lower body movements, not as a standalone glute solution. A complete glute program trains hip extension with exercises like hip thrusts and deadlifts, hip abduction with the machine or band variations, and compound loading with squats and lunges across all three areas.
Pairing With Hip Thrusts and Compound Movements
Hip thrusts, squats, and deadlifts load the gluteus maximus heavily through hip extension. The abductor machine targets the gluteus medius and minimus through a completely different movement pattern, making the two categories complementary rather than redundant.
- Sample pairing for glute focus: Start with a hip thrust or smith machine compound movement as your primary movement, then finish with 3-4 sets of abductor machine work as your isolation accessory.
- Using it as a warm-up primer: 2 light sets of 15-20 reps on the abductor machine before squats or hip thrusts activates the gluteus medius and can improve mechanics during the heavier compound sets that follow.
- Training frequency balance: The gluteus medius recovers faster than the gluteus maximus. You can train it 2-3 times per week alongside your regular lower body sessions without affecting recovery for heavier compound work. One study found elastic resistance elicited somewhat higher gluteus medius EMG than the seated machine, which means bands and machine work can alternate or combine without significant overlap in fatigue.[2]
What If You Do Not Have Access to an Abductor Machine?
Side-lying hip abduction performed on a mat is the best no-machine alternative for targeting the gluteus medius in isolation. A study comparing three side-lying hip strengthening exercises found the standard side-lying abduction exercise produced the highest gluteus medius activation with minimal TFL contribution, making it superior to the clamshell and external-rotation variants for pure glute medius work.[3]
- Side-lying hip abduction: Lie on your side with your body in a straight line, then lift the top leg in a controlled arc. Add ankle weights or a resistance band just above the knee for progressive overload over time.
- Standing cable hip abduction: Attach an ankle cuff to a low cable pulley and perform standing hip abduction. This loads the gluteus medius in a functional standing position and transfers well to walking and running mechanics. The cable machine collection at RitFit includes options that support this movement with a full range of attachment settings.
- Banded seated hip abduction: Place a mini resistance band just above the knees while seated on a bench. Push your knees apart against the band resistance using the same forward-lean cue you would use on the machine. Simple and highly portable.
- Lateral band walks: Loop a resistance band around your ankles or just above the knees and walk laterally in a semi-squat position. This loads the gluteus medius in a weight-bearing, functional pattern that complements the seated machine work.
If you are building a home gym with lower body machine coverage, the leg machines collection includes options suitable for hip-focused training. The multifunctional smith machine also supports cable-based standing hip abduction as one of many lower body movements from a single footprint.
"Many gyms have machines that allow for this. If you find one that feels right, then go really hard on these and make them a staple movement and go for progressive overload over time. The 4-way hip machine can work well."
Bret Contreras, PhD, PhD in Sports Science, known as The Glute Guy, Contreras Strength Institute
FAQs About How to Use the Abductor Machine for Glutes
What muscles does the abductor machine work?
The abductor machine primarily targets the gluteus medius and gluteus minimus, the muscles on the outer hip responsible for hip abduction, pelvic stability, and the rounded shape of the outer glutes. The tensor fasciae latae also activates but can be minimized with correct setup, including the forward lean cue and moderate weight selection.
How many sets and reps should I do on the abductor machine for glute growth?
For hypertrophy, perform 3 to 4 sets of 12 to 15 reps with a slow tempo and a 1-second pause at peak contraction. Rest 60 to 90 seconds between sets and train this exercise 2 times per week with at least 48 hours between sessions. Start with 2 to 3 sets if you are new before building volume.
Should I lean forward or sit straight on the abductor machine?
Leaning forward approximately 10 to 15 degrees at the hip is strongly recommended by coaches and trainers. This slight forward hinge shifts the line of pull onto the gluteus medius and reduces activation of the tensor fasciae latae and hip flexors. Sitting fully upright or leaning back is the most common setup error and significantly reduces glute activation.
What weight should I start with on the abductor machine?
Select a weight that allows 12 to 15 clean reps with a controlled tempo without bouncing or pelvic shifting. The abductor machine trains a smaller muscle group, so prioritize full range of motion and tempo over load. Add resistance in small increments only once you can complete all reps with clean form consistently.
Can I use the abductor machine as a warm-up before squats or hip thrusts?
Yes, and it is an effective strategy. Using 2 to 3 light sets of 15 to 20 reps before compound lifts primes the gluteus medius and can help reduce knee valgus during squats. Keep the weight light so the sets feel like activation rather than fatigue, and rest briefly before your main exercises.
Is the abductor machine good for building glutes or just toning?
The abductor machine builds real muscle in the gluteus medius and gluteus minimus when you apply progressive overload consistently. A systematic review found the seated hip abduction machine produced gluteus medius activation well above the threshold needed for strength adaptation. Treat it like any resistance exercise: increase reps or weight progressively and it will contribute to both glute size and strength.
Conclusion
Using the abductor machine for glutes correctly comes down to three habits: lean slightly forward before you push, control the tempo through both phases, and progress the load gradually over time. These adjustments shift the work onto the gluteus medius and gluteus minimus, and away from the compensating muscles that take over when form breaks down.
Start with 2-3 sets of 12-15 reps twice a week, pair the machine with hip thrusts and compound lower body movements, and explore how to use a smith machine at home for complementary lower body training options.
Disclaimer
This article is for general fitness education purposes only and does not constitute medical advice, diagnosis, or treatment for any injury or health condition. Consult a qualified healthcare provider or certified fitness professional before starting a new exercise program, especially if you have existing hip, knee, or lower back concerns.
Save on your next RitFit order
Tap the button to copy your code, then paste it at checkout.
References
1. González-de-la-Flor Á. Optimizing hip abductor strengthening for lower extremity rehabilitation: a narrative review on the role of monster walk and lateral band walk. J Funct Morphol Kinesiol. 2025;10(3). doi:10.3390/jfmk10030294. https://pmc.ncbi.nlm.nih.gov/articles/PMC12372021/
2. Brandt M, Jakobsen MD, Thorborg K, Sundstrup E, Jay K, Andersen LL. Perceived loading and muscle activity during hip strengthening exercises: comparison of elastic resistance and machine exercises. Int J Sports Phys Ther. 2013;8(6):811-9. https://pmc.ncbi.nlm.nih.gov/articles/PMC3867074/
3. McBeth JM, Earl-Boehm JE, Cobb SC, Huddleston WE. Hip muscle activity during 3 side-lying hip-strengthening exercises in distance runners. J Athl Train. 2012;47(1):15-23. doi:10.4085/1062-6050-47.1.15. https://pmc.ncbi.nlm.nih.gov/articles/PMC3418110/