


A defined waistline comes from training the muscles that wrap your midsection, not from any single magic move. This guide names the exercises that actually shape and tighten your waist and shows you how to program them.
It is built for adults at any level who want a tighter, more athletic-looking waist. You will get the honest truth about fat loss, the highest-value moves, and clear sets, reps, and safety guidance.
Table of Contents
- Can Exercise Really Slim Your Waistline?
- Which Muscles Shape Your Waist?
- What Are the Best Exercises for a Defined Waistline?
- How Should You Choose Your Load and Resistance?
- How Many Sets, Reps, and Sessions Per Week?
- How Do You Progress and When Should You Add Load?
- What Are the Best Substitutions and Variations?
- What Common Mistakes Should You Avoid?
- What Does a Weekly Waistline Plan Look Like?
Key Takeaways
- No spot reduction: Exercise tones and shapes the waist, but overall fat loss through diet is what reveals a narrower midsection.
- Train the obliques: Side planks, woodchoppers, carries, and Pallof presses build the side and deep core that create a tapered waist.
- Stronger does not mean wider: For most people, oblique training adds definition and a V-taper, not bulk.
- Anti-movement matters: Bracing and anti-rotation drills strongly recruit the deep internal oblique that crunches barely touch.
- Keep it simple: Two to four short sessions per week, two to three moves each, with steady progression is enough.
Can Exercise Really Slim Your Waistline?
Exercise alone cannot shrink your waistline by burning fat from that specific area, because spot reduction is not how the body loses fat. Targeted training strengthens and shapes the waist muscles, while a calorie-controlled diet is what reveals a narrower midsection.
- Shape versus size: Oblique work tightens and defines the sides of your torso so they show once body fat drops.
- Fat loss drives circumference: A modest calorie deficit with adequate protein is the most reliable way to reduce waist measurement.
So the smart plan pairs waist-focused training with sensible nutrition. Training builds the look, and overall fat loss makes it visible.
"Believe me, do not listen to anyone who says to not work your obliques because it will thicken your waistline. Developed obliques will make your waist look incredible as you continue to work on getting rid of body fat."
Jeff Cavaliere, MSPT, CSCS, Physical Therapist and Strength Coach, Athlean-X
Which Muscles Shape Your Waist?
Your waist is shaped mainly by the external and internal obliques, the deep transverse abdominis, and the rectus abdominis. The obliques run along the sides of your torso and create the taper from ribs to hips, while the transverse abdominis acts like a built-in corset.
- External and internal obliques: These side muscles drive rotation and side bending and define the V-taper at the waist.
- Transverse abdominis: The deepest layer pulls the midsection inward and supports a flat, tight look.
- Rectus abdominis: The front sheet adds the vertical center line of the midsection.
The deep internal oblique responds best to bracing and anti-movement work. During abdominal bracing, internal oblique activity reached about 60 percent of maximum, far higher than the rectus abdominis at 18 percent, external oblique at 27 percent, and erector spinae at 19 percent, and higher than in many dynamic moves like sit-ups[1]. For more deep-core ideas, see this deep core routine on a weight bench.
What Are the Best Exercises for a Defined Waistline?
The best waistline exercises emphasize anti-rotation, rotation, and side bending, since those patterns load the obliques the way they actually work. A short menu of seven moves covers stability, rotation, and loaded variations for a complete, tapered midsection.
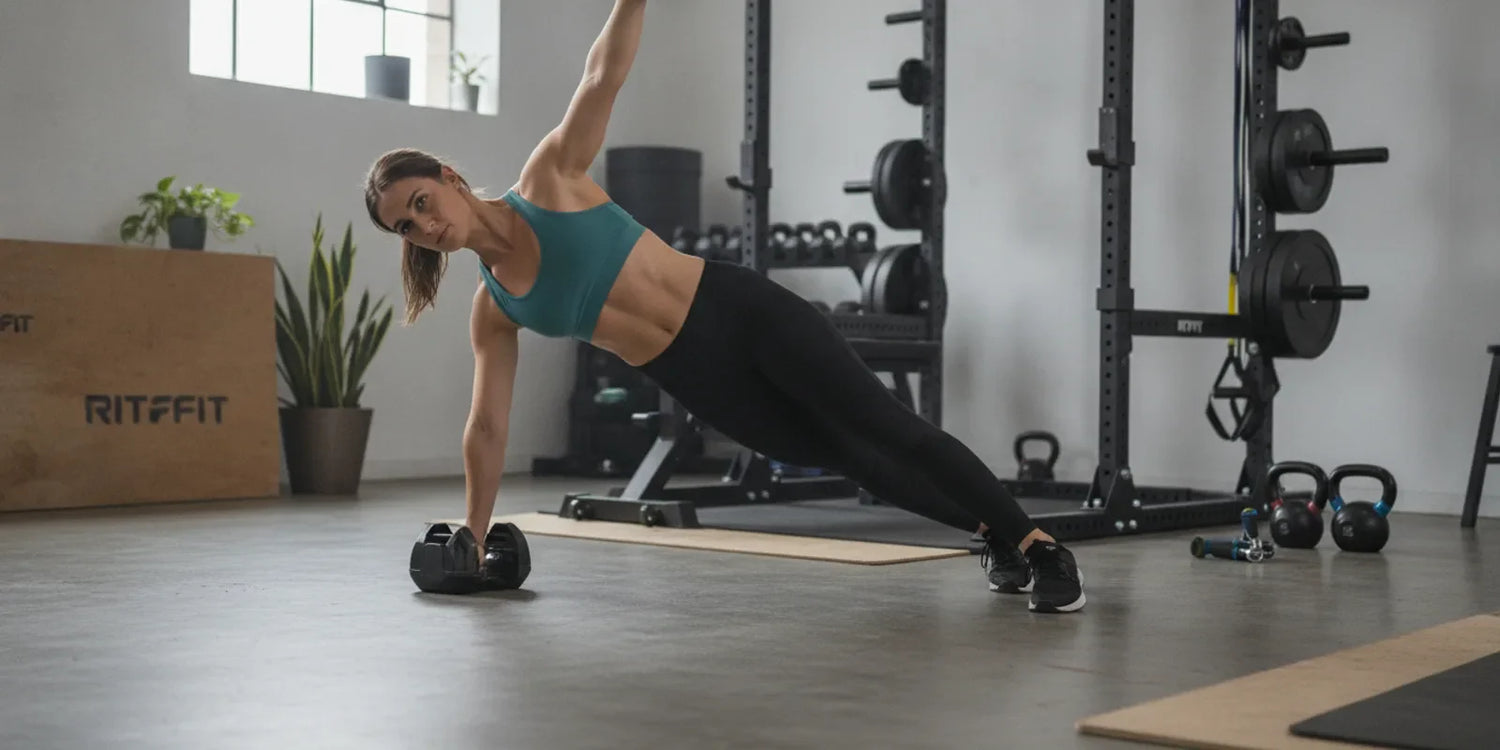
Side Plank
The side plank loads the obliques and the deep core through anti-lateral-flexion, building the muscular shelf that narrows the waist. Hold a straight line from head to feet, stack your hips, and add a reach-through for a rotational challenge.
Bicycle Crunch
The bicycle crunch combines trunk rotation with flexion, hitting the rectus abdominis and obliques together in one bodyweight move. Move slowly and rotate from the ribs rather than yanking the neck.
This short demo shows the controlled tempo and rib-driven rotation that make the move effective.
Cable or Band Woodchopper
The woodchopper trains rotation against resistance, loading the body diagonally in line with the oblique fibers. A pilot study found a self-oblique rotational drill coordinately activates abdominal and hip muscles, supporting rotational loading for the trunk[3].
Run it with an adjustable cable handle or grab resistance bands for a home version.
Pallof Press
The Pallof press is an anti-rotation hold where you resist a band or cable trying to twist your torso. Keep your hips square and press straight out, fighting rotation rather than creating it.
Suitcase Carry
The single-arm suitcase carry forces the obliques to resist side bending while you walk with weight in one hand. Stand tall, avoid leaning, and let the loaded side of your waist do the bracing work with kettlebells or dumbbells.
Russian Twist
The weighted Russian twist trains rotation through a larger range, raising oblique demand when you add load and control. Keep your chest tall and rotate from the trunk instead of swinging the arms.
Dead Bug
The dead bug is an anti-extension drill that teaches the deep core to stay braced while the limbs move. It is a safe starting point that builds the bracing skill the harder moves rely on.
How Should You Choose Your Load and Resistance?
Choose a load that lets you keep a braced, neutral spine for every rep, since form drives oblique recruitment far more than raw weight. Start light on rotational and carry exercises, then add resistance only once your technique stays clean.
- Bodyweight first: Master side planks, dead bugs, and slow bicycle crunches before loading anything.
- Light to moderate for rotation: Begin woodchoppers and Russian twists with a band or a 5 to 15 lb load and build up.
- Heavier for carries: Suitcase carries can handle more weight, often 25 to 50 lb per hand, as long as you stay upright.
The goal is controlled tension, not maximal effort. If your spine rounds or twists under load, drop the weight.
How Many Sets, Reps, and Sessions Per Week?
Most people get a defined waist from two to four short sessions per week, with two to three exercises per session and three sets each. The core recovers quickly, so you can train it on non-consecutive days alongside your usual workouts.
- Stability holds: Side planks and Pallof presses work well for 3 sets of 20 to 40 second holds per side.
- Dynamic moves: Bicycle crunches and Russian twists fit 3 sets of 10 to 15 controlled reps per side.
- Carries: Suitcase carries suit 3 sets of 20 to 40 steps per side.
Prioritize quality and control over chasing high rep counts. A few precise sets beat dozens of sloppy ones.
Try a quick set of ab exercises to warm up first.
How Do You Progress and When Should You Add Load?
Progress your waistline training when current sets feel controlled and no longer challenging, usually after two to three consistent weeks. Add load, range, or a harder variation only once your spine stays neutral and your form holds for every rep.
- Add reps or time first: Build to the top of each range before changing anything else.
- Then add load: Increase resistance on woodchoppers, twists, and carries in small steps.
- Then change leverage: Lift the feet on Russian twists or add a reach-through to the side plank.
One sign you are ready to add weight is finishing all sets at the top rep range with clean technique and no spinal shift. If form breaks, hold steady before progressing.
What Are the Best Substitutions and Variations?
Good substitutions let you train the same waist patterns with the equipment you have or around any limitations. Swap by movement type, matching anti-rotation, rotation, and side-bending patterns rather than copying an exact exercise.
- No cable: Replace the woodchopper with a band woodchopper or a standing band twist.
- Wrist or neck issues: Swap bicycle crunches for dead bugs or a forearm side plank.
- Harder challenge: Use an exercise ball variation to raise oblique and deep-core demand.
One useful swap is the abdominal rise on a ball. In one trial of 20 adults, external oblique, transverse abdominis, and erector spinae activity were significantly higher during the ball rise than a traditional crunch, with normalized activity ranging from about 10 to 62 percent[2].
Explore more exercise ball exercises or BOSU ball core exercises to add instability.
What Common Mistakes Should You Avoid?
The most common waistline mistakes are chasing endless crunches, rushing reps, and ignoring pain. Crunches mainly hit the front wall and do little for the side obliques that actually shape the waist.
- Skipping rotation and carries: Without anti-rotation and side-bending work, the obliques stay under-trained.
- Pulling the neck: Let the torso do the work and keep your hands light behind the head.
- Going too heavy too soon: Loaded twists with a rounded spine raise injury risk without adding definition.
Stop a set immediately if you feel sharp or pinching low-back pain, dizziness, or pain that radiates down a leg. A mild muscular burn is normal, but pain is a signal to rest and reassess. A complementary option is Pilates exercises for core strength, or build grip and control with ab roller exercises.
What Does a Weekly Waistline Plan Look Like?
A simple weekly plan rotates stability, rotation, and carry work across three short sessions so every waist pattern gets trained. Pair it with sensible nutrition, since fat loss is what makes the definition visible.
| Day | Focus | Sample Moves |
|---|---|---|
| Day 1 | Stability and anti-rotation | Side plank, Pallof press, dead bug |
| Day 2 | Rotation | Band woodchopper, Russian twist, bicycle crunch |
| Day 3 | Loaded carry and side bend | Suitcase carry, side plank reach-through, dead bug |
Leave at least one rest day between sessions and keep each workout to about 15 minutes. Consistency over weeks, not intensity in one session, builds the waistline you want.
FAQs About Exercises for the Waistline
Can exercises actually shrink my waistline?
Exercises strengthen and tighten the oblique and deep core muscles, which makes the waist look firmer and more defined. However, you cannot spot-reduce fat from one area, so the visible size of your waist depends mainly on overall body fat. Combine waist training with a calorie-controlled diet for the best results.
Will training my obliques make my waist look wider?
For most people, no. Building the obliques adds modest definition and the horizontal lines that create a V-taper, which usually makes the waist look tighter, not thicker. Only very heavy, high-volume loaded twisting over years could noticeably thicken the waist, which is rare for general trainees.
How often should I train my waistline?
Two to four short sessions per week is plenty for most people. The core recovers quickly, so you can train it on non-consecutive days alongside your regular workouts. Aim for two to three exercises per session, three sets each, and prioritize quality movement and control over high repetition counts.
What are the best exercises for a defined waist?
Anti-rotation and rotation moves work the obliques best, including side planks, cable or band woodchoppers, Pallof presses, suitcase carries, and weighted Russian twists. Pair these with bicycle crunches and dead bugs for the rectus abdominis and deep core. Rotate exercises every few weeks to keep progressing.
Are crunches enough to slim the waist?
Crunches mainly target the front abdominal wall and do little for the obliques that shape the waist. EMG research shows other moves activate the side and deep core muscles far more. Crunches can be part of a routine, but anti-rotation, lateral flexion, and rotation exercises matter more for waist definition.
Conclusion
A defined waistline is built by training the obliques and deep core with stability, rotation, and carry work, then revealing it with overall fat loss. No exercise spot-reduces fat, so pair smart training with sensible nutrition.
Start with bodyweight side planks and dead bugs, add rotation and loaded carries as your form holds, and train two to four short sessions each week. Stay consistent and progress gradually.
Disclaimer
This article is for general educational purposes only and is not medical advice. Consult a qualified healthcare or fitness professional before starting any new exercise program, especially if you have an injury or health condition.
References
1. Maeo S, Takahashi T, Takai Y, Kanehisa H. Trunk muscle activities during abdominal bracing: comparison among muscles and exercises. Journal of Sports Science & Medicine. 2013;12(3):467-474. https://pmc.ncbi.nlm.nih.gov/articles/PMC3772590/
2. Dolenec A, Svetina M, Strojnik V. Electromyographic Comparison of an Abdominal Rise on a Ball with a Traditional Crunch. Sensors (Basel). 2022;22(5). https://pmc.ncbi.nlm.nih.gov/articles/PMC8915105/
3. Nakai Y, Kawada M, Miyazaki T, Araki S, Takeshita Y, Kiyama R. A self-oblique exercise that activates the coordinated activity of abdominal and hip muscles-A pilot study. PLoS One. 2021;16(8):e0255035. https://pmc.ncbi.nlm.nih.gov/articles/PMC8360586/


