The smith machine seated overhead press is a real overhead press you can run alone, and this guide proves why the machine suits the lift. You will get the bench setup, grip, unracking, loading, and progression details below, plus how the seated angle differs from standing presses.
The setup uses an adjustable bench inside the rack with the backrest at 75 to 85 degrees, and every step is written for solo training with safety hooks. Form cues follow standard coaching practice, and every number in the article carries a source.
Quick Answer: Yes, the seated overhead press works on a Smith machine. The smith machine seated overhead press keeps the bar on a fixed vertical path, supports your spine with the bench backrest, and lets the safety hooks catch the bar at any point, so you can press heavy without a spotter.
Key Takeaways
- Machine Fit: The seated overhead press runs on a straight vertical bar path that matches the fixed guide rails, so the smith machine genuinely suits the lift.
- Backrest Angle: Setting the bench backrest at 75 to 85 degrees keeps the bar stacked over the shoulders while the pad supports the spine.
- Solo Safety: Safety hooks rack the bar at any height, so hard sets near failure are workable without a spotter.
- Seated vs Standing: Seated pressing removes leg drive and trunk stabilization demands, while standing presses build core coordination under load.
- Loading: Run sets of 6 to 12 reps and add weight only when every set reaches the top of the range with stable form.
Can You Do the Seated Overhead Press on a Smith Machine?
The seated overhead press works on a smith machine, and the fit is almost natural for the movement. The exercise runs on a straight vertical bar path that matches the fixed guide rails, the bench backrest replaces the trunk demand you would feel standing, and the hooks let you rack the bar at any point. That combination makes heavy solo pressing realistic without a spotter.
- Vertical Bar Path: The press travels straight up and down, and fixed rails hold the bar on exactly that line, so nothing drifts forward or backward.
- Spinal Support: The backrest holds your torso in place, which takes the balancing act out of the press and keeps the work on the deltoids.
- Built-in Bailout: Rotating the bar hooks the safety catches at any height, so a grind that fails ends in the rack instead of under the bar.
A 2018 electromyography study of 21 subjects found that anterior deltoid activity during the overhead press averaged 63.3 percent of maximal voluntary contraction with a more stable implement versus 57.9 percent with a less stable one[1]. Fixed rails and a supported torso remove the balance demand, which is exactly the direction that finding points.
The rails and hooks take the balance and the bailout risk out of the equation, so you can push the last reps close to failure alone. Machines in the RitFit Smith machine collection all share the rails and hooks this guide depends on.
"Few pieces of equipment in the home exercise industry are as comprehensive and versatile as this all-in-one gym system. The robust system provides a natural, centered bar path for compound lifts like squats, presses, and rows, and incorporates a dual cable crossover station with a full rack of precision-engineered attachments."Tom Eskey, CF-L1, CPT, Home Gym Equipment Reviewer at Garage Gym Revisited, in RitFit M1 Multi-Functional Smith Machine, Our Review
Seated vs Standing Smith Machine Press
The seated smith machine press and the standing version train the same joint action but split the work across the body differently. Seated pressing removes leg drive and trunk stabilization demands, so the deltoids carry more of the load and heavier weights move with less balance skill. Standing pressing recruits the core and teaches full body coordination under load.
| Factor | Seated Smith Machine Press | Standing Smith Machine Press |
|---|---|---|
| Leg drive | None, the legs stay out of the lift | Hips and legs contribute to the drive |
| Trunk demand | Backrest supports the spine | Core braces to hold the torso upright |
| Deltoid focus | Higher, less shared work | Shared with the trunk and full body |
| Loading | Heavier loads are realistic | Load is capped by bracing skill |
| Best use | Shoulder growth and heavy solo sets | Strength that transfers to standing performance |
Training analysis based on standard coaching practice, not a measured comparison.
Press variations genuinely change muscle stimulus, and an electromyographic comparison of four overhead press variations in 8 competitive bodybuilders found greater anterior deltoid excitation in the behind-neck barbell press than the machine shoulder press during the ascending phase, with an effect size of 1.42[2]. Treat the seated and standing smith machine presses as separate tools rather than duplicates.
Lifters who want the standing pattern can follow the standing Smith machine overhead press form guide or the standing Smith machine shoulder press walkthrough, both of which cover the setup this article skips.
Set Up the Bench and Bar Inside the Rack
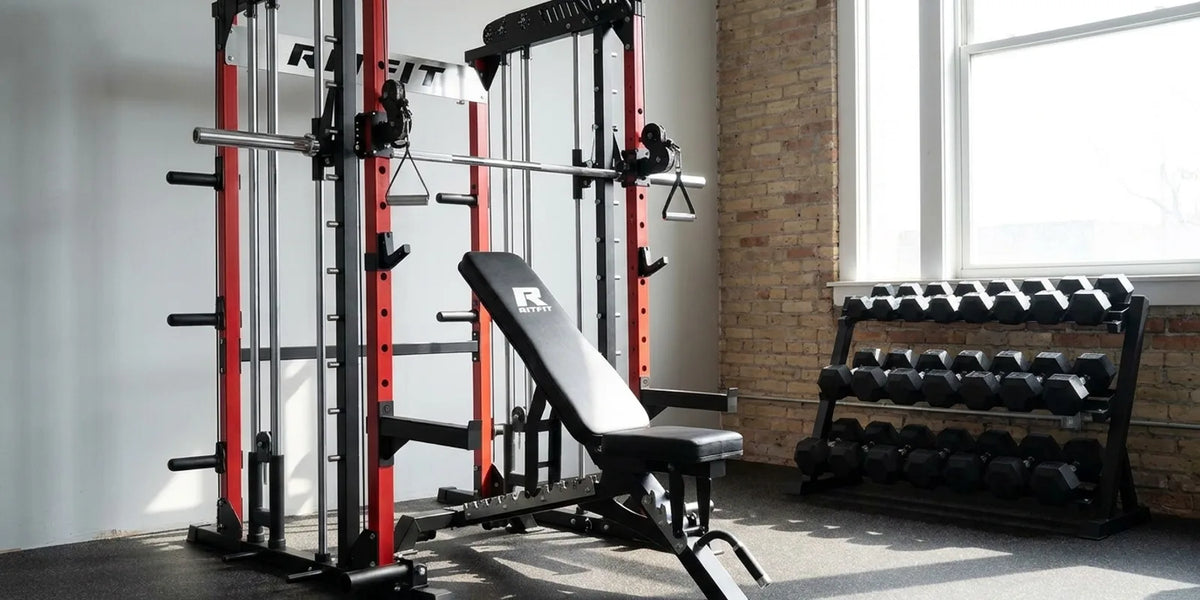
The bench sits fully inside the smith machine rack with the backrest at 75 to 85 degrees from the floor and the seat centered under the bar. This placement keeps the bar path vertical over the shoulders while the pad does the supporting. Small setup errors here change the exercise more than any cue during the set.
- Bench Position: Slide the bench between the uprights so the rails frame your shoulders, and center the pad on the bar path so the bar passes over the same line every rep.
- Bench Orientation: Face out from the rack with the backrest behind you, and park the bench on rubber gym mats or lock its wheels so nothing slides mid-set.
- Backrest Angle: Set the backrest at 75 to 85 degrees. Lower angles shift the work toward the chest and turn the press into an incline movement.
- Bar Height: Set the hooks so the unrack happens with nearly straight arms, and you should never press the bar out of a deep bend to start the set.
- Grip Width: Take a grip slightly wider than shoulder width so the forearms stay vertical under the bar at the bottom of each rep.
Before every set, pull the shoulder blades down and back against the pad and breathe into a braced midsection. That scapular position keeps the shoulder joint organized while the backrest handles the support.
Unrack, Press, and Rerack the Smith Machine Bar
The set starts with a straight-arm unrack, continues with controlled reps down to chin or upper chest height, and ends with a deliberate rerack into the hooks. Keep every rep on the same vertical line the rails provide. Speed comes later, after the path is automatic.
- Step 1, Unrack: Rotate the bar to clear the hooks and hold the load with straight arms. Settle the scapulae against the pad before the first rep begins.
- Step 2, Lower the Bar: Bring the bar down under control to chin or upper chest height with the elbows slightly in front of the bar.
- Step 3, Press: Drive the bar up until the elbows lock out over the shoulders, and exhale as the bar passes the sticking point.
- Step 4, Rerack: When the set finishes or the path bends, rotate the bar back into the hooks at the first sign of trouble instead of forcing another rep.
The hooks are the spotter, so use them early rather than late. A rep that slows unevenly or drifts off the rails is the signal to rack the bar and end the set.
Choose Weight, Reps, and Progression
A load you can press for 10 clean reps is the right starting point, and 3 to 4 sets of 6 to 12 reps form the working range. Add weight only when the top of that range arrives with stable form. The fixed rails reward consistency, so chase clean reps before chasing plates.
- Starting Weight: Pick a load you can press for 10 clean reps with about two reps left in reserve, and spend the first sessions grooving the bar path before adding plates.
- Working Sets and Reps: Run 3 to 4 sets of 6 to 12 reps for shoulder growth, and keep 1 to 2 reps in reserve on most sets.
- When to Add Weight: Add the smallest jump you own, often 2.5 to 5 pounds, once every working set reaches the top of the rep range with stable form.
- When to Hold or Drop: If reps slow unevenly or the bar drifts forward, repeat the load next session or reduce it slightly before pushing again.
Exercise scientists have tested seated overhead pressing at 6 kg and at 70 percent of one-repetition maximum in a study of 20 subjects, and found no significant muscle activity differences between the matched implements tested[3]. The usable loading range for this lift is wide, so light technique sets and heavy strength sets both belong in the plan.
Does the RitFit M2 Smith Machine Work for Seated Overhead Press?
The RitFit M2 Smith Machine handles the seated overhead press well because its rails guide the vertical press and its hooks give you a bailout at any height. The open frame accepts a standard adjustable bench inside the uprights, which is exactly what the seated setup needs. Solo garage gym lifters get a defined way out of every hard set.
- Bench Inside the Rack: The frame of the RitFit M2 Smith Machine takes the bench between its uprights, so the pad supports your spine while the rails hold the bar line and the deltoids do the pressing work.
- Hooks as Your Spotter: The rotating hooks rack the bar at any point in the set, which suits lifters training alone in a garage gym toward the end of a heavy shoulder day.
- Adjacent Options: The RitFit M1 Smith Machine covers the same seated press as the home gym all-rounder, and the RitFit M3 power rack with cable crossover and Smith machine adds a cable station beside the rails.
- Another Frame Format: The RitFit multifunctional Smith machine runs the same seated press in a different frame format for lifters building out a larger station.
"We love our 3d smith machine. It took me and my wife a few hours to put it together. Pretty straight forward. Great machine and products."
EVAN E. Verified Buyer, RitFit M2 Multi-Functional Modular Home Gym Smith Machine Tailored to All Fitness Levels
Work the Seated Smith Machine Press Into Your Upper Body Routine
Two pressing sessions per week fit most lifters, programmed on shoulder or upper body days with 48 to 72 hours between them. Treat the seated press as the main shoulder movement of the day and build the rest of the session around it. Recovery between sessions is what turns the loading plan into progress.
- Frequency: Press twice per week on nonconsecutive days, and keep pulling work like rows in the same sessions to balance the shoulder girdle.
- Session Order: Put the seated press first when shoulders are the priority, and follow it with lighter delt and triceps accessories once the heavy sets are done.
- Progression Across Weeks: Add reps toward the top of the 6 to 12 range first, then add load once the rep ceiling arrives consistently with clean form.
Common Mistakes in the Seated Smith Machine Press
Most seated smith machine press problems come from bench angle, grip width, or rep control, and each one has a simple fix. Setup errors change the exercise silently, so check them before loading the bar. Clean reps on the rails beat heavier sloppy ones every session.
- Bench Too Flat: Lowering the backrest toward 45 degrees turns the movement into an incline press and shifts work toward the chest, so keep the pad between 75 and 85 degrees.
- Grip Too Wide or Too Narrow: Wide grips shove the forearms off vertical and narrow grips crowd the shoulders, so aim for slightly wider than shoulder width.
- Pressing Behind the Neck: Bringing the bar behind the head changes the shoulder position and is not what this guide teaches, so keep the bar in front of the face and lower to chin or upper chest level.
- Grinding Shaky Reps: When the bar slows unevenly or the path bends, end the set and use the hooks instead of forcing one more rep.
Swap Movements When the Seated Press Bothers Your Shoulders
Lifters whose shoulders dislike the fixed bar path can swap to dumbbell pressing, a dedicated shoulder press machine, or a different smith machine pattern while the irritation settles. Swapping keeps the training week intact without grinding through a cranky joint. Return to the seated press when clean reps feel comfortable again.
- Dumbbell Shoulder Press: Dumbbells let each arm travel its own path, which helps lifters who feel locked into the fixed rails.
- Machine Shoulder Press: A dedicated machine like the RitFit Gorilla 2-in-1 chest and shoulder press machine keeps a fixed path with a seated pad and takes the bar out of your hands.
- Bradford Press: The Bradford press on a smith machine alternates the bar in front of and behind the head without locking out, so treat it as a delt variation rather than the same exercise as the seated press.
- Overhead Triceps Extension: The overhead triceps extension on a smith machine isolates the triceps as the elbows extend, so program it after the press as an accessory rather than a shoulder replacement.
Sharp pain, numbness, or a shoulder complaint that repeats across sessions is a stop signal rather than a push-through cue. Drop the overhead work and have a qualified clinician or coach look at the pattern before you reload it.
FAQs About Seated Smith Machine Press
Can you do the seated overhead press on a smith machine?
Yes. The smith machine seated overhead press works because the bar travels a fixed vertical path that suits a straight press, the bench backrest supports your spine, and the safety hooks let you rack the bar at any point. Set the backrest at 75 to 85 degrees and press inside the rack without a spotter.
What is the difference between the seated and standing smith machine press?
The seated version removes leg drive and trunk stabilization demands, so the deltoids do more of the work and you can load it heavily with less balance skill. The standing version recruits the core and trains full body coordination under load. Both build overhead strength, so rotate them instead of treating them as duplicates.
Is the smith machine seated overhead press safe without a spotter?
Yes, when you set the safety hooks correctly and keep the reps controlled. The fixed rails hold the bar on one path, and the hooks catch it whenever you rotate the bar back. Unrack with straight arms, press smoothly, and rack the bar before your grip or form breaks down.
How heavy should the smith machine seated overhead press be?
Start with a load you can press for 10 clean reps with two reps left in reserve, then run sets of 6 to 12. Add weight only when every set reaches the top of that range with stable form. Exercise scientists have tested seated pressing at 6 kg and at 70 percent of one-repetition maximum.
What angle should the bench be for the seated smith machine press?
Set the backrest at 75 to 85 degrees from the floor. That range keeps the bar path vertical over your shoulders while the pad supports the spine, so the press stays strict. Lower angles shift the work toward the chest and turn the movement into a different exercise.
How is the seated smith machine press different from a Bradford press?
The seated press finishes every rep with the arms locked out overhead and the bar stacked over the shoulders. A Bradford press alternates in front of and behind the head without locking out, which keeps tension on the delts but limits the load you can hold.
Does the overhead triceps extension on a smith machine replace the seated press?
No. The overhead triceps extension trains the triceps in isolation as the elbows extend under a fixed bar, but it barely loads the deltoids. Treat it as an accessory that follows the seated press rather than a replacement for shoulder pressing work.
Conclusion
The smith machine seated overhead press earns its place in a home gym because the fixed path, the bench backrest, and the safety hooks make heavy solo pressing workable. Set the bench at 75 to 85 degrees, press inside the rack, and progress load only when every rep stays clean.
Start with the setup above in your next shoulder session, and compare the standing version when you want the core demand back. Check the RitFit discount guide before you add a bench or a rack to the setup.
Disclaimer
This article provides general training information and not medical advice, and it does not replace evaluation by a qualified professional. Stop any exercise that causes sharp or persistent pain, and consult a clinician or certified coach before training around an existing shoulder injury.
References
1. Dicus JR, Holmstrup ME, Shuler KT, Rice TT, Raybuck SD, Siddons CA. Stability of Resistance Training Implement alters EMG Activity during the Overhead Press. Int J Exerc Sci. 2018;11(1):708-716. doi:10.70252/CUDK5288. PMCID: PMC6033506
2. Coratella G, Tornatore G, Longo S, Esposito F, Cè E. Front vs Back and Barbell vs Machine Overhead Press: An Electromyographic Analysis and Implications For Resistance Training. Front Physiol. 2022;13:825880. doi:10.3389/fphys.2022.825880. PMCID: PMC9354811
3. Błażkiewicz M, Hadamus A. The Effect of the Weight and Type of Equipment on Shoulder and Back Muscle Activity in Surface Electromyography during the Overhead Press-Preliminary Report. Sensors (Basel). 2022;22(24). doi:10.3390/s22249762. PMCID: PMC9781216